-
Functions
-
-

Data Recovery on Windows
 Recover Deleted Files from Win/Hard Drive
-

Data Recovery on Mac Recover Deleted Files from MacOS Devices
-

Data Recovery on iPhone Recover Photos/Messages on iPhone
-

Data Recovery on Android Recover Text Messages/Pics on Android

-

Ai-based File/Photo/Video Restoration Repair Corrupted Files/Photos/Videos with AI
-
-
-

SD Card Recovery
Recover Deleted Files From Sd Card
-

Hard Drive Data Recovery
Recover Deleted Files from Win/Hard Drive
-

LINE Chat History Data Recovery Recover Lost LINE Data Easily
-

WhatsApp Data Recovery Recover pics, videos, messages from WA
-

iOS Issue Repair Fix iPhone/iPad Issues Without Data Loss
-
-
-
Tips
-
 Hard Drive Recovery
-
Photo/Video Restoration
-
 Deleted Files Recovery
- Guide
- Support
- Pricing
-
Search
- Store
[Ultimate] How to Solve Outlook Not Receiving Email Issue

Microsoft Outlook is a groundbreaking email service and management application which made emailing convenient and professional. With Outlook, storing and sharing vital information via email has become popular because it offers maximum security and different layers of protection. However, no matter how efficient or seamless it runs, Outlook may experience some issues at some point in time. One of these problems include "Outlook not receiving email" problem. This article takes a detailed look on how to fix this problem. Read on.
Part 1. Reasons Why Outlook Not Receiving Email
Some of the primary causes of "Outlook not receiving email" problems include:
-
Your system's network connection could have an issue.
-
A security component such as firewall protection could be blocking the incoming email.
-
The mail could have gone to the Junk or Spam folder rather than the primary inbox.
-
Maybe your email account is not properly synced with Outlook.
-
The email, password, username, or configuration details you entered might have been wrong.
-
The outlook server could have been down, or the email client is unavailable.
-
An Outlook plugin could have caused the issue.
-
The Outlook data could have been corrupted by malware, and this prevented you from getting email.
-
The email file could be corrupted.
-
Outlook might have been set to work offline.
-
Email rules that are poor or inefficient.
Part 2. What to Do if Outlook Not Recieving Email
As already seen above, several reasons could lead to the issue of Outlook not receiving email. As well, there are different methods to fix this problem. Some of them will be discussed below.
1. Check the Firewall and Antivirus Software
Problems with receiving or sending email could result from antivirus, Windows Firewall, or other security program interrupting the use of Outlook. To check if this would fix the problem, you should disable the firewall settings on your system or uninstall any suspicious apps. In addition, if you recently added any plugin to Outlook, you can get rid of it and check if you can now receive any new emails on Outlook.

2. Check the Network and Outlook Service
You may not receive Outlook emails if your internet connection is unstable, poor, or broken. For example, if your Outlook's status is showing "Disconnected", "Working Offline", or "Trying to Connect", it indicates that your internet connection has a problem. You can switch to a better connection or restart your system and make sure that the internet connection you are connected to is a stable one.

Another cause could also be that Outlook's service might be currently down as well. To check the status of Outlook's service, go to their Service Status page and check for it. If it is marked red, it then means that Outlook is not available currently.
3. Check the Email Forwarding
If you have email forwarding enabled in your Outlook, the incoming messages will be forwarded to the selected email account. If you are not receiving emails, you can either check the email address chosen for forwarding, or disable the email forwarding on your Outlook account to receive the emails directly to your account. To disable the email forwarding:
Step 1. Open the email forwarding settings.
Step 2. Then scroll to the "Enable Forwarding" option and uncheck the box to disable it.
Step 3. If you want the forwarded messages to be stored in your Outlook account also, choose "Keep a copy of forwarded messages".

4. Check the Blocked Senders and Domain
Outlook allows you to keep a list of blocked people containing all the addresses you do not want to get emails from. If the sender you are supposed to get an email from was added to this list intentionally or accidentally, their emails would be rejected. In a situation like this, if you remove the sender's address from the list of blocked people, then this should fix the issue, and you should be able to receive emails from them. To check and probably remove an address from the block list:
Step 1. At the top left of Outlook, there is a tab, "Home". Click on it and then choose "Junk".
Step 2. From the newly opened menu, click "Junk Email Options".
Step 3. To view the addresses of people in your blocked list, choose the labeled "Blocked Senders".

Step 4. If you find the name of the person you are looking to get an email from in that list, then just click on their name and select "Remove" This will ensure that they are removed from the blocked list, and then you can now receive emails from them.
5. Check the Sort Settings
Outlook lets your sort your emails with different filters. You can organize your emails based on categories like To me, Unread, Subject, Date, From, To, etc. If you set a wrong sorting option or forgot to delete a sorting option that you needed temporarily, you may be unable to receive Outlook emails. So if you have your sorting option set to not show the most recent emails at the top, then the emails you newly received might not appear at the top. To fix this issue, you can change the sorting settings in Outlook. To do this:
Step 1. Launch Outlook and on the left-side pane, click on "Inbox".
Step 2. Choose the "Date" option by clicking on the "Sort by" text.

Step 3. Select "Newest on Top" at the bottom of the menu.
After doing this, your most recent emails will appear on top, and you would be able to see your most recent emails that were blocked by the filter.
6. Create a New Outlook Profile
One reason you would not be getting emails on Outlook could be that there is a problem with your Outlook profile. The Outlook profiles could get corrupted sometimes, or another setting could change the way they work. Creating a new profile is one way to get around this issue. This is an easy process, and it requires you to just reconfigure your email. Your email account settings should be kept handy because you will need them during the process. The steps involved are:
Step 1. Open Outlook and click on the File > Account Settings > Manage Profiles > Show Profiles.
Step 2. To add a new profile, click on "Add" on the profiles screen.

Step 3. Enter the name you want for the new profile and then click "Ok".
Step 4. Add your email account to the new profile you created by following the instructions on the screen.
Step 5. Click on the dropdown menu "Always use this profile" and then click on "Apply" and then "Ok" to select the profile you newly created.
Step 6. Then launch Outlook again to begin using the new profile.
7. Turn Off and On Automatic Refresh Option
Outlook automatically refreshes the folder on its own in the background. If you are not getting new emails, there is a probability that Outlook no longer refreshes or the auto-refresh feature has been disabled. And if you are sure that you've turn on this option, you can turn off and turn on it again to see whether you can receive the emails now. To check if the setting is enabled or not:
Step 1. Navigate to the "Send/Receive" tab and then open the "Send/Receive Groups" menu.
Step 2. Then choose "Define Send/Receive Groups".
Step 3. When the new window pops up, confirm that the option "Perform an automatic send/receive every XX minutes" is selected. You should set the interval to whatever time is convenient for you.

Step 4. Then click on "Close" to save the settings.
8. Turn on the SMTP Authentication
While setting up your account, there are possibilities that the details you entered were incorrect. These incorrect email server settings can result in problems when trying to send and receive emails on Outlook. If you are facing this type of issue, you should check the settings. To resolve the issue, you can attempt to reconfigure the SMTP and the IMAP/POP server settings on Outlook. To Turn it on:
Step 1.Open Outlook and click "File" tab. Then choose "Account Settings". This opens the "Account Settings" box. Verify that the email tab is selected and click on the account to highlight it.
Step 2. Click the change icon above and ensure that the Outgoing mail server (SMTP) is set to "smtp.gn.apc.org.".
Step 3. Click on More Settings and then click on the "Outgoing Server" tab.
Step 4. Add your email account to the new profile you created by following the instructions on the screen.
Step 5. Tick the box saying "My outgoing server (SMTP) requires authentication" and make sure that the circle-box "Use same settings as my incoming mail server" is chosen.

Step 6. Click on the Advanced tab and then change the SMTP port number to 587 from 25 and then choose TLS in the "Use the following type of encrypted connection" box.
Step 7. Then click on "Ok". Next, click on "Finish and close the email settings".
9. Remove Unnecessary Email Rules
Outlook rules are made or set to automate a lot of email-related tasks. If there is a rule linked to your received emails, it might deliver your emails to a different folder or even make them disappear from your inbox. You should check which rules you have active on Outlook and make sure that no rule is resulting in you not receiving your emails, and if you find any rule like that, you should disable it to resolve the issue. To check the rules section in Outlook:
Step 1. At the top of the Outlook window, you'll find a "File" tab. Click on it.
Step 2. Then click on the tab labeled "Info" and select "Manage Rules & Alerts".
Step 3. All the rules that you had created for your emails will show under "Email Rules". Then locate the rule that affects your incoming email and uncheck the box next to it. This should disable the rule, and then you should begin receiving emails in your inbox.

10. Remove Connected Accounts
On Outlook, you are allowed to connect with 20 email accounts at a time. However, linking multiple accounts can block some emails from entering your inbox resulting in Outlook not receiving emails. Therefore, it is recommended that you remove some of the accounts or all of them, leaving only the one that you currently make use of.
To do this, go to "Accounts > Connected Accounts > Remove Accounts" that are no longer in use.

11. Remove Outlook Plug-ins
Many third-party plugins normally help to improve the functionality of Outlook. However, some of the plugins can interfere with the operation of Outlook and result in an issue like Outlook not receiving emails. To disable these plugins, you can run Outlook in safe mode.
To run Outlook in a safe mood, open the Run utility by pressing "Windows + R" and then type "Outlook.exe /safe", then press "Enter".
If, when in a safe mode, you can receive emails, then it proves that a plugin caused the problem. You can then locate the faulty plugin by enabling then all one after the other, and when you have found it, you can either disable or remove it from Outlook.

12. Remove Outlook Cache
Cache files are saved on your computer by Outlook to help improve performance. These cache files can sometimes interfere with the normal operations of Outlook and prevent it from receiving new emails. You can manually remove these cache files in an attempt to fix this issue. Don't worry. None of your Outlook emails or attachments will be deleted. To remove these cache files:
Step 1. Open the Run utility by pressing "Windows + R", then type in "%localappdata%\Microsoft\Outlook" and press "Enter".
Step 2. You will see a folder named RaomCache. Inside this folder, you will find the cache files.
Step 3. Highlight all the files in the folder, right-click on any one of them, then click on "Delete" and restart Outlook.

13. Disable Focused Inbox
Outlook's latest version comes with two default folders, namely "Focused" and "Others." Your emails are automatically sorted by Outlook according to your priorities, and the more prioritized emails are saved in the "Focused" folder while the less prioritized are save in "Others."
If your Outlook is not getting new emails, be sure to check in the "Others" folder as Outlook sometimes save important emails there. If there are important emails, click on them and select the "Move" feature to move them to the "Focused" folder. You can move the emails from a particular address in the "Others" folder to the "Focused" folder. You may also find your emails by disabling the Focused Inbox. To do it:
Step 1. Choose "Show focused inbox" from the View tab.

Step 2.The Focused and Other tabs will then disappear from the top of the mailbox.
Step 3.Or you can go to Settings > Display Settings > Focused inbox.
Step 4.Then select "Don't sort messages" or toggle the option to off.
14. Disable Offline Mode
The Work Offline option on Outlook allows you to disconnect from the server if you do not want to receive new emails. If, for some reason, this option is turned on, then it is why you are not receiving new emails. You can fix this issue by disabling the offline mode in Outlook, and the steps involved include:
Step 1. Launch Outlook, and then click on the tab at the top named "Send/Receive".
Step 2. In the Preferences section, there is an option called "Work Offline", click on it.

This should bring Outlook back online, and you might have to wait for a few minutes to get your new emails.
15. Clean Your Outlook Inbox
The inbox of the Outlook mail has a specific storage limit for email, and when the limit has been exceeded, no additional mail can be stored. So ensure to clean the Outlook mail inbox regularly so that there can always be space. You can delete email that no longer required, or you can create a backup of your important emails on an external hard drive and then delete them from your Outlook inbox. The "Sweep" feature will help you to delete emails from a particular address, or only delete emails above ten days old, or it will keep only the latest emails from the sender.

16. Contact the Sender
If you have attempted these methods and still can't receive emails, you could reach out to the sender from whom you are expecting the mail to let them know that you have not received the email. It may be that it was not delivered from their end to check and resend it if that is the case.

17. Contact ISP or Email Administrator
This should be the last resort if all other methods have failed to yield a result. You should contact your Internet Service Provider (ISP) or your email administrator, informing them of your current dilemma if the problem persists.

Part 3. How to Recover Lost/Deleted Emails from Outlook
In case you want to recover deleted or lost Outlook emails, professional data recovery software is your preferred choice.
Recover your Outlook Emails Easily
AnyRecover is one of the best data recovery applications out there. It has a simple design and features, making it easy to access and use. Further, AnyRecover works on various operating systems including macOS, Windows 11, 10, 8, 7, and more.
Main features of AnyRecover Data Recovery:
![]()
2,061,704 Downloads
-
Files recovery is available under different circumstances like mistaken deletion, system crashes, and malware.
-
Additionally, AnyRecover supports more than 1000+ file types, including documents, photos, videos, emails, and audio.
-
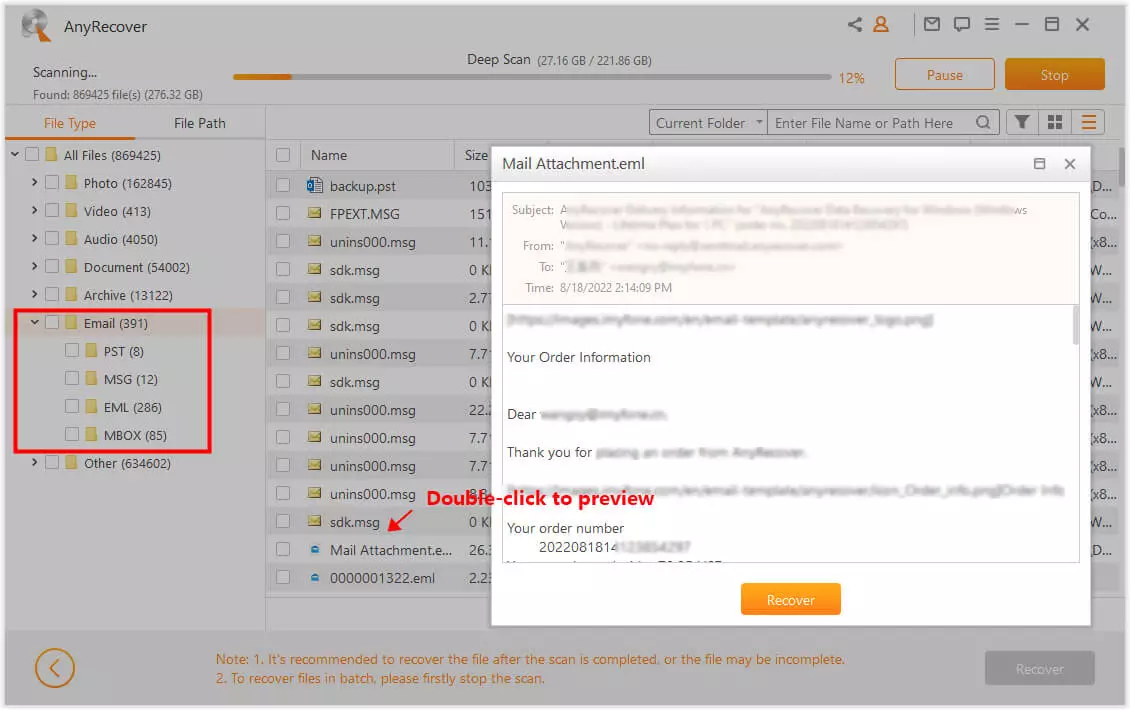
It can recover deleted emails from Outlook, Gmail, AOL Mail, and etc.
-
With a deep scan as well as an all-around scan, it ensures that a high recovery rate can be reached.
-
It's totally free to scan and preview files. And you can download it and give it a try.
Once a file is deleted, storage space will be marked as free and the original data will be overwritten. The longer you wait, the lower the chance of recovery. Since AnyRecover offers free scans and previews, you can download the program to check whether it works or not.
Step 1 Start the AnyRecover application, choose your preferred files location path. After selecting the location, hit "Start" button to start scanning.

Step 2 Then the program will start to scan all files on the selected disk. It may require some time based on the size and quantity of files. And you can pause or stop the process once you have found the files you want.
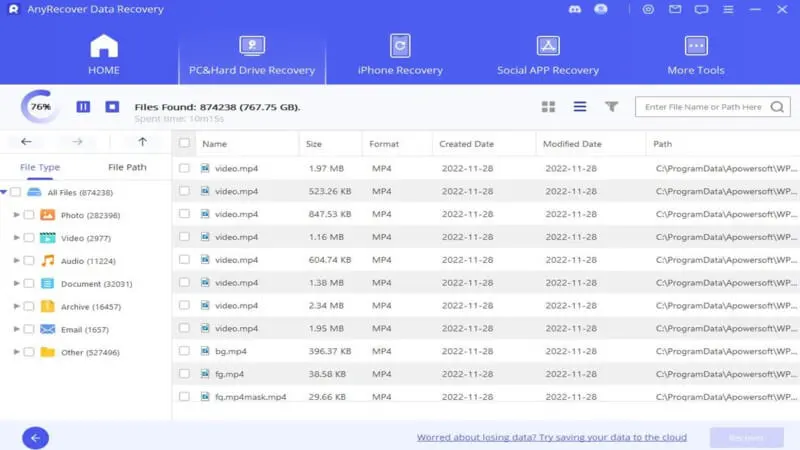
Step 3 You can preview the preferred files before recovering them. Select the main or important files that you need and click the "Recover" button.
Conclusion
If Outlook is not receiving email, you can apply any one of the above methods to ensure that the problem is fixed. As noted, this issue can be caused by different problems, but the good news remain that there is a solution for every Outlook not receiving email problem.
However, if you are facing the issue that you cannot find your emails or permanently deleted them by mistake, don't forget to downlod AnyRecover and let the professional data recovery tool bring them back with ease.
Rated successfully!
You have already rated this article, please do not repeat scoring!
![]()
![]()
![]()
![]()
![]()
![]()
![]()
![]()
![]()
![]()
![]()
![]()
Copyright © 2024 AnyRecover. All rights reserved.
Time Limited Offer
for All Products
Not valid with other discount *