


Are you wondering how to make a looping GIF from video files? For that matter, why convert video to looping GIF when video is a better format for most social platforms? The biggest reason is that a looping GIF is eye-catching and more entertaining. Also, the looping effect makes it much funnier than a simple video playing just once.
Whatever your reason, there are several great options to make a looping GIF from a video file in 2021. Here are the 6 best ways to make looping GIFs from videos using some powerful and versatile tools. And we highly recommend Filme which can create GIF fast and easily.

Part 1. Use a Desktop Video Editor like iMyFone Filme
If you want the best way for how to make a looping GIF from a video, then iMyFone Filme what you need. Filme is a premium video editor that anybody can use because it's so intuitive. You don't have to be a professional, but it also comes with pro-level tools like timeline editing, filters, transitions, animation, text captions, and other effects.
-
Import and Export media directly from your mobile device, which sets it apart from the rest of the crowd of video editors
-
Record your screen and audio (screencast with audio) right from your device and turn it into a GIF
-
Use Fast Video Mode to create eye-catching video slideshows in just a few seconds
-
Apply a range of effects and filters to make your videos pop before converting them to GIF
-
Easy-to-use tools like crop, trim, split, change speed, alter brightness/contrast/white balance, rotate, reverse, etc. to make your GIFs look more professional
Filme is flexible enough to allow you to choose your video source, which gives you even more freedom to express yourself via hilarious or heart-warming GIFs. Here are three methods outlined below. You can try them out once you install iMyFone Filme on your PC:
Method 1: Create a Looping GIF from Videos Imported from Your Phone
Filme is flexible enough to allow you to choose your video source, which gives you even more freedom to express yourself via hilarious or heart-warming GIFs. Here are three methods outlined below. You can try them out once you install iMyFone Filme on your PC:
Step 1: Import the media using the corresponding option

Step 2: Drag it from the media library to the timeline editor or right-click the thumbnail for Add options
Step 3: Trim the video to a shorter size using the handlebars on either side of the clip

Step 4: Use the crop tool to cut out extra parts of the video scene

Step 5: To choose a section of the video clip, put the playhead at the beginning of the section and click on the scissors icon - same thing for the end of the section

Step 6: For further editing, click the Edit icon or right-click the clip and choose Edit - make changes like rotate, offset, aspect ratio, color balance, contrast, etc.

Finally, hit Export and choose GIF as the output
Method 2: Record your Screen and Make a Funny, Eye-catching Looping GIF
Another way to make a looping GIF in iMyFone Filme is to record your screen (and audio, if you want to) using the newly-available screencast function. Once you record the video and save it, the file will be available in your media directory on the top left panel.
As before, you can drag it to the timeline and edit it to match what you had in mind. If you need to add effects, filters, or transitions, you can use the tabbed menu on the top left, where you'll see an Effects tab, a Transition tab, a Text tab, and an Audio tab. They contain tons of free templates, effects, text animations, and free audio tracks that you can add to your video.
After you're done editing and are happy with the results, you can use the Export icon to get your looping GIF output file.

Part 2. Use a Photo Editor like Adobe Photoshop
Photoshop is an awesome utility to handle imagery, but did you know you can also use it to create amazing looping GIFs from video files? The process is a little different because it only supports image formats, which means your video won't be imported as a video but as individual frames or image layers. Nevertheless, no article on GIF images is complete without mentioning the most popular image editor in the world.
The Process
Step 1:?Launch the version of Adobe Photoshop you're using and use the File menu to select the Import → Video Frames to Layers… option.

Step 2: Choose the video to be imported and hit OK to open a dialog box. Here, you can do various actions:
- Choose the entire video by leaving the default selection as it is - From Beginning to End
- Click the radio button for Selected Range Only and then use the trim handles to select the portion of the video that you want to import as images.
- You can also skip frames by choosing to import only every alternate or every third frame. Remember, the higher this number, the jerkier and less smooth your GIF will be.
- Finally, check the box for Make Frame Animation, which is Adobe's term for converting a video to GIF.
Step 3: When you hit OK in the above pop-up, the video frames will be imported as image layers. That's why it's important to know that when editing them, make sure all the layers are selected for each edit that you do.
Step 4: For the editing part, you can use various tools like the crop tool, color adjustments, backgrounds, filter effects, and anything else that Photoshop offers. Remember, you're just bulk-editing a bunch of images, not a video. However, also keep in mind that any effects you add will add to the file size when you take the GIF output.
Step 5: Finally, you can set the loop count by opening the timeline editor (Window → Timeline) and choosing Forever or using a different count. Hit the Play icon to see a preview of your GIF. If you need to insert a delay period between frames, use the Select All Frames option in the timeline and then choose No Delay. Anything over that will give the GIF a slow-motion effect, in case that's what you're looking for.
Step 6: When you're done with all edits, use the Export option from the File menu and click on Save for Web (Legacy). This will show you the GIF export option. Click that to export the file as a GIF.
Limitations
Whether you're a Photoshop pro or a newbie to the game, there are some limitations even when using this versatile tool:
![]()
![]()
![]()
![]()
Of course, Photoshop is a great tool for animated GIFs from videos, but with so many limitations, it's much better to use a video editor like Filme because you have more options and the process itself is much faster.
Part 3. Make a Looping GIF from Video with Online Tools
There are actually tons of GIF creator tools available online where you can even insert a YouTube URL and directly convert it to GIF. We've showcased three different tools you can use for this purpose.
MakeaGIF
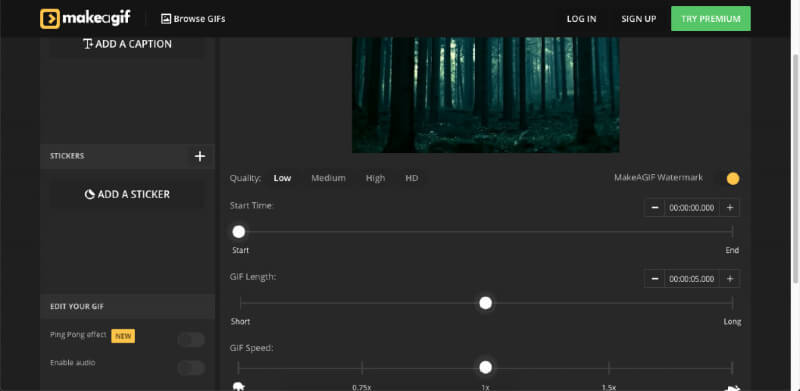
MakeaGIF Premium is one of the best online video to looping GIF converter platforms available in 2021. As mentioned above, all you need is a URL from YouTube and you're good to go. You can also use other video URLs, webcam footage, and even image sequences like Live Photos or Burst Photos as your source files to convert video to looping GIF. Inside, you'll see a range of settings for conversion, as outlined in the process below:
Step 1: Go to the MakeaGIF video to looping GIF converter webpage.
Step 2: Choose the right option based on your source video.
Step 3: On the next page, drag and drop your file or paste the video URL. You will be taken to the next page without any further action. If that doesn't work, click Continue to Editing.
Step 4: On the editor page, you can insert a caption, choose an alternate playing speed, choose filter presets, specify a duration or trim the video, and even add stickers. There's also a ping-pong effect that you can apply so your GIF plays back and forth in an endless loop.
Step 5: Click the Continue to Publishing button again and assign a category to your GIF. You can also add tags so people can find it easily, or you can set it to Private.
Step 6: Finally, hit the Create your GIF button to see the preview and download the GIF file. You can also directly share it to several social media sites.
Pro:

Limitations
![]()
![]()
Paid Version: Premium version at $11.95 per month
GIPHY
GIPHY has one of the largest collections of user-generated GIFs in the public domain. It also offers robust tools for video to looping GIF conversion. It's free to use the service but you will need to create a login for yourself. Once you do that, proceed as shown below:
Step 1: Click the GIF button to upload a MOV or MP4 video. If you have the URL, paste it in the section below that. The video will automatically be uploaded to the site.

Step 2: On the first page, select the duration of the GIF and the start time, then click Continue to Decorate.

Step 3: On the next page, you can add a caption, with effects and animation settings right below that.
Step 4: There are also tabs to add stickers, filters and even draw over the video.
Step 5: When you're done editing, hit Continue to Upload. On the penultimate page, you can enter a source URL if you have one, and also add tags. Set the Public toggle button to Off if you don't want others to access the GIF. Click Upload to GIPHY and wait for the file to be made available.
Step 6: Finally, click Media, and then click Download against the second option - that's the GIF output file.
Pros
Limitations
![]()
![]()
![]()
Paid Version Details: GIPHY is a free GIF repository so there's no paid version. Registering an account allows you to save your creations on the cloud.
Zamzar
Another completely free tool is Zamzar, a popular file conversion platform. It accepts both URLs and uploads and is an efficient tool even when using the free version. The premium plans give you a higher upload size limit and unlimited conversions, but the free version is a very simple conversion tool with no editing options.
Step 1: Go to the Zamzar video to looping GIF converter URL and click Add Files to upload the video or click the 'select link' option to paste a URL.

Step 2: Choose the output format as 'gif' and hit Convert Now.
Step 3: Once the conversion is completed, the file will be available to download. You can also opt to get an email alert when the conversion is done.
Pros
Limitations
![]()
![]()
![]()
Paid Version: Starts at $9 a month for Basic, up to $30 a month for Business.
Part 4. How to Make a Looping GIF of a Video on Mobile Devices
If you have an iOS or Android phone or tablet, there are several options for you to choose from. Here, we list two iOS apps and two Android apps for you to try out.
Video to GIF (iOS)
Video to GIF is a lightweight app for iOS devices that can flexibly convert local and iCloud videos to GIF in a matter of seconds. You can also shoot a video and directly convert it into a looping GIF, or even paste a YouTube URL to convert the video to a looping GIF. Here's how to use it:
Step 1: Choose an upload option on the homepage of the app.
Step 2: Upload your video to see the first editing page, where you can set the duration and start/end times for the video.

Step 3: From here, you can edit the GIF by adding stickers, changing the playback speed, rotating or reversing it, and even changing the quality of the output.
Step 4: Apart from the download option, it also generates a GIF link that you can use anywhere. In addition, it's easy to share directly to social media using the Share option at the end of the process.
Pros
Limitations
![]()
![]()
GIF Toaster (iOS)
GIF Toaster is another useful iOS video to looping GIF converter app that's easy to use. However, you'll need to download the video to your Camera Roll before converting it. Nevertheless, it allows various other upload options apart from video files.

Step 1: Choose the source as Video to GIF and import your video from the Camera Roll

Step 2: Using the editing tool, you can flip the video, rotate it, add filters, change the speed, etc.
Step 3: Finally, choose the encoding options and aspect ratio and download your GIF. There's also a GIF viewer integrated into the app so you can preview your GIF after it's created.


