Converting a video to gif is a work of art for sure, but you don’t have to spend hundreds of hours to achieve a masterpiece. Art and creativity come from within, but it gets even better when you put some smart work into it instead of hard work. Why edit, cut and crop your videos and put an intense amount of work into converting your video into a GIF when you can do it all with software like photoshop, etc.
These days, every software comes forward with new and exciting features- and using them can help you save a lot of time yet create something thrilling. You don’t necessarily have to have a photoshoot for all your conversion purposes because there are numerous alternatives available. We are here to help you learn how to convert videos to gif with or without photoshop. Buckle up and let the learning journey start!
Part 1. Convert a video to GIF with Photoshop
Photoshop is one of the most favorite editing apps available today- even experts love to use it because of the exciting features and easy navigation it offers. Also, there is no added cost for using it and learning it is engaging and straightforward. Another great thing about photoshop is that it offers various versions so different people can use one according to their preference. You can follow the following steps on Ps cc to convert a video to a gif whether you are a mac or Windows user.
Step 1: Download the Photoshop Ps cc version on your device.
Step 2: Install your app correctly and click on the “run” feature.
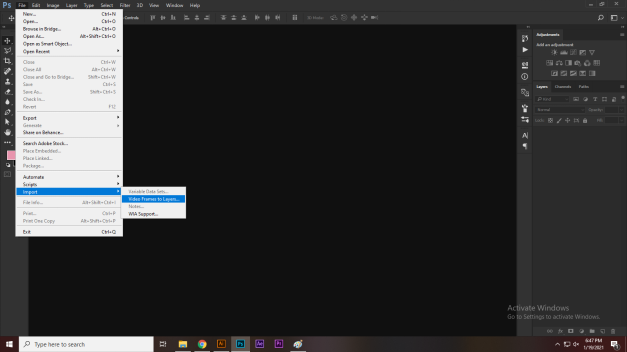
Step 3: Click on the “file” option on the upper left side. Click on the “import” option and then on “video frames to layers.” Processing further, select the desired video file and open it.
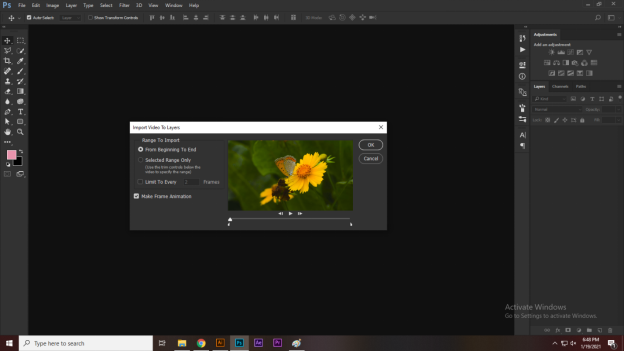
Step 4: You will see a dialog box appear on your screen, asking about the portion of the video you want to convert to a GIF. Click on “from beginning to end” if you’re going to convert the entire video or “selected portion only” otherwise.Also, make sure to tick the “make frame animation” at the end of the dialog box.
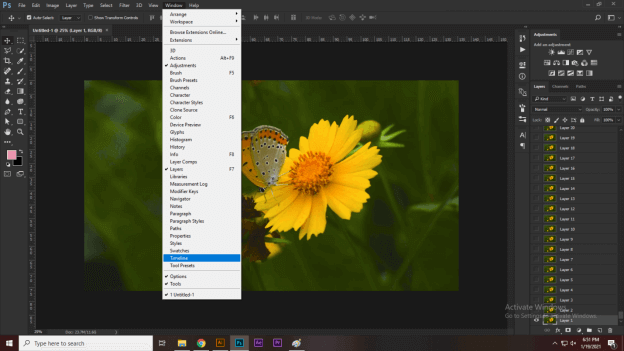
Step 5: After making the layers, click on the “windows” option from the bar at the top, and choose “timeline” from the dropdown menu.
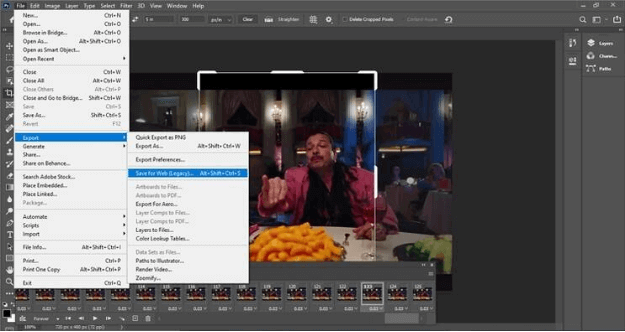
Step 6: Now, click on the “file” followed by “export” and “save for web” to save your GIF frame.
Step 7: A dialogue box will appear on your screen featuring a preview window for your GIF- from here; you can set the quality, etc., of your it. Click on the “preset drop-down menu,” choose your GIF, and do the editing.
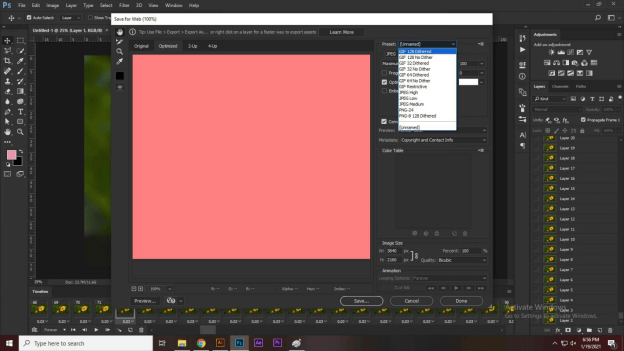
Step 8: Click on “done,” “play icon” to preview and “save.” You are done!
Part 2. Make a Gif from a Video Without Photoshop
You no longer have to stick to the standard version and follow the pattern or method other people use to convert their videos to GIFs. If you are looking for a smarter, cheaper, and more comfortable way, Filme should be your option. It enables editing and conversions on Mac, Windows and enables mobile mode as well. This software comes with no technical complexities; hence, it is easiest to install and use it.
iMyFone Filme favors us by providing the most straightforward and non-technical video editing that is just one click far. iMyFone Filme comes with plenty of built-in background music options, effects, template, and other basic features that all collaborate to develop a stunning and watch-worthy fast speed video.
Let’s go through the steps of making GIF with Filme
Steps to use Filme
Step 1: Download the “Filme” on your device.
Step 2: Click on “import video” to open the desired video in Filme.
Step 3: Select the video and wait for it to appear on your timeline.
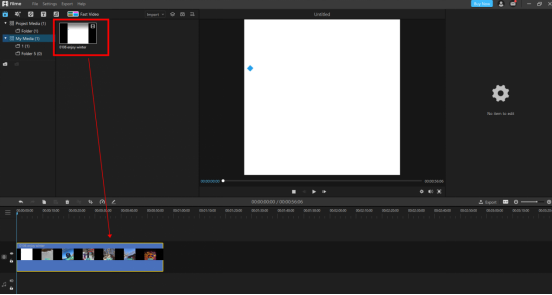
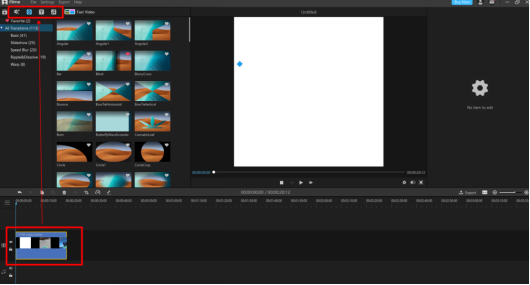
Step 4: Click on the “all transition” option on the left of your screen to add text, audio, and other exciting effects to your gif.
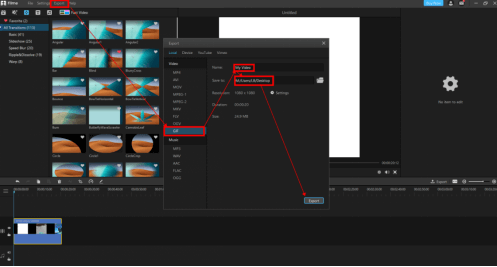
Step 5: Choose the option “export video” appearing on the top of your screen, followed by “input name video,” and save it to your device. Besides, you can also use Filme to create loop GIFs and share those funny GIFs with your friends.
Part 3. Other 3 ways to make GIF without Photoshop
There are various other online tools, apps, and software available that can help you convert your videos to GIF easily and quickly. But don’t worry, you don’t have to find them as we have already shortlisted these for you.
1 UniConverter
UniConverter is a top-notch converter that can help you convert your videos to GIFs while allowing you to use attractive editing tools and modes.
Steps to convert video to GIF using Uniconverter
Step 1: Download UniConvertor on your device.
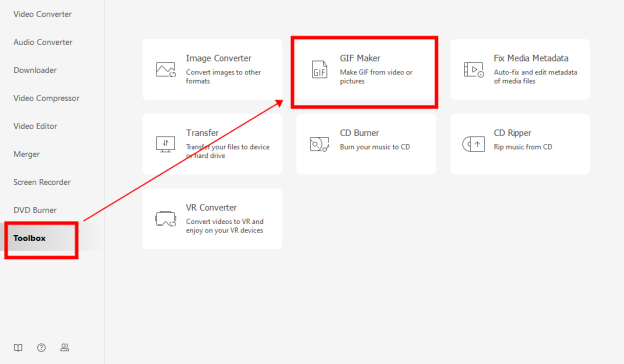
Step 2: Click on “toolbox” from the primary interface on the left side. Choose the “GIF Maker” from the options on your main screen.
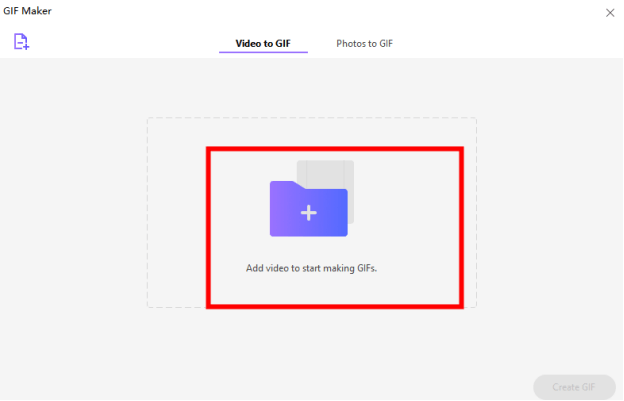
Step 3: Upload the video you want to convert by clicking on the “+/Add files” option.
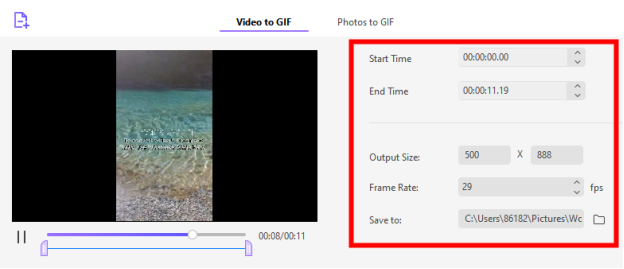
Step 4: Then choose your output settings, frame rate, and start/end time of your video you want to convert to GIF.
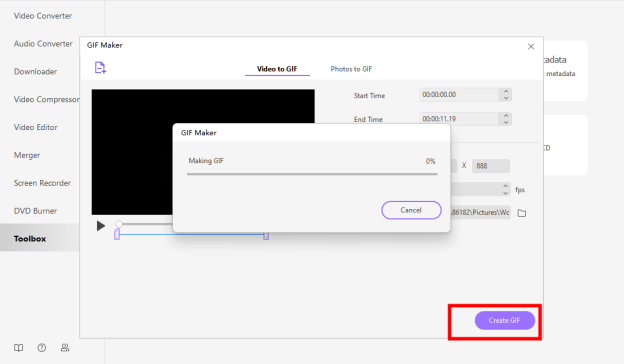
Step 5: Choose the option “Create GIF” appearing right below the editing options and then choose to confirm to start converting.
2 GIFMaker
GIFMaker is a free online tool that enables you to create high-quality GIFs from the ease of your home. You can choose various settings as per your preference and download your content without any watermarks etc. You can also share your Gifs directly to your social media.
Steps to convert video to gif using GIFMaker
Step 1: Go to the “GIFMaker” website.
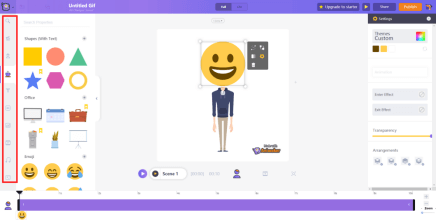
Step 2: Start with a blank canvas.

Step 3: Adjust the colors, fonts, music, and more to perfectly fit your brand. Add text animation effects, transition effects, and more.
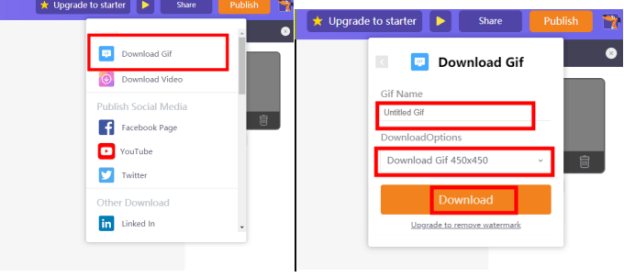
Step 4: Point to “Publish” and select “Download Gif”. And then title your GIF, set GIF size and choose download.
Step 5: Click on “Manage Exports” to check your GIF.

3 GIPHY
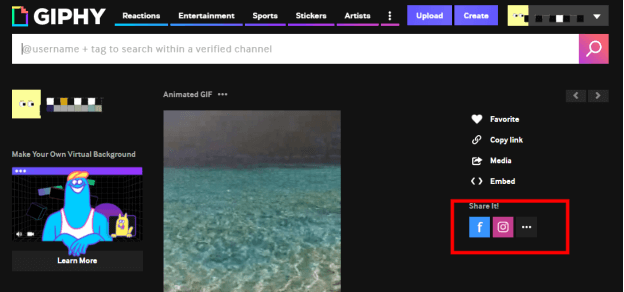
GIPHY is an online converter that not only allows you to create your Gifs but enables you to browse millions of pre-created Gifs as well. They have thrilling Gifs and stickers from different categories that you can share on your socials.
Steps to convert video to gif using GIPHY
Step 1: Open “GIPHY” online and upload your video

Step 2: Either add a video or URL by adding or dragging the desired file on the main GIFY screen- the file should be 15 seconds long and less than 100MB.
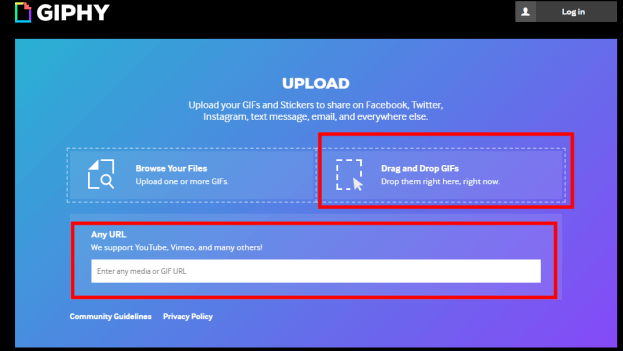
Step 3: Adjust a video duration and start timings using the sliders.
Step 4: Edit the video, add stickers, add captions or reposition your video using the editing tabs
Step 5: Click on the “Upload to GIPHY” tab to finish editing.
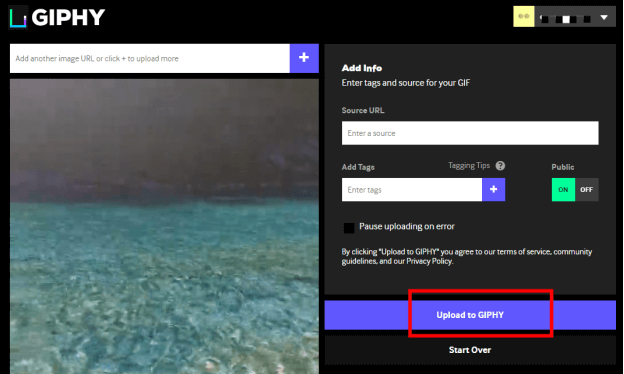
Step 6: Share the GIF on your social media platforms.
Comparison
| Features | Photoshop | Filme |
| Supported format | PSD, PSB | Almost all formats |
| System available | Windows, Mac | Windows, Mac |
| Advantage | Easy to use | Advanced features Numerous effects Easy for beginners Fast export |
| Disadvantage | expensive | Sometime stuck when editing |
Tips for Making a GIF with Ps cs3 or cs6
Ps cs3 version
1.Install and launch Ps cs3 version on your system.
2.Import the desired file from desktop to photoshop and click on “video frames to layers.”
3.Choose the file you want to convert to gif and select the range for conversion- full video or a selected portion.
4. Click on “animation” from the toolbar to preview the frames.
5.Click on “file” followed by “save for web and device.” A new window will pop up on your screen, click on the “save” button, and type your file’s name to save it to your computer.
6.Open the saved file on your computer to see your new gif.
Ps cs6 version
1.Create a canvas in Ps cs6 and add your video as a layer.
2. Go to your “windows” option, click on “timeline,” and then on “create video timeline.”
3.Make edits to the timeline as per your preference and proceed further to finish.
4.Go to the option “file,” followed by “save for web” and then “gif” from the drop-down list.
5.Share the GIF and impress everyone with your unique content.
Frequently Asked Questions
1. How do you speed up or slow down a gif in photoshop?
If you want to change the speed of your gif in photoshop, follow the steps below.
1. Open photoshop on your device.
2.Choose the gif whose speed you want to change- it will open up and appears to be a single timeline.
3.To retime, click right on the “timeline” option.
4.A dropdown menu will appear on your screen with two options; duration and speed.
5.Choose the “speed” option, and adjust the speed from the slider. Moving the slider to the left will slow down the pace while moving it to write will fasten it.
6.That’s all! Preview your video to see if you need further adjustments.
2. How to overlay text over GIFs in Photoshop?
Follow the steps below to add text over a GIF and make it more appealing.
1.Import the gif to photoshop.
2.Click on the window tab appearing on top of the screen and choose the option “layers.”
3.Various options, including frames, paint, text, etc., will appear on the left side of your screen.
4.Choose “T(text)” to add text to your gif. You can reposition it by dragging it anywhere on your screen.
5.Click on “save file” to export the GIF, and you are all done!
3. Can I create a gif with audio in Ps?
The gif format of photoshop doesn’t allow adding audio. To do so, you need to use a video format such as mp4, etc.
4. How to create a rotating gif using Photoshop?
You can create a rotating/spinning gif using photoshop if you follow the following steps.
1.Go to your photoshop app, click on “new,” and create a 150 by 150-pixel document, and set the background settings to “transparent.”
2.Click on the “eclipse” tool and set the width and height to 150 by 150 and center position.
3.Adjust the film and stroke color as per your will, or “transparent” if it is your first try. Align and adjust the thickness as you see fit
4.Right-click on the “layer” and “convert it to smart object.”
5.Right-click on “thumbnail” followed by “ok” and go to the selection tool to delete the lower half of the circle created. Save and close the smart object; once done.
6.Now animate this preloader by going to “window” the “timeline” and click the arrow appearing besides “eclipse 1.”
7.Create a keyframe for it by directing to frame 15 and set the time duration for it and 180 degrees setting for the preloader.
8.Select the loop playback for it and export the file to your device by saving it.
Conclusion
Converting your videos to gifs is a piece of art, and you must make sure your work is the best! Although there are various editing tools available like photoshop, GIPHY, and UniConverter, the thing is they won’t make your piece distinctive. Almost everyone has access to these software. You should use something different like “Filme”. It will allow you to use advanced features, attractive transition effects, and a lot more! Also, it is easy to use and not expensive. Filme is all you need to create exciting gifs!


