


Simple Steps: How to Add Watermark in Word for Copyright
Category: Edit PDF

1 min read
Looking to protect your Word documents from unauthorized use? Adding a watermark is a quick and effective way to mark your content as original and discourage copying. In this guide, you’ll learn how to add a watermark in Word for copyright protection—and how to secure your files even further by watermarking PDFs using desktop software.

In this article:

Part 1: How to Add a Watermark in Word (Step-by-Step)
Watermarks in Word help you mark ownership, show confidentiality, or add branding to your documents. Here’s a detailed step-by-step guide on how to insert a watermark in Microsoft Word (Word 2016 and later, including Word 365).
Step 1: Open Your Document
Start by launching Microsoft Word and opening the document where you want to insert a watermark. If you're working on a new document, be sure to add your content first so you can see how the watermark looks on the page.
Step 2: Go to the “Design” Tab
Once your document is open, head to the top of the screen and click on the “Design” tab.
Tips: Using Word 2010 or earlier? Look under the “Page Layout” tab instead.

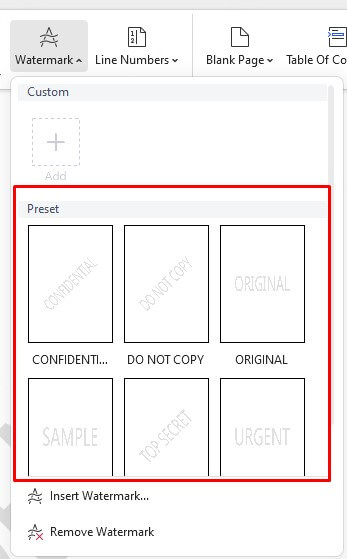
Step 3: Click on “Watermark”.
In the Page Background group, click the “Watermark” button. You’ll see a dropdown with a variety of built-in options like:
- Confidential
- Do Not Copy
- Draft
Clicking any of these will apply the watermark to every page of your document instantly.
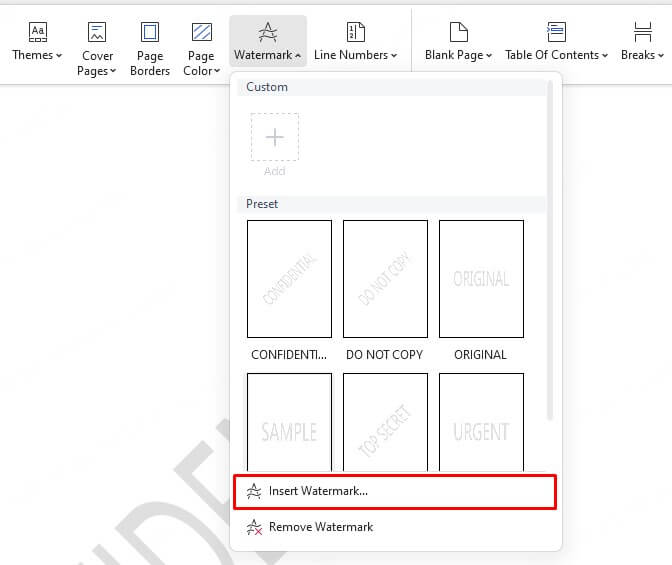
Step 4: Create a Custom Watermark
Want something more personalized? Follow these steps to create your own watermark:
- Click “Watermark” > “Custom Watermark…”
- In the Printed Watermark window, choose between:
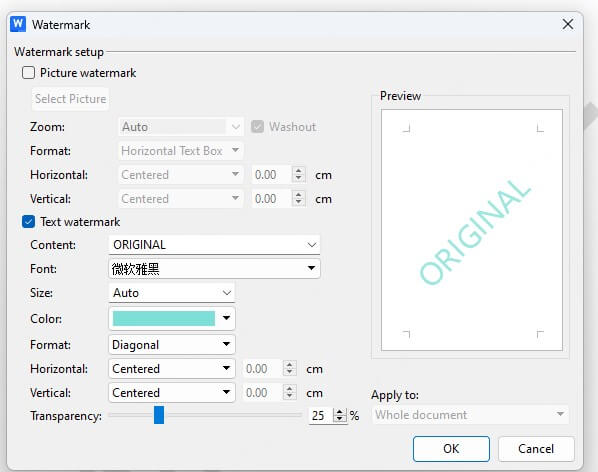
1 Text Watermark
To add a text watermark, start by selecting the “Text watermark” option in the Printed Watermark window. Enter your custom text—this could be something like “© 2025 YourBrand”, “Private Document”, or any wording that fits your document's purpose.
Next, customize the appearance to suit your needs. Choose the font and size that align with your branding or readability preferences. You can also select a color for the text and decide whether you want the watermark to appear diagonally across the page or horizontally behind the content. If you prefer a more subtle watermark that doesn't distract from your main content, check the box labeled “Semi-transparent.”
2 Picture Watermark
If you’d rather use an image or company logo as your watermark, choose the “Picture watermark” option. Then click “Select Picture…” to upload your image from your device, online sources, or a Bing search.
Once your image is uploaded, you can adjust the scale to control the size of the watermark. For a softer, background-style appearance, enable the “Washout” effect, which fades the image slightly so it doesn't overpower your text.

Part 2: How to Add a Watermark in a PDF File
Adding a watermark to a PDF is an effective way to protect your content, reinforce your brand, or indicate document status. Compared to Word documents, PDFs offer stronger security features—like restricted editing and consistent formatting across devices—making them a more reliable choice for copyright protection. With PDFacademy, a powerful desktop PDF editor, you can easily insert, update, or manage watermarks across single or multiple PDF files. Here’s how to do it step-by-step:
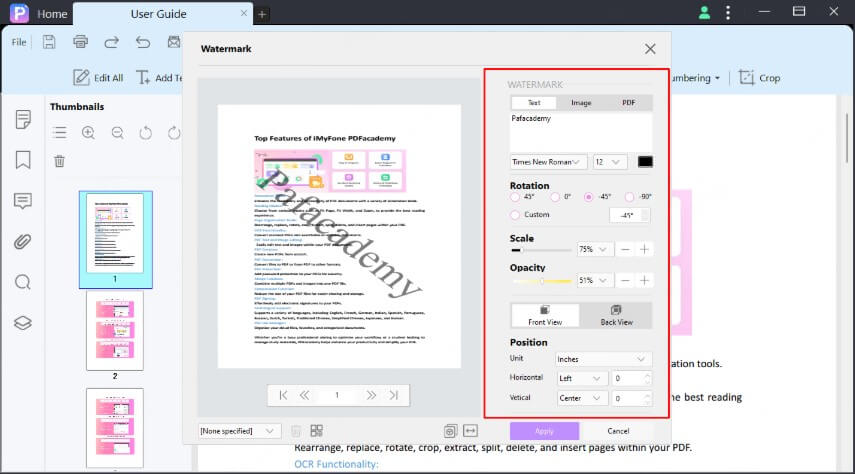
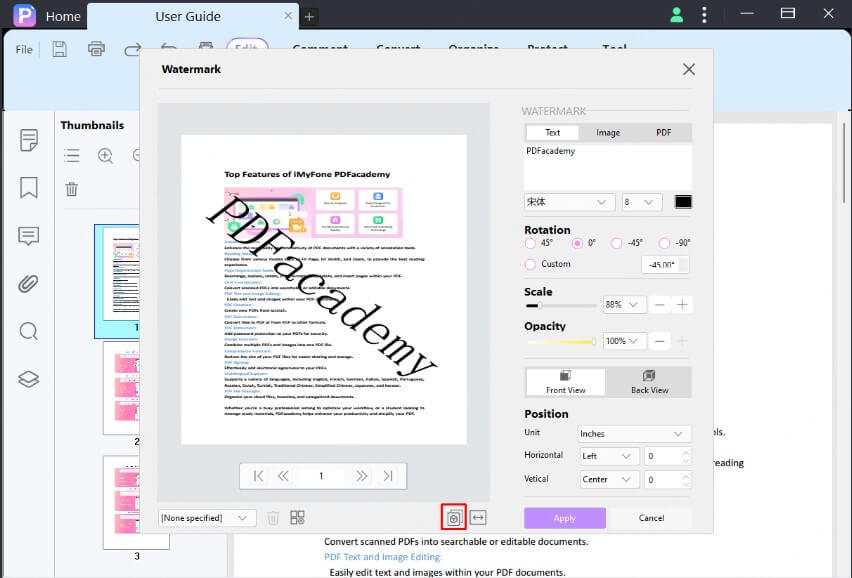
Step 1: Add a Watermark to a Single PDF
Start by opening your PDF file in PDFacademy. Then, click on the “Edit” tab, and you’ll see the page design options appear on the toolbar. Click “Watermark” and select “Add Watermark.”
You can choose from three watermark source types:
- Text– Type your desired content (e.g., “Confidential” or “© YourCompany”). Customize it with your preferred font, size, and color.
- Image– Upload a company logo or any image you’d like to use as a watermark.
- PDF – Use another PDF as the watermark source.
Next, adjust the ratio and opacity using the sliders to control how the watermark appears on the page. You can also choose whether the watermark should be placed in the foreground or background of your content for optimal visibility.
Step 2: Select the Page Range
Click the double-arrow icon next to the page range setting. You can manually enter specific page numbers or apply the watermark to odd pages, even pages, or the entire document—whatever suits your needs.
Step 3: Apply the Watermark
Once everything is set, click the “Apply” button to finalize and insert the watermark into your PDF.
To save time on future projects, you can save your current watermark settings as a template. This allows you to quickly reapply a consistent watermark style across documents. You can also choose an existing template from the list, apply it, or delete it if no longer needed.
Part 3: How to Add a Watermark to Multiple PDFs
With PDFacademy, applying a watermark to multiple PDFs at once is quick and easy. Follow these steps:
Step 1: Open Multiple Files Window and Add PDFs
Launch PDFacademy and click the batch processing icon to open the Multiple Files window. Click “Add Files” and select all the PDF documents you want to watermark. You can choose multiple files or entire folders depending on your needs.
Step 2: Choose Watermark Mode and Customize Settings
In the Multiple Files window, select the “Add Watermark” mode. Then customize your watermark by choosing the type (text, image, or PDF) and adjusting options such as font, size, color, opacity, placement (front or back), and page range to fit your preferences.
Step 3: Start the Batch Watermarking Process
After configuring the settings, click the “Start” button. PDFacademy will process all the selected PDFs and apply the watermark to each file automatically.
Part 4: Why Add a Watermark for Copyright Protection?
Protecting your original work is crucial in today’s digital world. Adding a watermark helps you maintain control and clearly communicate ownership. Here’s why it matters:
- Clearly Indicates Ownership: A watermark visibly marks your content, making it clear who owns the document and discouraging unauthorized use.
- Deters Unauthorized Use: Watermarked files are less appealing to content thieves because the watermark makes misuse obvious.
- Maintains Brand Integrity: Adding your logo or brand name as a watermark reinforces your brand identity every time the document is viewed or shared.
- Communicates Document Status: Watermarks can display messages like “Confidential,” “Draft,” or “For Internal Use Only” to guide how your content is handled.
- Protects Against Content Theft: Even if copied or shared without permission, the watermark remains visible, helping safeguard your copyright both legally and practically.
Part 5: Word vs. PDF Watermarking: Which Should You Choose?
When it comes to protecting your documents, choosing the right format for watermarking is key. Both Word and PDF files allow watermarking, but they differ significantly in security, consistency, and professionalism. Here’s a detailed comparison to help you decide which option best fits your needs:
| Feature | Word Watermarking | PDF Watermarking (e.g., with PDFacademy) |
|---|---|---|
| Security | Easy to remove or edit by others | More secure; harder to modify or remove without permission |
| Consistency | May appear differently on various devices or versions | Maintains exact appearance across all devices and platforms |
| Compatibility | Requires Word or compatible software to view/edit | Universally viewable with any PDF reader |
| Customization Options | Basic text and image watermark options | Advanced options including layering, opacity, and templates |
| Professionalism | Suitable for drafts or internal documents | Ideal for official, published, or copyrighted documents |
| File Size Impact | Generally small impact | Can increase file size depending on watermark type |
| Editing Flexibility | Easy to update watermark | Requires specialized software to update watermarks |
FAQs:How to Add Watermark in Word
1 Why is PDF watermarking better for copyright protection?
PDF watermarking offers stronger security because watermarks are harder to remove or alter without specialized software. PDFs also maintain consistent formatting across all devices, making it a reliable format to protect your copyrighted content.
2 Can I watermark multiple PDFs at once?
Yes! Tools like PDFacademy support batch watermarking, allowing you to add watermarks to multiple PDF files in just a few clicks, saving you time and effort.
3 Does watermarking make a PDF file uneditable?
Watermarking itself doesn’t make a PDF uneditable. However, with PDFacademy, you can set editing restrictions and permissions alongside adding watermarks to enhance your document’s security and prevent unauthorized changes.
Conclusion
Adding a watermark in Word is a straightforward way to mark your documents and protect your copyright. Whether you choose a text or picture watermark, it helps signal ownership and discourage unauthorized use. For stronger protection, especially when sharing or publishing your work, consider converting your documents to PDF and using a dedicated tool like PDFacademy to add secure, professional watermarks.
Ready to safeguard your content? Start watermarking your Word documents today and take control of your copyright!
(Click to rate this post)
Generally rated 4.5 (256 participated)
Rated successfully!
You have already rated this article, please do not repeat scoring!