


How to Draw on PDF and Preserve Your Annotations
Category: Edit PDF

2 mins read
Ever tried drawing on a PDF only to lose your edits after saving? It’s frustrating—and more common than you think. Whether you're sketching diagrams, adding notes, or marking up a document, knowing how to draw on PDF and preserve your annotations properly can save you time and stress. In this guide, we’ll walk you through simple, effective ways to draw on PDFs and make sure every stroke stays right where you want it.
In this article:

What is PDF Annotation?
PDF annotation refers to the process of adding extra information to a PDF file without changing its original content. These annotations can include highlights, underlines, sticky notes, text comments, freehand drawings, shapes, and stamps. They are often used for reviewing, editing, or collaborating on documents—allowing users to mark up PDFs much like they would a printed page.
For example, students might highlight key points in lecture notes, professionals may leave feedback on contracts, or designers could sketch ideas directly onto blueprints. Annotations are non-destructive, meaning they overlay the content rather than alter it, making them essential for effective communication and document review.
Key Benefits of Using PDF Annotations
Adding annotations to your PDFs offers several practical advantages, whether you're working solo or collaborating with others:
- Enhances Clarity: Highlight important points, add comments, or draw directly on content to make your thoughts clear and easy to follow.
- Supports Collaboration: Multiple users can leave feedback or suggestions directly on the same PDF, streamlining team communication and review processes.
- Saves Time: No need to print, scan, or rewrite—annotations let you mark up documents instantly and digitally.
- Non-Destructive Editing: Annotations don't alter the original content, so you can review, comment, and revise without losing the source material.
- Improves Document Organization: Use notes, shapes, and highlights to visually organize content, making it easier to reference and understand later.
- Ideal for Remote Work and Study: Annotated PDFs are perfect for sharing insights, corrections, or study notes in online classrooms or distributed teams.
How to Draw on PDF in PDF Editor
With PDFacademy’s intuitive tools, drawing and annotating PDFs is both simple and flexible. Whether you're sketching freehand or adding structured shapes, follow these steps to enhance your PDF content effectively.
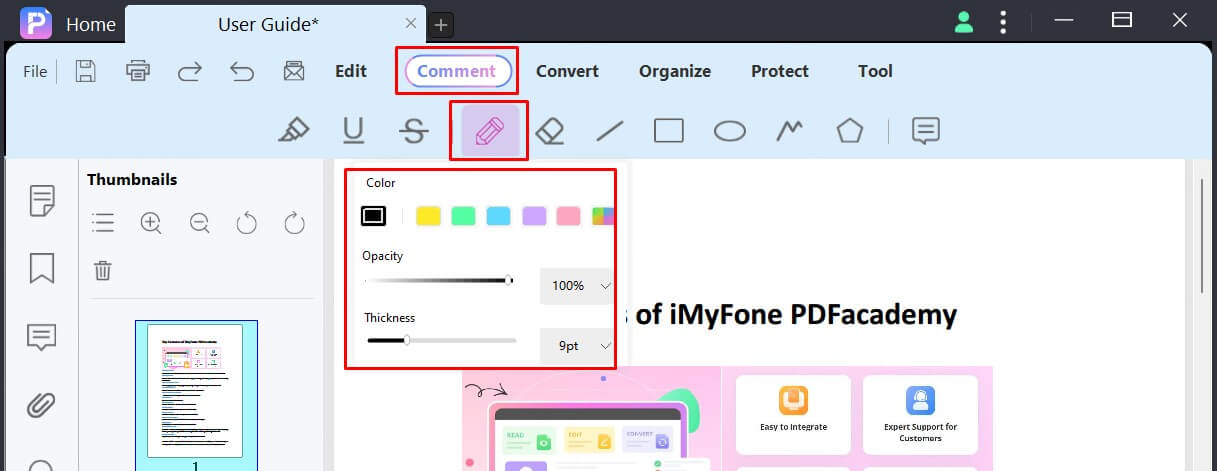
1 Freehand Drawing with the Pencil Tool
To make quick sketches or hand-drawn notes directly on your PDF:
Step 1: Select the Pencil tool from the annotation toolbar.
step 2: Before drawing, customize your pencil style by adjusting the color, opacity, and thickness.
step 3: Use your mouse or stylus to draw freely on the PDF.
If you make a mistake, use the Eraser tool to remove unwanted pencil marks.
Note
The eraser only works with pencil annotations—it won't affect shapes, text comments, or highlights.
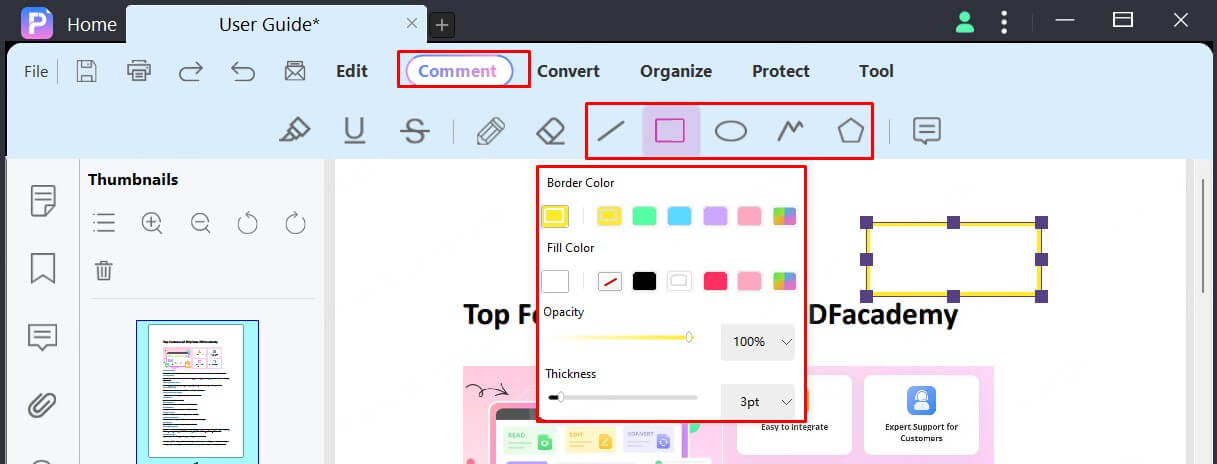
2 Adding Shapes to Your PDF
For more precise markups, PDFacademy offers five shape tools under the “Comment” tab:
- Line: Click the Line icon and drag to draw a straight line.
- Rectangle / Oval: Click the Oval icon, then click and drag to draw a shape.
Hold “Shift” to draw a perfect circle or square.
- Polyline: Draw an open shape with multiple connected line segments. Double-click to finish.
- Polygon: Create a closed shape with three or more sides. Double-click to complete.
3 Customizing Annotations
After drawing or adding shapes, you can easily customize their appearance to suit your needs. Follow these steps:
Step 1: Click on the annotation you want to modify—whether it’s a freehand drawing, line, shape, or other markup. This selects the element and prepares it for editing.
Step 2: Access the annotation’s settings. You can either use the Properties Panel that appears automatically when the annotation is selected, or right-click on the annotation and choose “Properties” from the context menu.
Step 3: In the properties menu, adjust the appearance of your annotation. You can change the fill color, border color, opacity, and line width to match your desired style or highlight important elements.
How to Draw on PDF in Microsoft Edge
Microsoft Edge comes with a built-in PDF reader that lets you draw on PDF files easily—perfect for quick markups or notes. Here’s how to do it:
Step 1: Open your PDF in Microsoft Edge.
Right-click your PDF file and choose “Open with > Microsoft Edge”, or drag the file into an Edge window.
Step 2: Select the Draw tool from the top toolbar.
Click the pen icon labeled “Draw” to activate the freehand drawing mode. Then, customize the pen by selecting your preferred color and thickness from the dropdown menu.
Step 3: Start drawing directly on the PDF.
Use your mouse, trackpad, or stylus to sketch or annotate anywhere on the page.
Step 4: Save your changes.
Click the save icon (floppy disk) in the upper-right corner to preserve your drawings in the file.
How to Draw on a PDF Online
Drawing on a PDF online is quick, easy, and doesn’t require any software installation. Just follow these three steps:
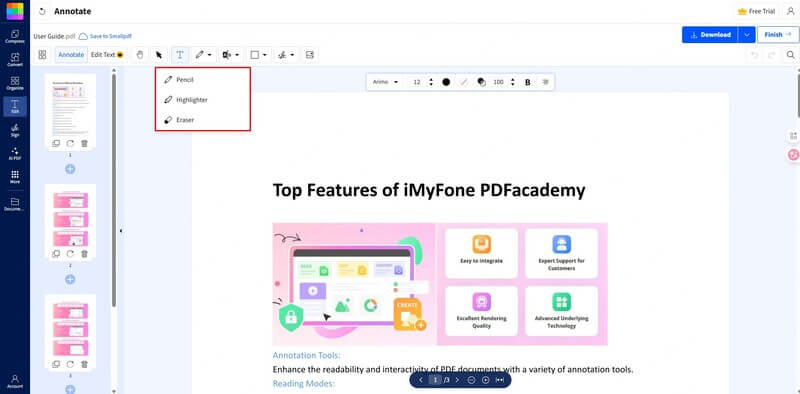
Step 1: Upload Your PDF
Choose a trusted online PDF editor such as PDFescape, Smallpdf, or Sejda. Visit the website and upload your PDF file from your device or cloud storage.
Step 2: Use the Drawing Tool
Once the file opens, select the Draw, Pencil, or Freehand tool from the toolbar. Adjust the color and line thickness if options are available, then start drawing freely on the document.
Step 3: Save and Download
When you're finished, click the Save or Apply button, then download the edited PDF with your drawings included.
How to Draw on PDF in Google Drive
While Google Drive doesn’t have built-in tools for drawing directly on PDFs, you can still annotate them using connected apps like Lumin PDF or DocHub. Here’s how to do it:
Step 1: Open Your PDF in Google Drive
Go to drive.google.com, find your PDF file, right-click it, and choose “Open with > Connect more apps.” Search for and install an annotation tool like Lumin PDF or DocHub.
Step 2: Use the Drawing Tools
Once the PDF opens in the selected app, look for the Draw, Pen, or Freehand tool in the toolbar. Customize your pen color and thickness if needed, then start drawing directly on the document.
Step 3: Save and Sync
After finishing your annotations, click Save or Done. Your edited PDF will be automatically saved back to Google Drive with your drawings intact.
Comparing Methods to Draw on PDF: Pros and Cons
Here’s a clearer and more straightforward version of the pros and cons table for the PDF drawing methods:
| Method | Pros | Cons |
|---|---|---|
| PDFacademy PDF Editor | Freehand + shape tools Customizable colors, opacity, thickness Eraser tool for pencil marks | Requires access to PDFacademy Learning curve for beginners |
| Microsoft Edge PDF Reader | Built-in, no installation needed Simple and quick for sketches Saves directly in browser | Only basic freehand drawing Limited customization |
| Online PDF Editors (PDFescape, Smallpdf, Sejda) | No software install required Easy-to-use interface Some features free, others paid | Requires internet connection Privacy concerns with uploads |
| Google Drive + Connected Apps (Lumin PDF, DocHub) | Seamless with Google Drive Real-time collaboration Auto-save to Drive | Must install/authorize third-party apps Features vary between apps Requires Google/app login |
Draw on PDF Now
With the right tools, drawing on PDFs and preserving your annotations doesn’t have to be complicated. Whether you're adding quick sketches or detailed markups, PDFacademy makes it easy to create, customize, and save your work with precision.
Try PDFacademy today and take full control of your PDF annotations—effortlessly and reliably.
(Click to rate this post)
Generally rated 4.5 (256 participated)
Rated successfully!
You have already rated this article, please do not repeat scoring!