


How to Save PDF as JPEG on Windows, Mac, and Mobile
Category: Edit PDF

3 mins read
Want to turn your PDF files into easy-to-share images? Whether you're sending a document via chat, posting visuals online, or extracting a page for printing, saving a PDF as a JPEG can be incredibly useful.
In this guide, we’ll show you exactly how to save PDF as JPEG on Windows, Mac, and mobile devices—using both built-in features and reliable tools. No design skills or tech background needed—just clear steps to get it done fast.
In this article:
- Part 1: How to Convert Google Doc to PDF on a Computer

- Part 2: How to Save PDF as JPEG on Mac Using Online Tools
- Part 3: How to Save PDF as JPEG on Mobile Devices (Android & iOS)
- Part 4: Tips for Better Conversion Quality
- Part 5: Why Save a PDF as a JPEG?
- Part 6: FAQs about How to Save PDF as JPEG
Part 1: How to Save PDF as JPEG on Windows – Using PDFacademy
PDFacademy is a powerful desktop tool for Windows that lets you convert PDF files into various formats, including Word, Excel, PowerPoint, and multiple image types like JPEG, PNG, and TIFF. Here's how to easily save your PDF as JPEG using PDFacademy:
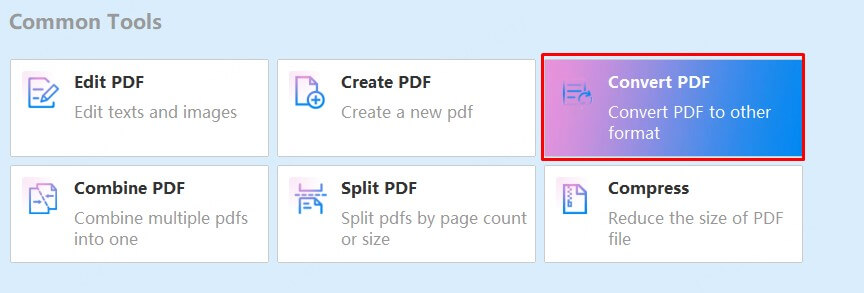
Step 1: Open PDFacademy
Launch PDFacademy and go to the Recent List Page. In the Common Tools area, click on the “Convert PDF” button to start the conversion process.
Step 2: Add Your PDF File
Click the “Add Files” button to upload your PDF. Then, from the Output Format menu, select “JPEG” as your desired file type.

Step 3: Set Output, Begin Conversion
If you want to save the images to a specific location, set your Output Folder. After that, simply click “Start” to begin converting your PDF to JPEG.
Part 2: How to Save PDF as JPEG on Mac Using Online Tools
For multi-page PDF to JPEG conversion on Mac, online tools offer a fast and hassle-free solution. Here's how to do it in just three steps:
Step 1: Open a browser and visit a reliable tool like Smallpdf, ILovePDF, or PDF2JPG.net.
Step 2: Upload your PDF file and choose JPEG as the output format.
Step 3: Click Convert, then download the JPEG images once the process is complete.
Part 3: How to Save PDF as JPEG on Mobile Devices (Android & iOS)
For users who prefer a stable and app-based method instead of online tools, a free app like PDF Converter: Documents to PDF (available on both Android and iOS) provides a convenient way to convert PDFs into JPEG images. Here's how to do it:
Step 1: Install the App
Go to the Google Play Store or Apple App Store , search for “PDF Converter”, and install a trusted, well-reviewed app that supports PDF to JPEG conversion.
Step 2: Import Your PDF
Open the app and tap “Import” or “+” to upload your PDF file from your phone, cloud storage, or email.
Step 3: Select JPEG as Output Format
Choose JPEG or Image (.jpg) from the list of available formats. Then, confirm your selection.
Step 4: Convert and Save
Tap “Convert” to start the process. Once done, save the JPEG images to your device gallery or share them directly from the app.
Part 4: Tips for Better Conversion Quality
Getting high-quality JPEG images from your PDFs depends on several key factors. Follow these tips to ensure your converted images look clear and professional every time.
1 Choose the Right Resolution
The resolution determines how detailed your image will be. For print-quality JPEGs, selecting a resolution of 300 DPI or higher is ideal. If your images are for web use or sharing online, 150 to 200 DPI offers a good balance between quality and file size. Always check the resolution settings in your conversion tool before starting.
2 Use Original PDF Files
Starting with the original PDF file ensures the best source quality. Avoid converting from PDFs that were scanned or saved at low resolution because they often produce blurry or pixelated JPEGs. If you only have a scanned PDF, try to obtain a cleaner or higher-quality version before conversion.
3 Adjust Image Quality Settings
Many PDF converters let you set the image quality or compression level. Choosing a higher quality setting preserves more detail and results in sharper images. Keep in mind that increasing quality usually leads to larger file sizes, so find the right balance based on your needs.
4 Crop or Edit Before Conversion
Removing unnecessary margins, blank spaces, or irrelevant parts of the PDF before converting can improve the final JPEG appearance. Editing your PDF to focus on essential content avoids wasted space and makes the images more visually appealing. Many PDF tools include simple cropping features.
5 Avoid Multiple Conversions
Every time a file is converted between formats, some image quality may degrade. To maintain the clearest images, convert your PDF directly to JPEG rather than converting it through multiple intermediate formats like PNG or TIFF. This minimizes quality loss and speeds up the process.
Part 5: Why Save a PDF as a JPEG?
Saving a PDF as a JPEG image offers several benefits depending on your needs. Here are some key reasons to convert PDFs into JPEGs:
- Easy Sharing and Viewing: JPEG images are supported on almost all devices and platforms, allowing quick viewing without requiring a PDF reader.
- Better Compatibility for Web Use: Many websites and social media platforms accept image files like JPEG rather than PDFs, making JPEGs easier to upload and display online.
- Simplified Printing: JPEGs often print more reliably from phones and photo printers, avoiding some common formatting issues found with PDFs.
- Extracting Specific Pages or Content: Converting PDF pages to JPEG lets you use individual pages or graphics separately, perfect for presentations or social posts.
- Reduced File Size for Images: JPEG files can be smaller than PDFs in some cases, making them easier to store, email, or share without losing much quality.
Part 6: FAQs about How to Save PDF as JPEG
1 What are the key steps to batch convert PDFs to JPEG using PDFacademy?
To batch convert using PDFacademy on Windows:
- Open the program and click “Convert PDF” on the main interface.
- Add multiple files using the “Add Files” button and choose JPEG as the output format.
- Add multiple files using the “Add Files” button and choose JPEG as the output format.
PDFacademy processes all files in one batch, making it perfect for high-volume tasks.
2 Why would I need to save a PDF as a JPEG instead of just sharing the original file?
JPEGs are more universally accessible—they can be opened on nearly any device without special software. They're also easier to embed in websites, presentations, or social media posts. Converting to JPEG is ideal when you want simplified access, better visual compatibility, or when dealing with non-editable snapshots of PDF content.
3 Will images and formatting stay intact after conversion?
In most cases, yes. Reliable PDF to JPEG converters like PDFacademy preserve the original layout, images, colors, and visual elements during conversion. However, keep in mind that complex layouts or interactive components—such as forms, hyperlinks, or embedded media—will not remain functional; they’ll appear as part of a static image. After converting with PDFacademy, you can also use its editing tools to fine-tune the resulting images or make additional adjustments if needed.
Conclusion
Saving a PDF as a JPEG is simple and versatile, whether you’re using Windows, Mac, or a mobile device. By choosing the right tools—like PDFacademy for Windows, online converters for Mac, or mobile apps—you can easily convert your files to image format for sharing, printing, or editing.
Ready to convert your PDFs hassle-free? Try PDFacademy today and experience fast, high-quality PDF to JPEG conversion on your Windows PC!
(Click to rate this post)
Generally rated 5 (256 participated)
Rated successfully!
You have already rated this article, please do not repeat scoring!