How to Create an Editable PDF for Easy Form Filling
Category: Edit PDF

1 min read
An editable PDF is a type of file that lets users type directly into fields, such as text boxes or checklists, without altering the rest of the document. It’s a practical format for digital forms, especially when you need others to fill out information clearly and quickly.
These PDFs are commonly used for job applications, surveys, contracts, and registration forms. Unlike static or printed versions, editable PDFs streamline data collection, reduce paperwork, and make it easier to share and submit forms online.

What You Need to Create an Editable PDF
Before you begin, make sure you have the right tools and materials ready. Creating an editable PDF is simple when you have:
- A computer (Windows or Mac)
- A PDF editor – This could be a dedicated desktop tool like PDFacademy, Adobe Acrobat, or a trusted online platform
- Your original file – Typically a document in Word, Excel, or non-editable PDF format that you want to turn into fillable form
While some platforms offer advanced features, most users can create professional-looking editable PDFs using basic form tools like text fields, checkboxes, and dropdown menus. For the best balance of ease, privacy, and control, using desktop software is often recommended.
Method 1: Create an Editable PDF Using PDFacademy (Recommended)
If your PDF is scanned or image-based, you won’t be able to edit or select the text until you apply OCR (Optical Character Recognition). PDFacademy includes a powerful built-in OCR feature that converts scanned content into searchable and editable text. Here’s how to do it:
Step 1 Open Your Scanned PDF and Start OCR
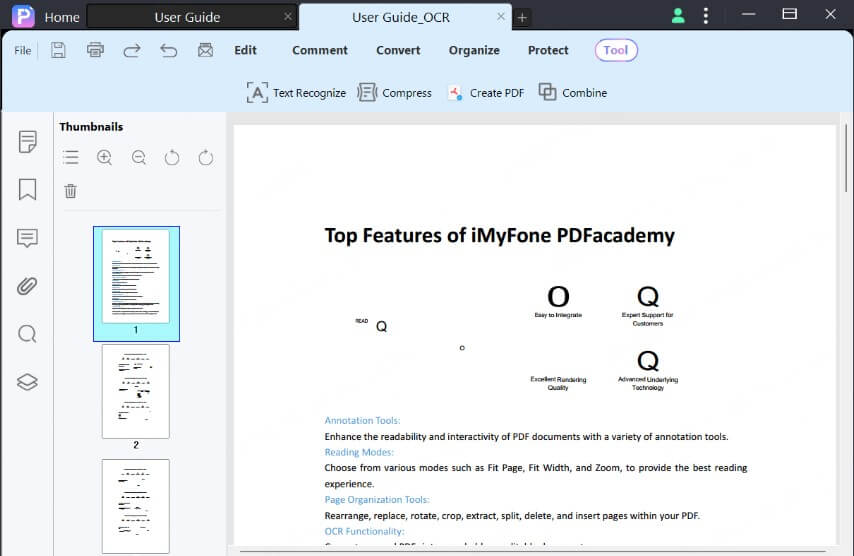
Launch PDFacademy and open the scanned PDF file you want to convert. Then, click Tool > Text Recognize in the toolbar to activate the OCR function, which prepares the document for text recognition.

Step 2 Select the Correct Language
A pop-up window will appear asking you to choose the language of your document. Selecting the right language ensures accurate text recognition. After making your choice, click OK to begin the OCR process.

Step 3 Wait for OCR Completion and Edit
PDFacademy will display a progress bar as it processes your document. Once finished, it will automatically open a new file with “_ocr.pdf” added to the name. This editable PDF allows you to copy, edit, and save text just like a regular document.
Method 2: Create an Editable PDF with Microsoft Word
If you don’t have a dedicated PDF editor, Microsoft Word can be a useful alternative for creating simple editable PDFs—especially for basic forms or questionnaires. Here’s how:
Step 1: Open your document in Microsoft Word. If you’re starting from scratch, use tables or spacing to lay out your form clearly.
Step 2: Enable the Developer Tab (if it’s not already visible). Go to File > Options > Customize Ribbon and check the box for “Developer.” This gives you access to form tools.
Step 3: Use the tools in the Developer tab to insert form fields such as text boxes, checkboxes, and drop-down lists. You can also set properties like default text, formatting, and restrictions.
Step 4: When your form is ready, go to File > Save As and choose PDF as the format. This converts your Word form into a static PDF with editable fields.
Method 3: Create an Editable PDF with Adobe Acrobat Pro
Adobe Acrobat Pro is one of the most powerful tools for creating and managing PDF forms. It offers advanced features like automatic field detection, digital signature integration, and extensive formatting options. Here’s how to use it:
Step 1: Open Adobe Acrobat Pro and load your existing document (Word, PDF, or scanned form).
Step 2: Go to Tools > Prepare Form. Acrobat will automatically scan the document and detect potential form fields. You can manually adjust or add new fields like text boxes, checkboxes, dropdowns, and buttons.
Step 3: Customize each field’s appearance and behavior—set validation rules, default values, tooltips, and required fields as needed.
Step 4: Preview your form to check functionality, then save the file as an editable PDF ready for distribution.
Method 4: Create an Editable PDF Using Free Online Tools
If you're looking for a quick and no-cost solution, several free online tools let you create editable PDFs directly in your browser. While convenient, they may have limitations like file size caps, fewer form options, and potential privacy concerns. Here's how it typically works:
Step 1: Visit a trusted online PDF editor like PDFescape, Jotform PDF Editor, or Sejda PDF.
Step 2: Upload your document (Word or PDF) to the platform. Most tools will load the document in a visual editor.
Step 3: Use the available tools to add form fields—text input boxes, checkboxes, dropdowns, and more. Arrange and resize them as needed.
Step 4: Once your form is complete, download the editable PDF to your device. Some platforms may also allow you to share the form via a link or email.
How to Share or Distribute Your Fillable PDF
Once your editable PDF is ready, the next step is to get it into the hands of others—whether it’s clients, colleagues, or customers. Here are a few effective ways to share your fillable PDF:
- Email Attachment: Simply attach the PDF to an email and send it to your recipients. Make sure to mention that the form can be filled out digitally and saved.
- Cloud Storage Link: Upload the file to a cloud service like Google Drive, Dropbox, or OneDrive. Then generate a shareable link and control permissions (e.g., view-only, download access).
- Website or Intranet Upload: If you manage a website or internal portal, you can host the PDF there for easy access. This is useful for HR forms, client onboarding, or event registration.
- Form Submission Systems: For advanced use cases, you can embed the PDF into an online form tool that collects and stores responses automatically—great for large-scale surveys or applications.
Always test the form on different devices (desktop, tablet, mobile) before distributing to ensure users can open, fill, and save the file correctly.
Tips for Better Fillable PDFs
Designing a high-quality fillable PDF means thinking beyond just form fields. These tips will help you create documents that are clear, easy to use, and professional.
1 Make Fields Clear and User-Friendly
Use descriptive labels for each field so users know exactly what information is needed. Avoid vague terms like “Field 1” or “Input.” For important fields, mark them with an asterisk (*) or use validation to prevent incomplete submissions. These simple visual cues reduce confusion and improve completion rates.
2 Make Fields Clear and User-Friendly
Choose field types that suit the input—text boxes for open answers, checkboxes for multiple options, and dropdowns for fixed choices. Set a logical tab order so users can easily navigate the form using the Tab key. Together, these steps ensure a fluid, frustration-free filling experience.
3 Make Fields Clear and User-Friendly
Avoid visual clutter by leaving enough space between fields and grouping related questions under clear headings. A clean layout improves readability and makes the form feel less overwhelming. Always aim for simplicity—less is more when it comes to effective form design.
4 Make Fields Clear and User-Friendly
Before distributing your fillable PDF, test it across different devices and PDF viewers. Check if all fields are working, required validations are in place, and the layout remains intact. Testing helps you catch issues early and ensures a smooth experience for your users.
Conclusion
Making an editable PDF that others can fill out is easier than ever. Whether you’re working with scanned files or designing from scratch, the right tool makes all the difference. PDFacademy offers a simple, powerful way to create fillable PDFs with just a few clicks—no hassle, no learning curve.
Try PDFacademy today and turn any document into a professional, editable PDF in minutes.


