


User Guide of iMyFone Umate Pro
Launch iMyFone Data Eraser and Start to Wipe Your iOS Device
Do you think deleting directly text messages, call history or other information on your iPhone is absolutely safe? Definitely not. All your deleted data is still saved on your iPhone, even though you cannot see it. iMyFone Umate Pro offers you an efficient way to free up iDevice space and protect your privacy on iPhone/iPad/iPod Touch.
Note: To erase data in any erasing mode, including “Erase All Data”, “Erase Deleted Files”, “Erase Private Data” and “Erase Private Fragments”, please turn off “Find My iPhone” first. This is not required when you use “One Click to Free Up Space” mode.
Part 1. One Click to Free Up Space
iMyFone Umate Pro allows you to release space just with one click. It has five powerful functions: Clean up junk files, Erase temporary files, Compress photos losslessly or backup and delete the photos, Delete large files and Remove unused apps. With over 25 analysis technologies, you can securely delete this useless data, free up lots of space and speed up your iPhone, iPad and iPod Touch!
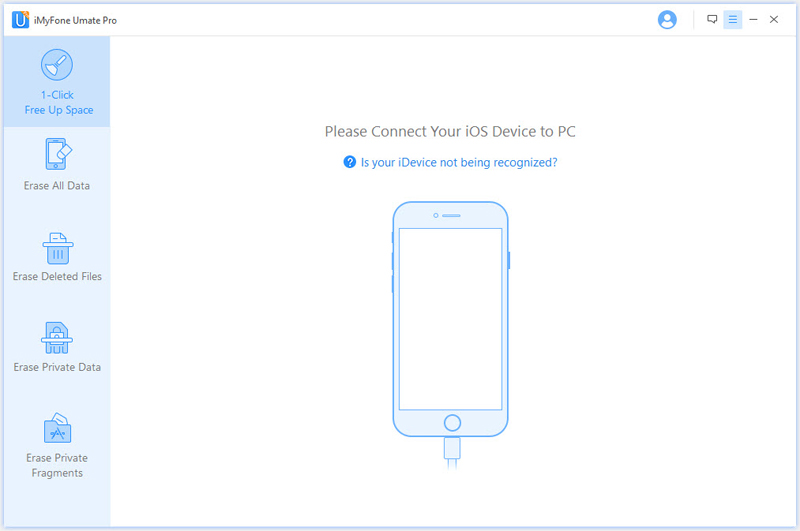
Step 1. Connect Your iDevice to PC
Of course, you already have the software on your PC. Run it and connect your iOS device via a cable.
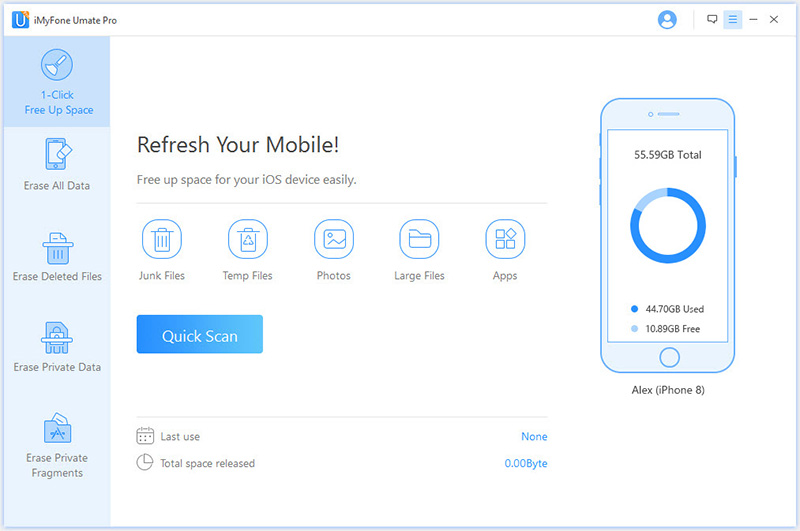
Step 2. Scan Your Device for Space-Saving Analysis
This software integrates more than 25 analyzing technologies, and it can scan and analyze data. Click "Quick Scan" for a full space-saving analysis on how much space can be saved by cleaning up junk files, clearing temporary files, compressing photos, deleting large files and removing apps.
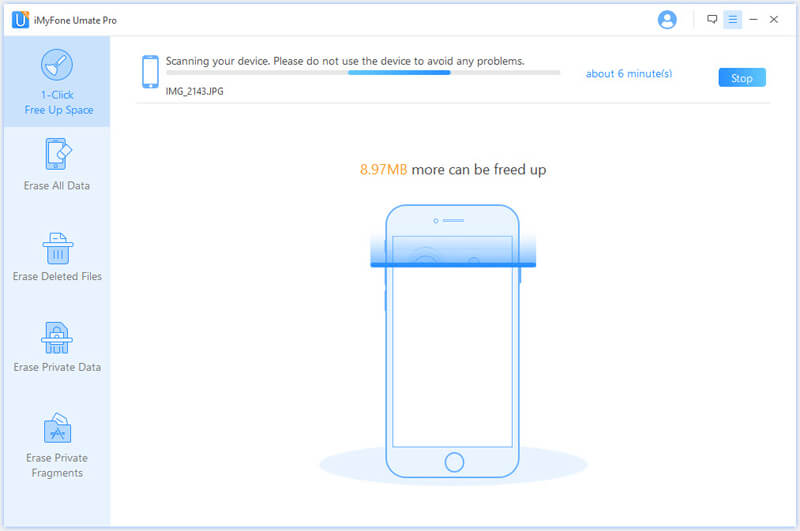
The software starts scanning.
Step 3. Release Space for Your Device
After scanning, it is clear that you do have huge space to save. You can click the clean button to clean up the space.
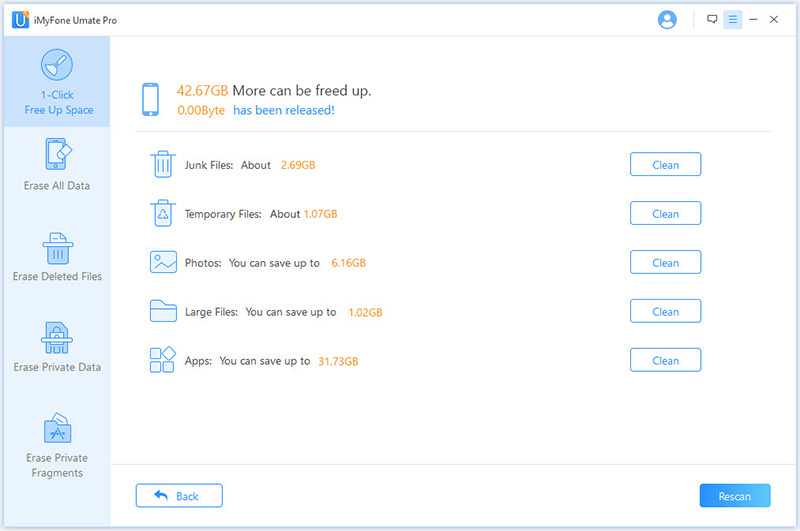
After cleaning, you will see how much space has been released and how much more can be released by the other functions as the below interface shows. Choose any part to continue.
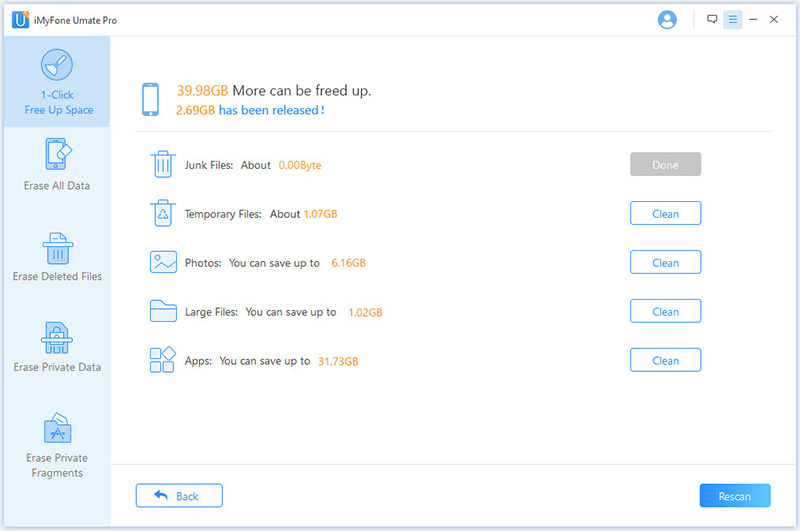
You can show off the results with your friends on Twitter or Facebook; or check out your backup files in backup folder.
Note:
- There are two releasing patterns you can choose to clean iPhone space. First, all the space-releasing procedures can be done after you click the Quick Scan button, which is a full space-saving analysis. They can be done individually in each tab at the bottom of the interface according to their different functions. That means you can start with junk cleaning, photo compression or managing apps as you prefer.
- Please keep your device connected with your PC and do not use the device during the whole process to ensure the program operates properly.
Part 2. Erase All Data
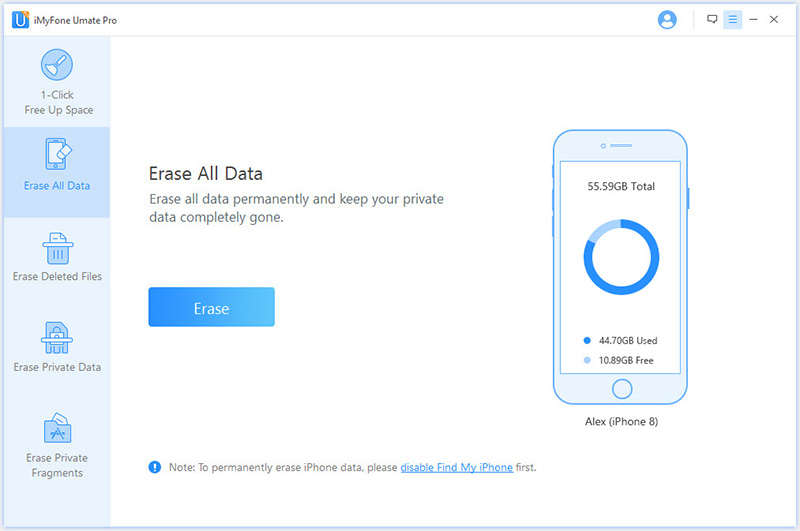
iMyFone Umate Pro supports deleting everything on your iPhone, iPad and iPod Touch. The data will be wiped out totally and everything stored on the device will be gone once you select this option.
To Erase ALL data from the iPhone or iPad, please follow the steps below:
Step 1. Connect Your iDevice to PC
After downloading iMyFone Umate Pro, please connect your iOS device to your computer via cable. If this is the first time you have connected to the computer, you need to Trust the computer first.
Step 2. Choose Erase Mode
When your iPhone or iPad connects successfully, choose the "Erase All Data" tab. Click the “Erase” button and then in the next window you will be asked to type "delete" into the box to confirm.
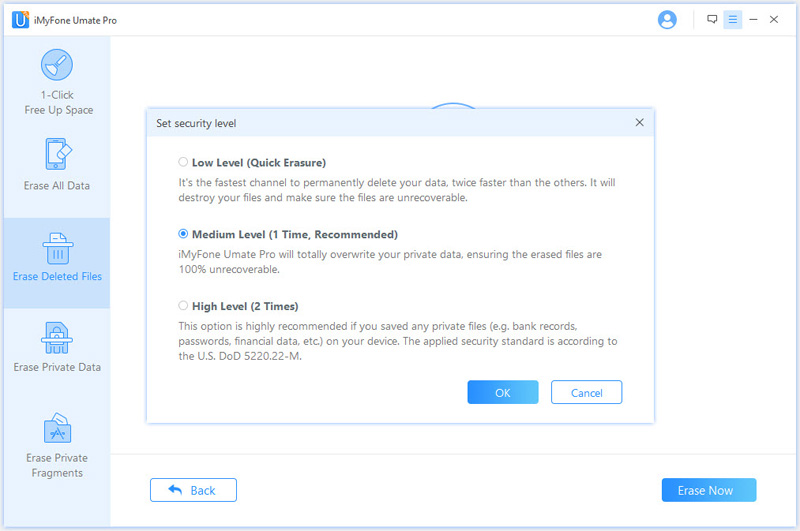
Step 3. Select Security Level and Confirm
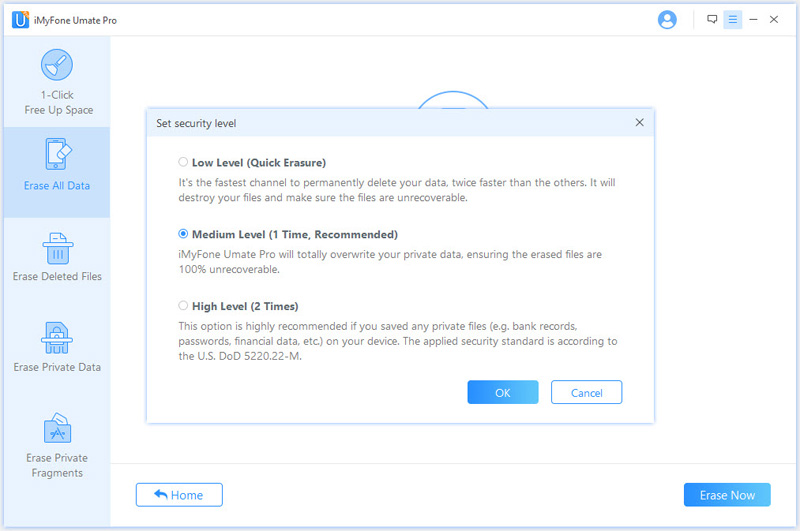
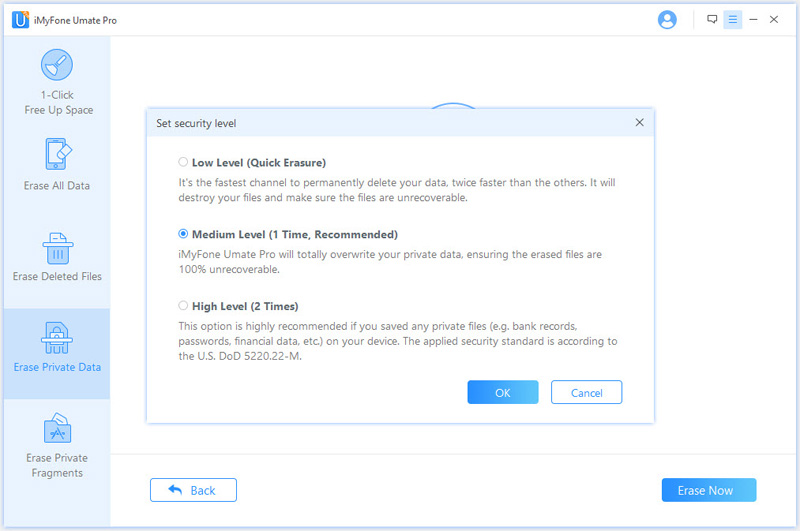
Type "delete" into the box to confirm. Of course if you want to change the security level, you can click the link to change the level. Please read the security level settings carefully.
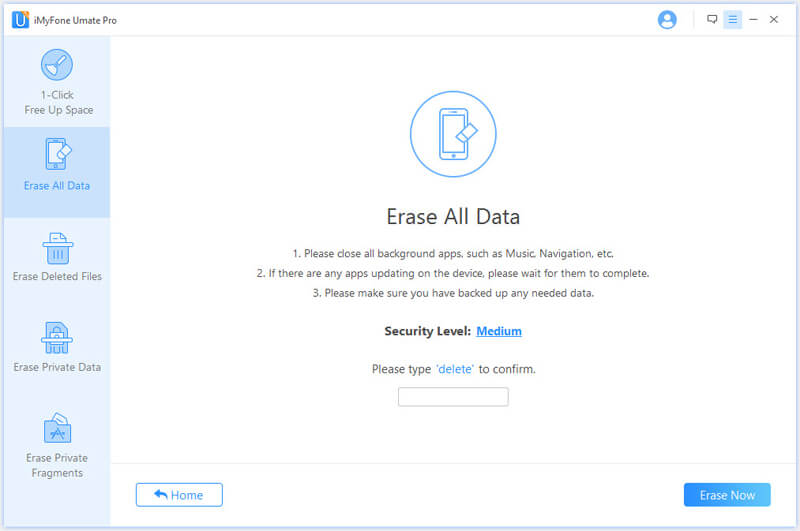
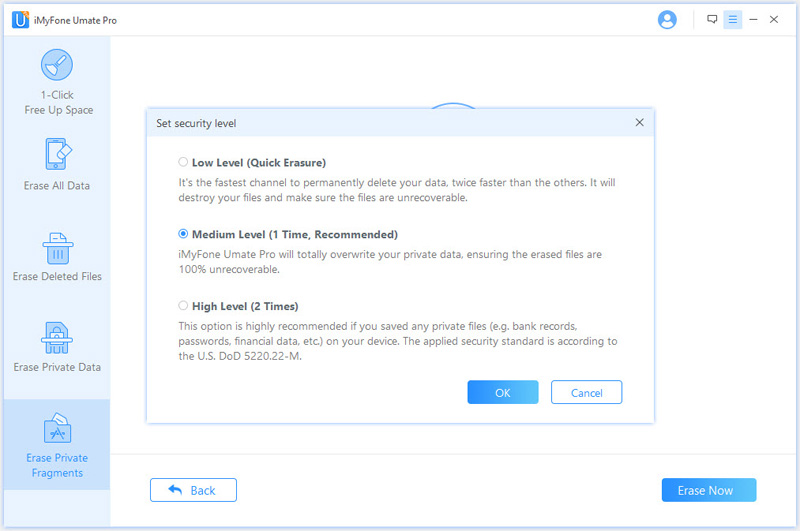
There are 3 erasing levels. You can choose the one that suits you best. We recommend Medium Level.
Step 4. Start to Erase
After you manually type 'delete' into the box to confirm your action, Click Erase Now button to erase all data on your device.

Caution: This action will PERMANENTLY erase all data and CANNOT be undone. Please make sure you've backed up the data in case of any data lost.
Note:
- Please keep your device connected with your PC and do not use the device during the whole process to ensure the program operates properly.
- Your data or device may be damaged if you stop the process while the program is erasing data or your device is restarting.
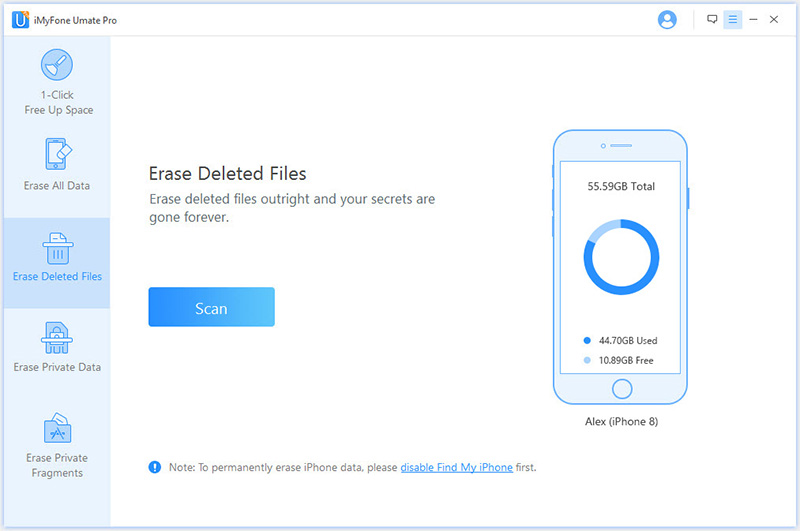
Part 3. Erase Deleted Files
Erasing deleted files can make sure that the files you previously deleted are no longer accessible or recoverable. If you want to ensure previously deleted data is unrecoverable then this option will suits you.
To erase deleted files which actually still remains on the device, please follow the steps below:
Step 1. Connect Your iDevice to PC
Please connect your iOS device to computer via cable. If this is the first time you are connecting to the computer, you need to Trust the computer first on your iPhone.
Step 2. Choose Erase Mode and Scan
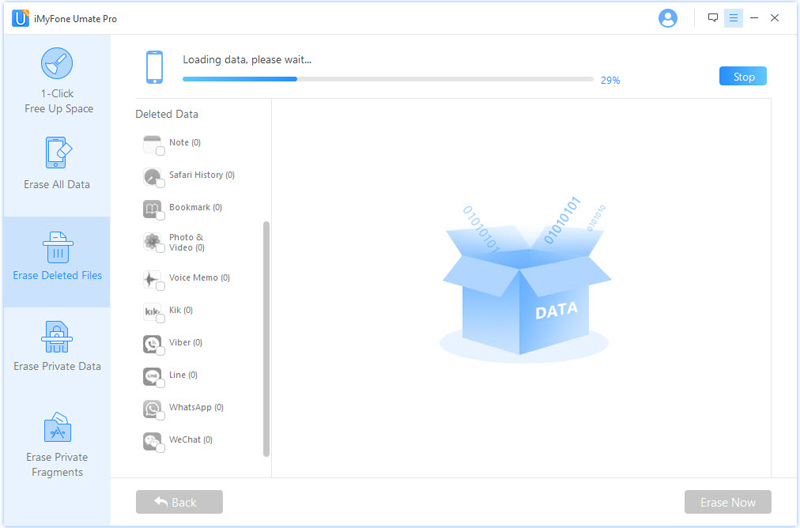
Choose the Erase Deleted Files tab, click "Scan" and then iMyFone Umate Pro will start to scan the device and list all of the deleted files. This process would take several minutes.
Step 3. Preview and Select Files
After the scanning process is finished, iMyFone Umate Pro will list all the deleted files. You can click them one by one to preview and tick off the file types which you want to erase in the box. Then click "Erase Now" button to erase the selected deleted files.
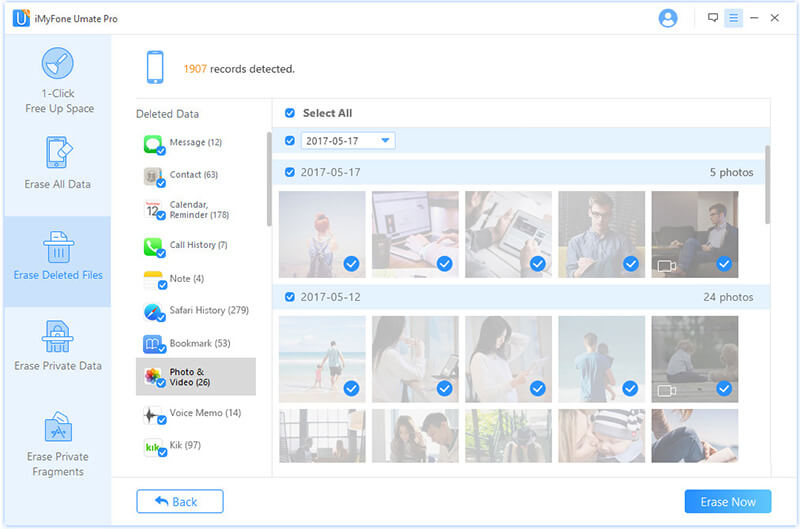
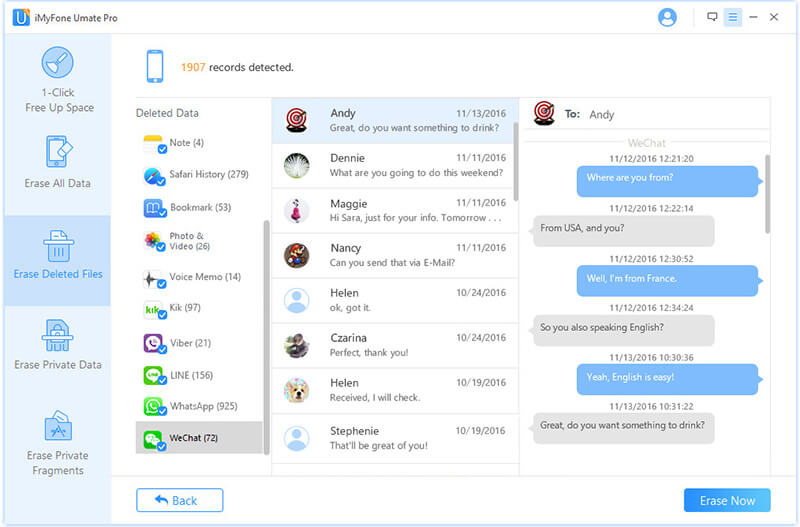
Of course, multiple selections are supported, also. Normally iMyFone Umate Pro will choose them all.
Step 4. Select Security Level and Confirm
Next you should type "delete" into the box to confirm.
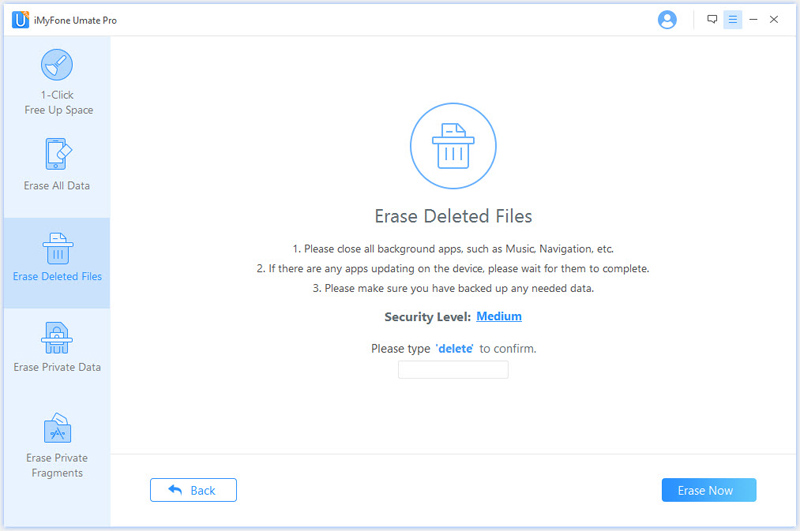
Of course if you want to change the security level, you can click the link to change the level. Please read the security level settings carefully.
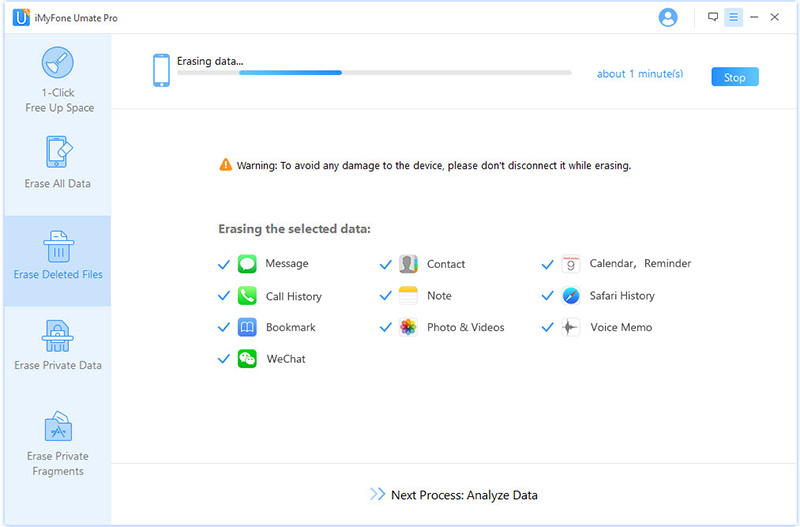
Step 5. Start to Erase
After you manually type "delete" into the box to confirm your action, click the Erase Now button to erase all data on your device.
Note:
- iMyFone Umate Pro supports previewing and erasing the deleted files, but it is not able to help you recover them. If you want to retrieve the deleted files, please use iMyFone D-Back instead.
- Please keep your device connected with your PC and do not use the device during the whole process to ensure the program operates properly.
- Your data or device may be damaged if you stop the process while the program is erasing data or your device is restarting.
Part 4. Erase Private Data
There is personal information stored in your iPhone which you normally can’t find.
Do you worry that the account information, private photos, browsing history, emails, or other personal information on your mobile devices may be revealed to others? iMyFone Umate Pro will delete all of this residual information completely and permanently. It can make sure the private data will be rendered unrecoverable.
To do this, please follow the steps below:
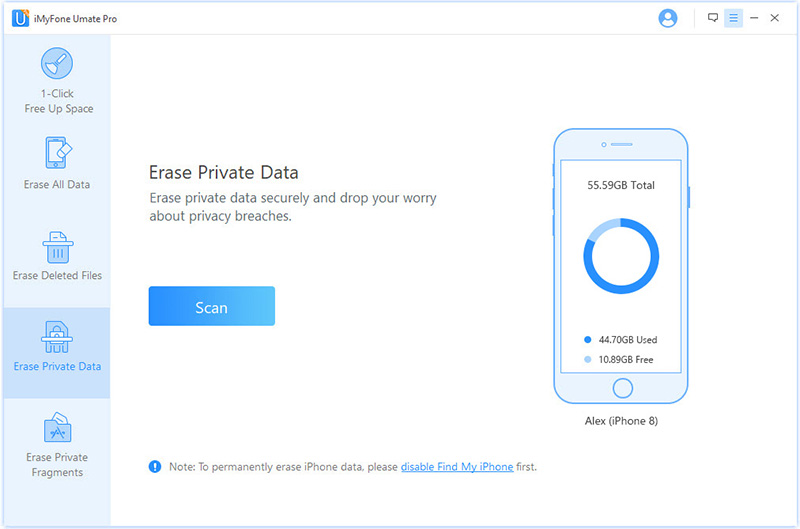
Step 1. Connect Your iDevice to PC
Connect the iPhone or iPad to computer. If this is the first time you are connecting to the computer, you need to Trust the computer first.
Step 2. Choose Erase Mode and Scan
Click the Erase Private Data tab, click "Scan" and then iMyFone Umate Pro will start to scan the device. It will take several minutes to finish the process.
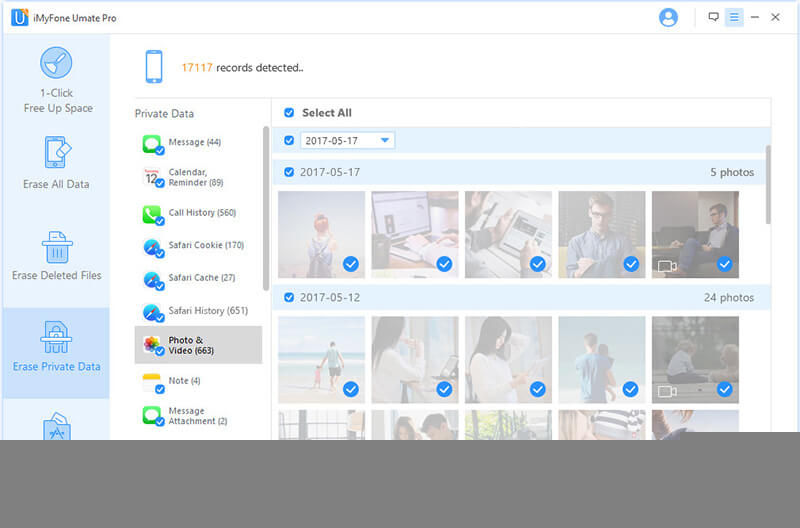
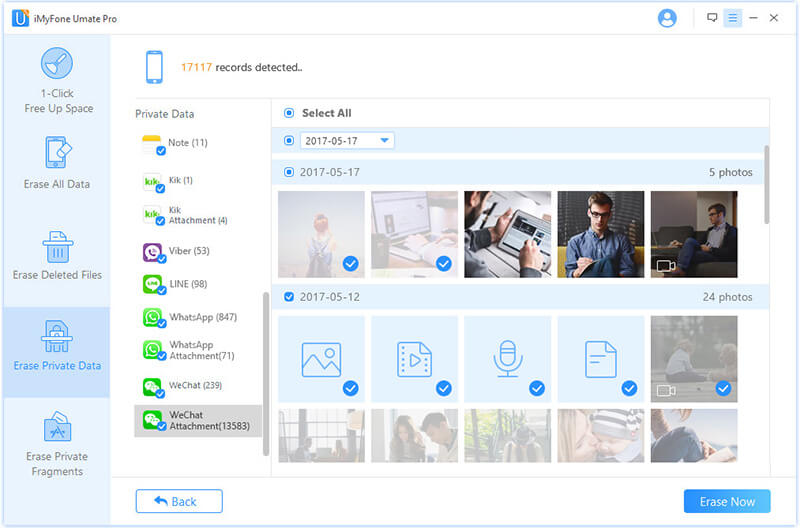
Step 3. Preview and Select Data
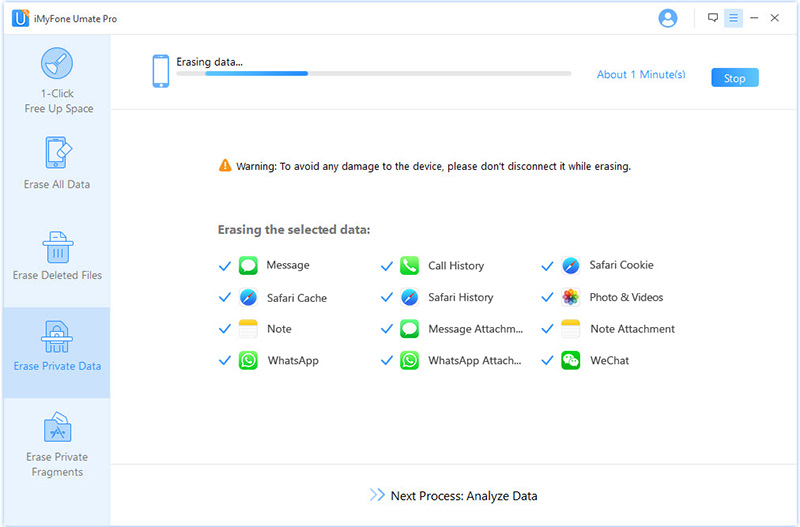
After scanning, iMyFone Umate Pro will list all your private data including photos, messages, call history, WhatsApp, etc. You can click to preview them. After you've selected private files which you want to erase, click the Erase Now button. Then a warning pop-up window will show you warnings.
Step 4. Select Security Level and Confirm
Type "delete" into the box to confirm. Of course if you want to change the security level, you can click the link to change the level. Please read the security level settings carefully.
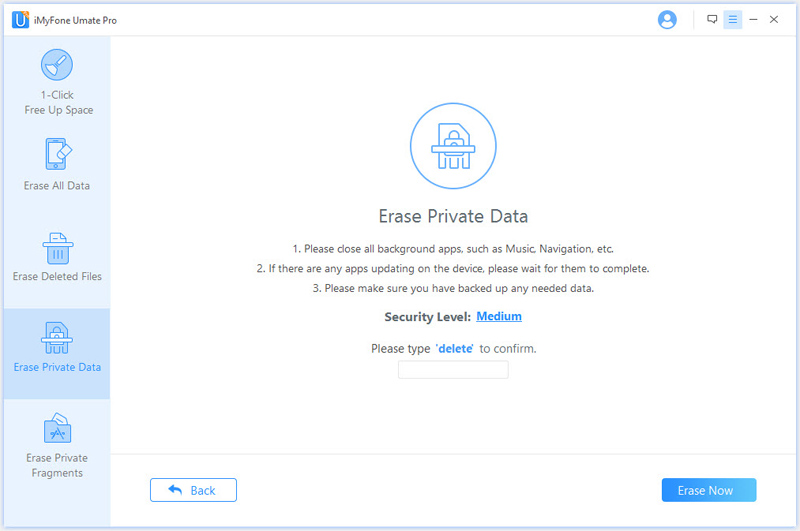
Step 5. Start to Erase
After you manually type 'delete' into the box to confirm your action, then click the Erase Now button to erase the private data.
Note:
- Please keep your device connected with your PC and do not use the device while the whole process to ensure the program is operating properly.
- Your data or device may be damaged if you stop the process during the program is erasing data or your device is restarting.
Part 5. Erase Private Fragments
Erasing incomplete private fragments can find out all private traces produced by third-party apps and permanently destroy them. No need to worry about the safety of your private data then.
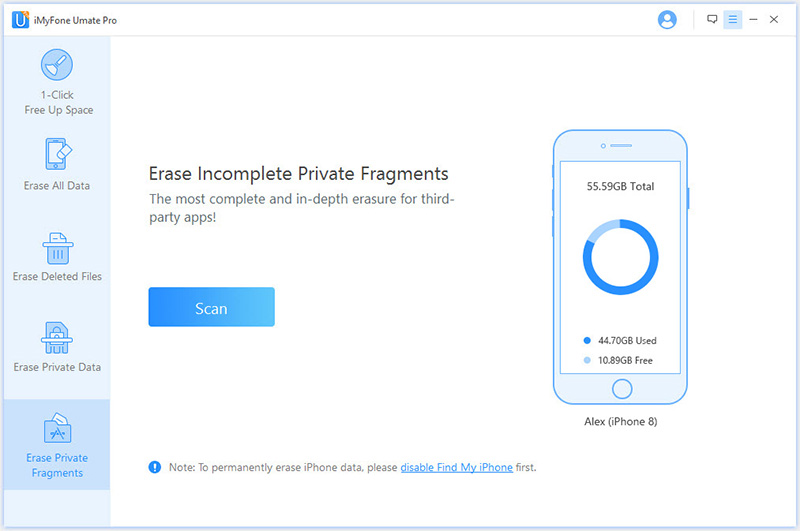
Step 1. Connect Your iDevice to PC
Please connect your iOS device to computer via USB cable. If it is the first time your device is connecting to the computer, you need to trust the computer first on your device.
Step 2. Choose Erase Mode and Scan
When your device is connected successfully, choose the "Erase Private Fragments" tab. Click "Scan" button and iMyFone Umate Pro will start to scan your device. It will take a few minutes to finish the process.
Step 3. Select Apps to Erase
When the scanning process is finished, iMyFone Umate Pro will show you how many private fragments left of every third-party app, such as WhatsApp, WeChat, Snapchat, Kik, Line, Instagram, etc. Then click "Erase Now" button to erase the selected fragments.
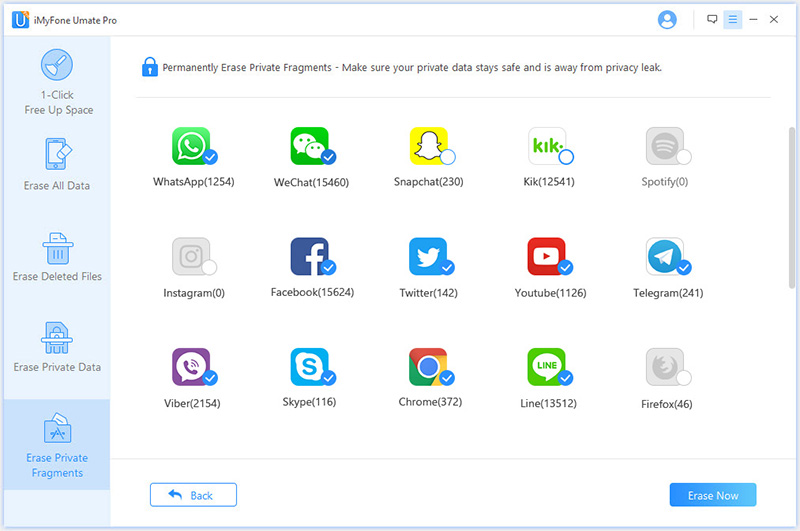
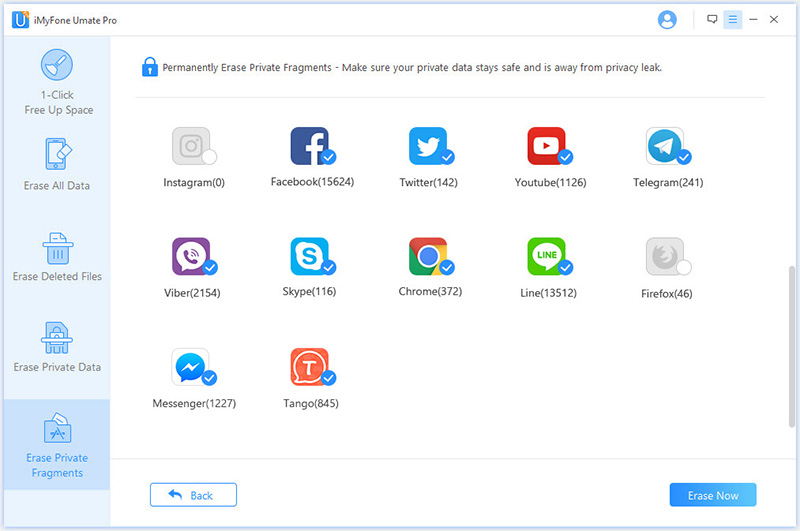
Note: All the third-party apps which have private fragments are selected by default. You can uncheck the ones which you do not want to erase before clicking "Erase Now" button.
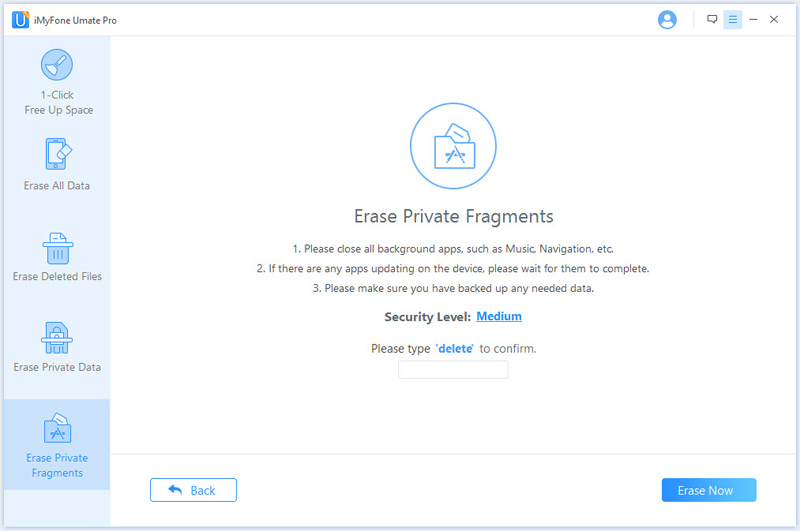
Step 4. Select Security Level and Confirm
Type "delete" into the box to confirm. Of course, if you want to change the "Security Level", you can click the link to change the level. Please read the security level explanations carefully.
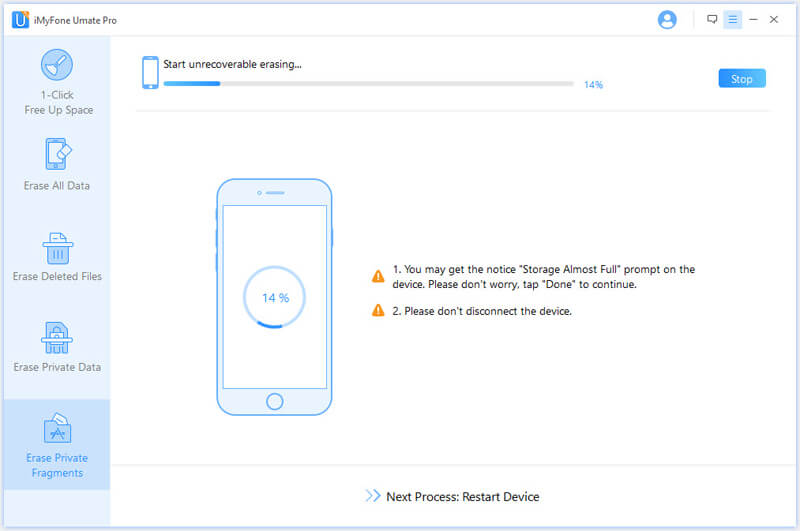
Step 5. Start to Erase
After you manually type "delete" into the box to confirm, click "Erase Now" button. It will remind you how much time would be needed to finish the erasing process. Click "Continue" button to go on.
Note:
- Please keep your device connected with your PC and do not use the device during the whole process to ensure the program is operating properly.
- Your data or device may be damaged if you stop the process when the program is erasing data or your device is restarting.
Still Need Help?
Go to Support Center >