


 August 2, 2022
Apple allows the users to transfer their Facetime calls to Mac and iPad. It is a great feature because Facetime drains the battery due to the camera during the call. So, it is a better option to transfer your Facetime call from iPhone to Mac and iPad. Let us see how we can transfer Facetime calls from iPhone to Mac and iPad with ease.

Table of Content [Hide]

Part 1. Requirements of System and Settings
For transferring facetime calls from iPhone to Mac and iPad, there are certain requirements of system and settings. Follow these requirements, and you can easily transfer facetime calls from iPhone to Mac and iPad.
- To be able to transfer Facetime calls from one device to another, make sure both the devices are connected to the same Internet.
- Open Settings in Facetime and go to Preferences. Here, you will see an option of Calls from iPhone. Tick this box.
- Now, on your iPhone, you need to go to Settings > Phone > Call on other Devices and enable calls on other devices.
- However, these are settings of the latest iOS versions. To see about older Macs, contact Apple Support.


Part 2. How to Transfer Facetime Call from iPhone to Macbook
The problem with transferring Facetime calls from iPhone to iMac or MacBook is that it is a little complex. Cellular calls can be transferred easily, but Facetime calls cause some issues. It is because Facetime requires video calling, and it can be difficult to get both devices on the same page. Make sure you have the latest Mac or macOS, and then try these steps.
Step 1. Start your Facetime Call from your iPhone. You will see different options on the active phone call screen.
Step 2. Here, click on Audio. It will show different options as well, including speaker, iPhone, and the device you have allowed to transfer the call to.
Step 3. Choose the option of iMac or MacBook from the Audio, and it will transfer your active call to the MacBook or iMac.

Step 4. The user will need to click on the Video option to enable the camera of a MacBook or iMac. It will then turn the call into a video call like Facetime.

Part 3. How to Transfer Facetime Call from iPhone to iPad
If you want to transfer a Facetime call from iPhone to an iPad, then it is easier and less complex than transferring a call from iPhone to MacBook. It requires only a few steps, and your Facetime call will be transferred from iPhone to iPad.
Step 1. To transfer the call, you need to dial or receive the call first.
Step 2. Once the user is on-call, you will see six different options on the screen. Here, tap on Audio. Currently, it will be on the iPhone.
Step 3. You need to select the iPad from this Audio option to transfer the call to the iPad. Check again if both of your devices are connected to the internet or not.

Step 4. The screen of your iPad should turn into an active call screen, and it will notify the user, From your iPhone.
Step 5. However, if you want to listen to the call on your iPhone again, you can turn on Audio and select iPhone.
Bonus: Ultimate Tool to Backup and Export Data in iOS Devices
There are not many tools available in the market that offer iOS backup and export. But in this part of the article, we will talk about a third-party tool that can not only create a backup of data but can also export data to iOS devices. You can easily secure your files and create a reliable backup that can be restored when needed.
iMyFone iTransor Lite is a professional tool that allows the user to export data from iPhone without any issue. It can export data from iPhone, iTunes, and iCloud as well. It supports more than 18 types of data and makes it easy to create a backup for iOS users. To create a backup using iMyFone iTransor Lite, you can follow these steps:


Step 1.Download and install iMyFone iTransor Lite on your Mac. Open the tool. Here, you will see many options, click on Acquire Backup from Device & iCloud and then choose Backup Device.

Step 2.Then connect your iPhone or iOS to the computer, and make sure it is detected. The user gets to the device what backup he wants, selective backup or full backup. Choose from the right side of the tool.
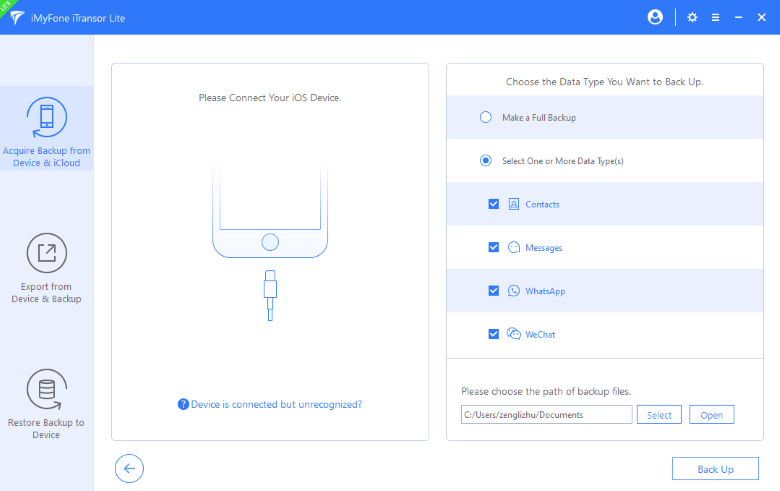
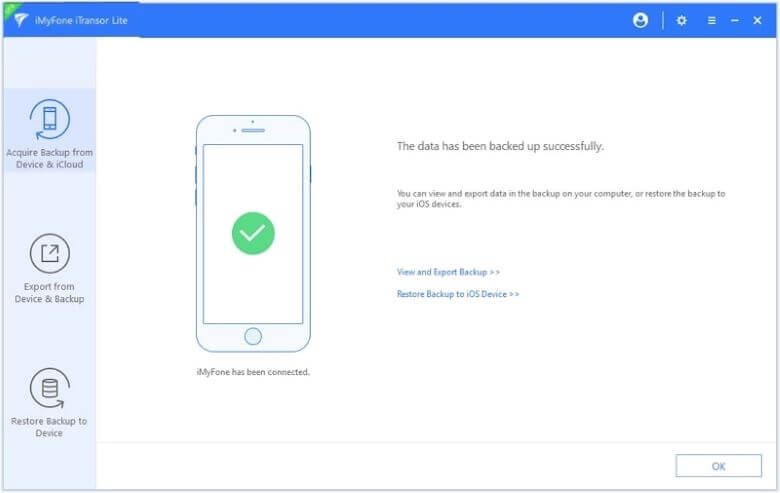
Step 3.After selecting the type of backup, click on Backup. The tool will then start backing up the data. You will see a notification when it is done.
Conclusion
It is a great feature of the iPhone that it allows transferring Facetime calls to Mac and iPad. Both have almost similar steps. The user can follow the requirements and steps to transfer the call to either device. However, if you want to create a backup of your iOS device to secure your data, then iMyFone iTransor Lite is the best tool for you. It can back up the data with just a few clicks. iMyFone iTransor Lite allows the users to make a full backup as well as a selective backup. The user can download this tool for free and try to create a backup and then export it as well.