


 June 3, 2025

Part 1: How to backup gallery photos and videos from Android to PC/Mac
The best way to backup gallery photos and videos from Android to PC/Mac is none other than D-Back for Android. It is a massive tool that stimulates recovering all the data from the Android device.
Various aspects make the D-Back for Android stand out. From offering a simple user interface to allowing you to retrieve data from all Android devices, iMyFone D-Back has undoubtedly come a long way
1,000,000+ Downloads
Key Features:
- iMyFone D-Back has a straightforward interface, and anyone can use this tool even if they haven’t backed up any data before
- It supports multiple formats (CSV, HTML, and VCF) to save the data
- Transferring/Recovering Speed is super fast
- Can work with more than 6000 android sets
- 100% safe to use
How to export/backup gallery photos/videos from Android phone to PC/Mac using D-Back for Android
Step 1: Launch the D-Back for Android before connecting the Android to the PC. If you want to export videos or photos from Google Drive, select'' Recover Data from Google Drive''.
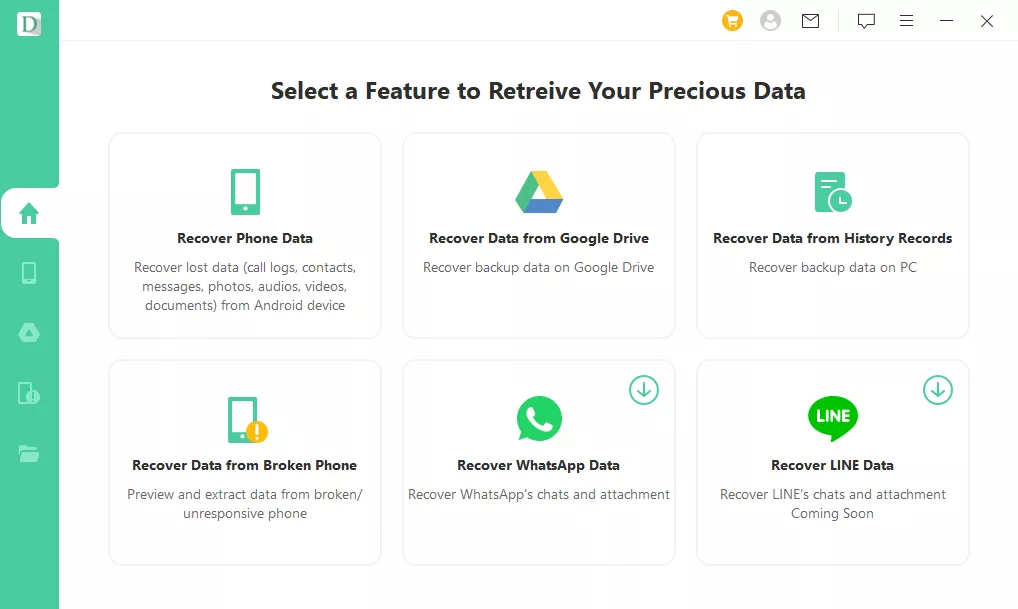
Step 2: Scan for your files and select the files you'd want to export to your PC.

Step 3: Click on the ''Recover'' icon to export the Android data to the PC.

Part 2: How to backup photos on Android to SD Card?
If you want to export the Android data to your PC, you can copy the data to an SD card. After moving the data to the SD card, you can then connect the SD card to the PC to transfer the Android data to the computer. Since Android devices don't support normal SD cards, you'll need to look for a microSD card.
Follow the guide below to back up photos on Android to an SD card.
Step 1:To begin with, you'll need to insert the SD card after turning off the Android device. You can place the microSD card in the card slot.
Step 2: After inserting the SD card into your Android device, start the Android device. Next, launch the '' Files'' app. Navigate to the Files app and choose the "Images'' icon under Categories.

Step 3: Press and hold the images you want to transfer to your SD card. Next, choose '' Move to'' after clicking on the ellipsis icon. Now, the move to the SD card icon pops up, and all you need to do is tap on the ''Continue'' option.
Step 4: Select ''Allow'' if a message asks you to grant permission.
Step 5: After transferring the Android photos to the PC, you'll need to turn off the Android device. Next, take the SD card from the Android device and connect it to the PC. Now, you can share SD card photos to a PC via a card reader.

Part 3: FAQs about exporting gallery photos/videos from Android phone to PC/Mac
3.1 Is it safe to use NAS to backup your Android phone?
You can't use the NAS as your alone backup solution. Since NAS devices are vulnerable to threats, including device failure, physical damage, and fire, opting for this method might be risky. So, using the NAS to back up the Android phone isn't a safer option.
3.2 What is the best way to automatically backup all android photos to NAS
The best way to automatically backup all Android photos to NAS is to use the File Station app.
Here's how to do it.
Step 1: Login to NAS and launch the File Station app on your NAS
Step 2: Select the Moments icon after hitting the Home and Drive icons. Next, select Create a new folder after hitting the Create option.
3.3 Automatic backup of android phones to NAS when on home WiFi
Backing Android devices to NAS automatically when on home WiFi is pretty simple. All you need to do is install an application like Acronis Mobile on your Android or iOS device.
Next, install the same app on the NAS and make sure that NAS and mobile devices are connected to the same WiFi network. You can automatically back up the Android data to NAS by only following simple steps.
Conclusion
We are wrapping this article up but not before introducing efficient ways to help you know how to export/backup gallery photos/videos from Android photos to PC/Mac. You can transfer the Android data to an SD card for moving the data to a PC later, but this method might be time-consuming. Thus, opting for D-Back for Android is the most reliable option. It enables you to back up your Android data on a PC with a few clicks.