


 March 29, 2023
During disk cleanup, some unnecessary files are deleted to free up some space in the storage. But unfortunately, important files also get deleted in this cleanup deliberately or accidentally. For the recovery of such files, there are different methods. We will discuss how to recover deleted files after hard disk cleanup using a command prompt and a third-party data recovery tool.

Part 1. What is Disk Cleanup?
1.1. What is Disk Cleanup?
Disk cleanup is a complete process that frees up space in the hard drive and improves the performance of the PC. It deletes downloads and all the temporary files that are not needed on the computer. Moreover, sometimes it also deletes system files. There are different types of Disk cleanup, including basic file deletion and automated file deletion. It also includes another process that optimizes the PC if you are running short on storage.
Disk cleanup is a very effective process that significantly improves the system's performance. People think that it is an ordinary process, but those who have tried it would let you know that it is very powerful and reduces the lagging and crashing of your system.
1.2. Is It Safe to Do a Disk Cleanup?
It is safe to perform or do a disk cleanup on your computer, but it is not safe to delete everything. The disk cleanup scans your computer and shows you a list of files. But not all these files can be deleted because they can hurt your computer. Deleting some important files can make your computer stuck on the blue screen.
When you are performing a disk cleanup, make sure not to delete Windows ESD Installation Files. It has a large file size, and you may think of deleting it but do not, as it will set your PC to a factory reset condition. However, you can delete all the temporary files and browser caches that pile up to a large size. Also, delete the thumbnails of images and recycle bin to clear up some good amount of space on your computer.
Part 2. How to Recover Files after Disk Cleanup
2.1. Recover Accidentally Deleted Files after Disk Cleanup Using Advanced Tool
If you have lost important files or data after disk cleanup and want to recover the files, then it can be done easily. iMyFone D-Back is a data recovery tool that allows the user to recover any type of file in any situation. If you accidentally deleted or lost a file in a partition, it can recover easily.
iMyFone D-Back supports numerous file types and has an excellent success rate of data recovery. It allows the user to preview the data before recovering it.
Here are the steps that one can follow to recover the files after disk cleanup using iMyFone D-Back.
Step 1: Download and install iMyFone D-Back. Open the tool and select the drive from which you want to recover the files.
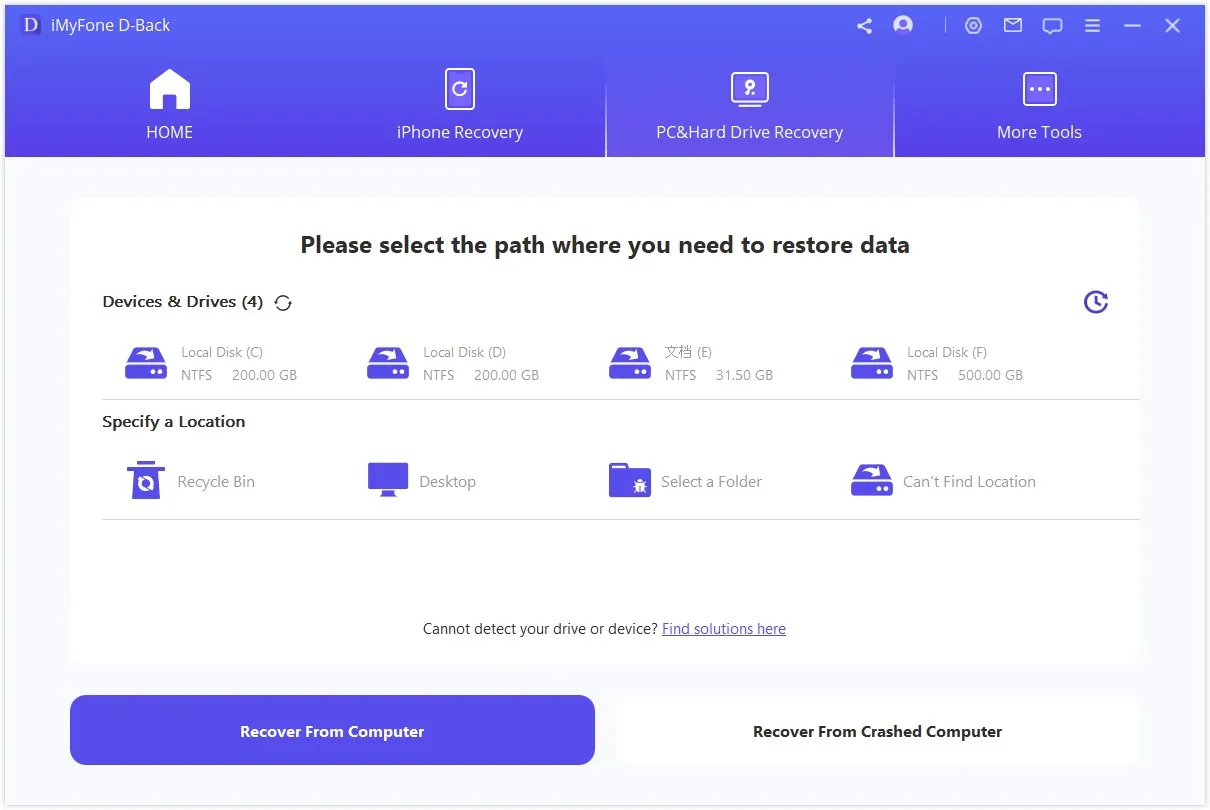
Step 2: The tool will then perform a deep scan and result in a list of recoverable files. The user can also halt the scan if the desired file is already found.
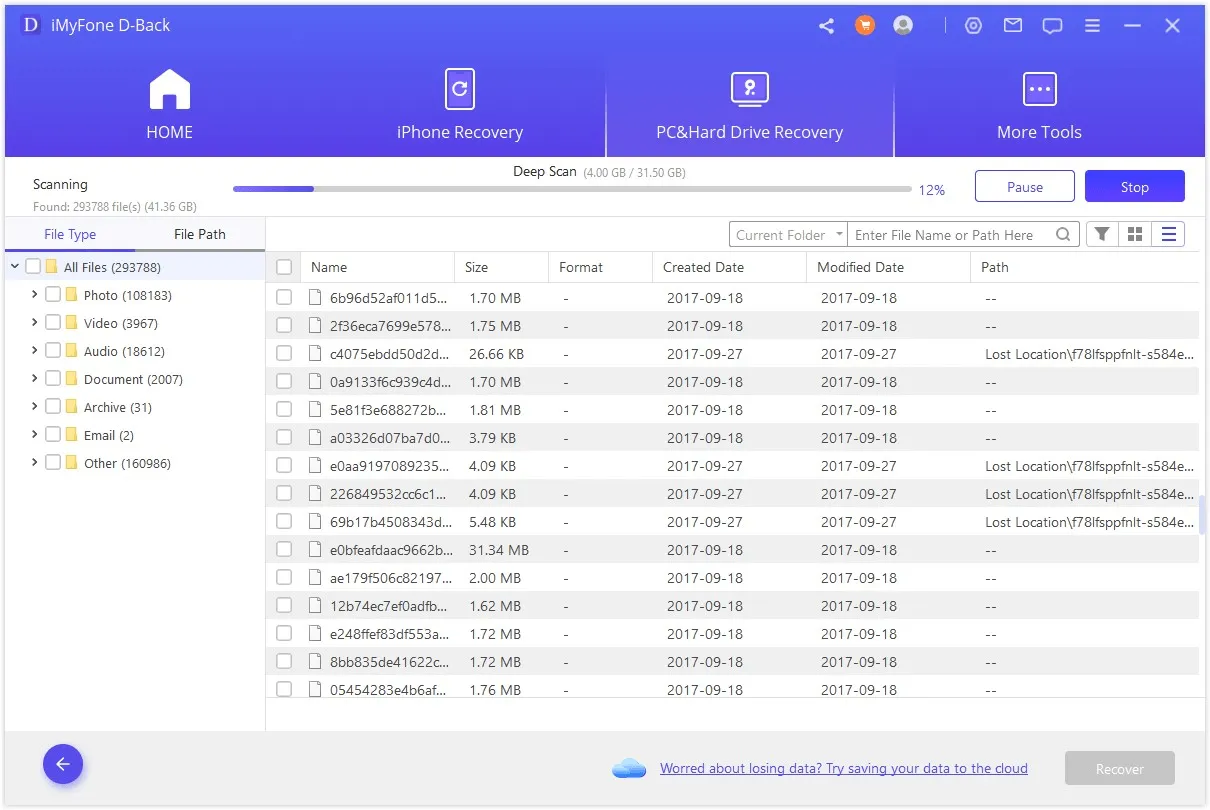
Step 3: The last step is to preview the file and finalize which files need to be recovered. Choose the files that you want to recover and click on “Recover” to restore them to your computer. Make sure to select such a path where you remember that you restored a file.

2.2. Recover Deleted Data after Disk Cleanup Using Command Prompt
If anyone doesn’t want to use a third-party data recovery tool, then a command prompt is the solution. Command prompt allows the user to recover deleted data after disk cleanup. After executing a few commands, the CMD prompt will scan the drive you select and recover the data.
Here are the steps that one can follow to recover deleted files using the command prompt.
Step 1: Open the Run program by pressing “Windows + R” and type CMD in it. Hit Enter. It will open the command prompt.
Step 2: Type “chkdsk ‘drive letter’ /f” in the command prompt and press enter. Then press ‘Y’, which means yes, to confirm your command.

Step 3: Type the drive letter again so the command line can return to the start.
Step 4: Type “drive letter : \attrib -h -r -s /s /d *.*” and it will recover all the deleted files in the storage that you selected. Or you can also type “attrib -r -s drive:\
Bonus Tip: How to Make Disk Cleanup
There are different ways in which the user can enter commands in the command prompt and clean the disk. However, we will discuss a few common commands that are used for disk cleanup in Windows. Command Prompt is required for disk cleanup.
Cleanmgr
Step 1: Press “Windows + R” and type cmd in it to open CMD Prompt.
Step 2: Type “cleanmgr” in the CMD prompt. It will pop up a disk selection menu. Choose the drive that you want to clean.

Step 3: When you choose the disk, it will show you different files and junks that you can remove with disk cleanup. Choose the files and click on “OK” to clean your disk space.

Cleanmgr/sageset
This is another command that users can use to clean up the disk. The syntax of this command is “c:\Windows\system32 > cleanmgr/ sageset: 1”. This command will not ask for the disk selection, but instead, it will take you straight to select the category of different junk files to delete and clean up your disk.
Conclusion
Disk cleanup is a good and healthy practice for Windows users. It helps the user to get rid of junk files and caches, including temporary files, to free up space in the system storage. Moreover, it also improves the performance of the system and reduces any kind of lag that appears.
Sometimes disk cleanup deletes important files, but we have different ways to recover deleted files. The first method is to use an effective third-party data recovery tool-iMyFone D-Back. It is the easiest way to get your data back, requiring only a few steps. But if anyone doesn’t want to use this tool, then CMD Prompt can also help the user recover the deleted files.