Making iPhone groups is a fantastic way to message multiple people at once. Perhaps you and your friends want to use an iMessage group chat to talk to each other instead of sending individual messages, or maybe you’re looking to create a group chat for you and your family. There are endless reasons for iMessage groups and they really are one of the most useful iOS features.
Do you know how to create contact groups on iPhone? If not, here’s everything you need to know.
Part 1: Backup Your Device First
The first thing you must do is take a backup of your iPhone. It can’t be stressed enough how important it is. If your iPhone crashes when you are making a group chat, then you could lose a lot of your personal data.
Fortunately, this isn’t a common occurrence, but it isn’t worth taking the risk.
Part 2: How to Create Contact Groups on iPhone
After you’ve backed up your iPhone you can move on and use one of the following solutions to create contact groups on iPhone.
1 Create Contact Groups on iPhone via iCloud
A popular way of creating iPhone groups is to use iCloud. This can make it easier to create large groups as a computer is used to do so.
- On your iPhone, go to “Apple ID > iCloud” (or for older iOS, just tap “iCloud” from the main Settings menu) and enable the “Contacts” slider.
- Go to a computer and open the iCloud website. Sign in to your iCloud account and click “Contacts”.
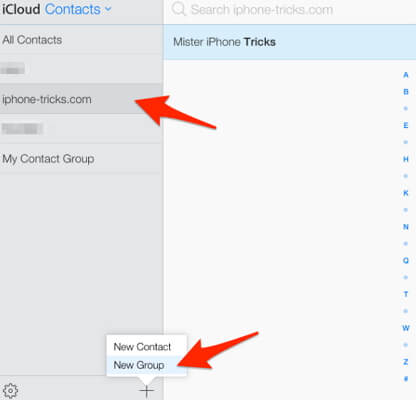
- At the bottom-left, click the + icon and select “New Group”. Name it accordingly, click “All Contacts”, and drag the contacts you want into the group chat.
2 Make A Contact Group Using App
You can also use a third-party app to create a group on your iPhone.
- Open the “App Store” and search for “Groups”.
- Download the app and open it.
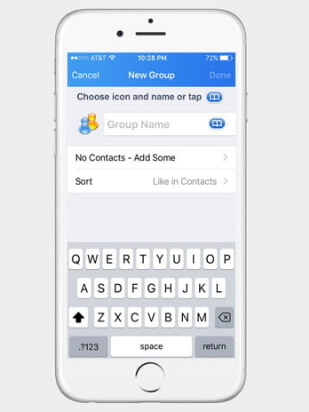
- Simply tap “Add New Group” followed by “No Contacts - Add Some” to add people.
Part 3: Tips You Should Know about Contact Group on iPhone
Now that you know how to create contact groups on iPhone, here are a few handy tips for managing your group chats.
1 Delete Groups on iPhone
Are you in too many group chats? Here’s how you can delete them and remove yourself from them.
- On a computer, go to the iCloud website and sign in using your iCloud account.
- Choose “Contacts” and click on the group chat that you want to delete.
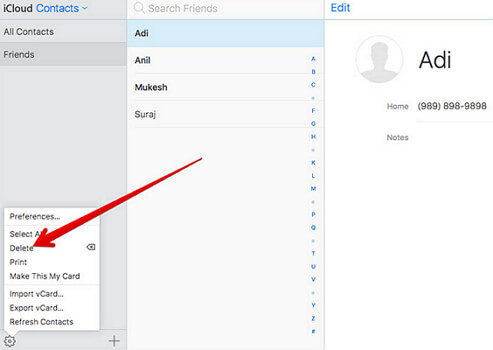
- Click the settings icon at the bottom-right and click “Delete”. You need to click “Delete” again to confirm.
2 Email Your Contact Group on iPhone
If for whatever reason you aren’t able to message in your group chat, you can email them. As long as you are signed into your email account on the Mail app then you will be able to do this on your iPhone.
- Launch the “Mail” app and tap the compose icon at the bottom-right.
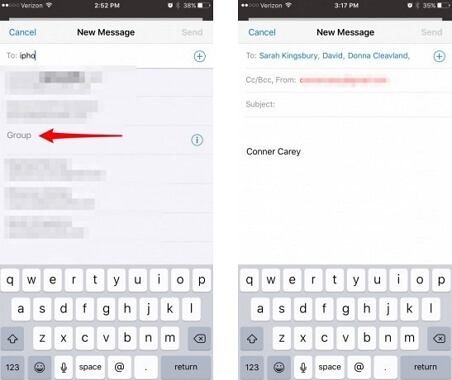
- In the “To” entry, start typing the name of the group.
- After a few letters, the group should be shown. Tap on it then enter your message and hit “Send”.
3 Send A Message to Your Contact Group
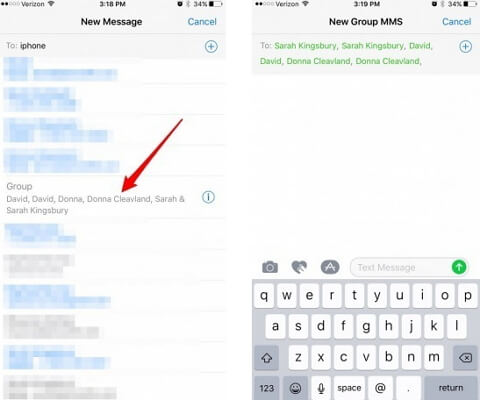
Finally, you can message the contact group through your messaging app. This is the most convenient way to go about messaging and managing your iPhone group chats and therefore it is ideal.
- Open the iMessage app and tap on the compose icon at the top-right.
- Next, tap the “To” space and enter the group name that you want to message.
- Enter your text message and press the send button. This chat will be accessible for future messages unless you delete it.
4 Manage Contacts on Your iPhone
Group chats often contain important messages and because of this, it’s important to back up your iMessage data every so often. Given how important backing up is, it’s our recommendation that you use iMyFone D-Port.
- Selectively back up your iOS device’s data.
- Download and view backups from your iCloud account.
- Back up only data from WhatsApp, WeChat, or iMessage.
- Export files from a backup or your device.
This gives you a quick view into what iMyFone D-Port has to offer. There’s also the added benefit of being able to do a full backup or restore, meaning that it can be used as an iTunes alternative.
To Conclude
There you have it - everything you need to know about how to create contact groups on iPhone. Make sure you follow both of the solutions on how to create your group chats and decide which is the most effective. If you have any other tips or tricks for iPhone users that can be used for group chats, feel free to comment below.


 January 2, 2025