


 March 29, 2023
Aren’t your deleted files in the recycle bin? Don’t worry; there are various solutions to solve this problem and recover your lost data. In this article, we will share how you can recover deleted files not in the recycle bin. We will share different methods and their step-by-step procedure.
Let’s start!

Table of Content [Hide]
- Part 1. Recover Deleted Files Not in Recycle Bin with Best Efficient Way

- Part 2. Recover Deleted Folder Not Showing in Recycle Bin Using Built-in Windows/Mac Tools
- Bonus Tip: Why are My Deleted Files Not in the Recycle Bin and How to Solve This Problem?
- Part 4: FAQs About Deleted Files Not in Recycle Bin

Part 1. Recover Deleted Files Not in Recycle Bin with Best Efficient Way
The best way to recover deleted files not in the recycle bin is a data recovery tool. These tools recover your data without any hassle, and the success rate is commendable.
iMyFone D-Back is a user-friendly data recovery tool for Mac and Windows. It makes the data recovery process easier than ever. You only need to follow a few simple steps, and your data will be recovered without any hassle.
The software works in all scenarios, including files not in the recycle bin, accidental deletion, computer crash, lost partition, virus attack, RAW partition, etc. It can recover more than 1000 formats and repair the corrupted videos and photos during recovery. The files are recovered at a very fast pace, and they are organized according to their format.
Step 1: Launch iMyFone D-Back after installation. On the main screen, you will see the Recycle Bin. Click on Recycle Bin or drive from where you want to recover the data.
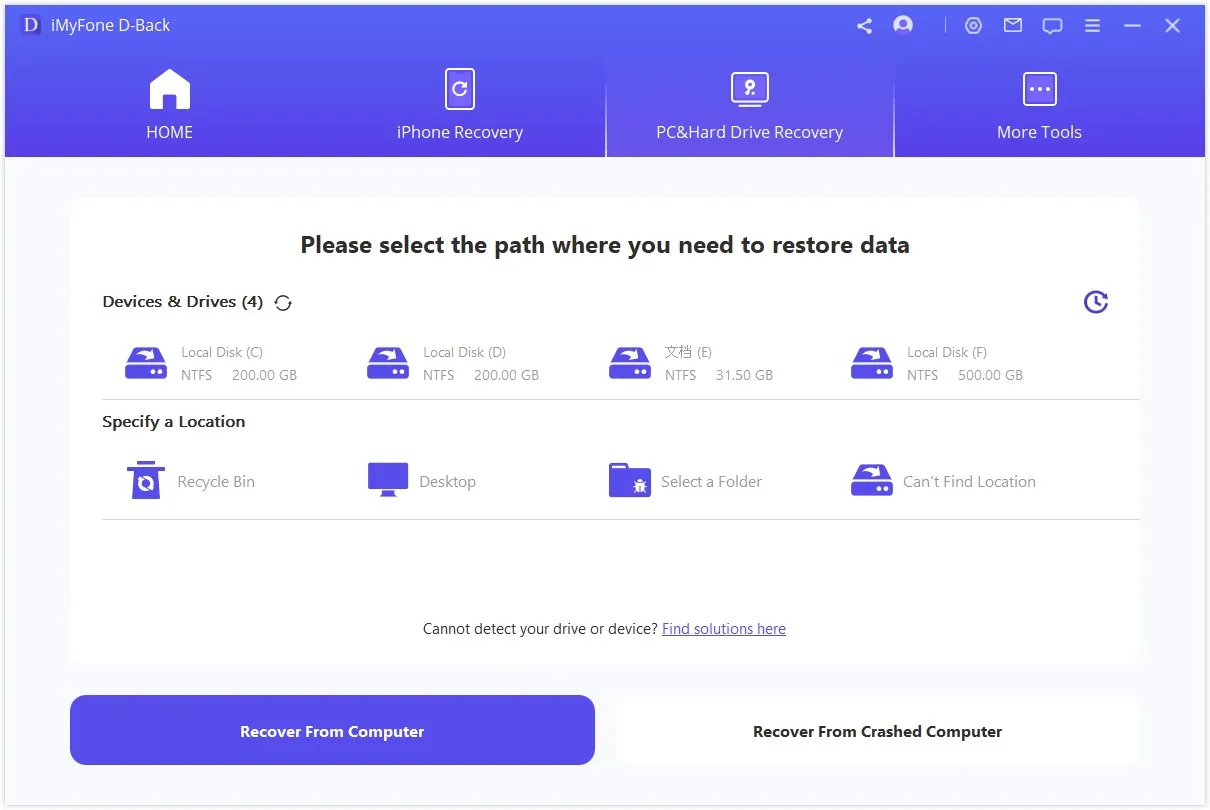
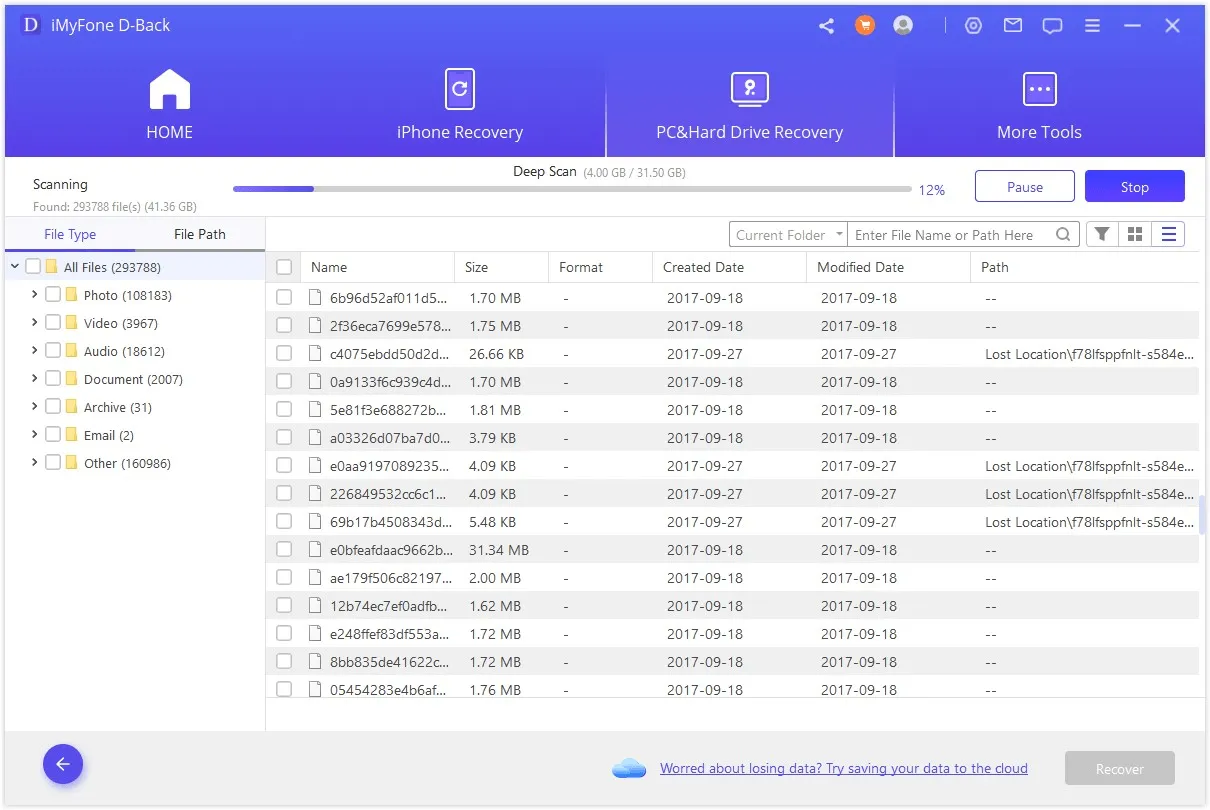
Step 2: The software will start the recovery. It will do a quick scan first and then a deep scan. If you have found your files, you can stop the scan. After scanning, you can also search the files or folders in the search bar.
Step 3: Select the files for recovery. Click on the Recover button. Select the path, and your files will be recovered quickly.

Part 2. Recover Deleted Folder Not Showing in Recycle Bin Using Built-in Windows/Mac Tools
There are more ways to recover deleted folders not showing in the recycle bin. But these methods have various conditions, or they might not work in every case. You can still try these and see whether they work in your case or not.
Restore Previous Version (Windows)
Windows has a built-in feature of restoring the previous version of the drive or folder. Even if you have deleted the folder from the drive or the main folder, you can go back to the previous version and restore all your data. It is pretty simple, and you don’t need third-party software.
But this method only works if it was enabled before losing the folder. Thus, if this feature is not enabled, you cannot recover the folder.
Step 1: Windows has a built-in feature of restoring the previous version of the drive or folder. Even if you have deleted the folder from the drive or the main folder, you can go back to the previous version and restore all your data. It is pretty simple, and you don’t need third-party software.
Step 2: Windows will open a new window. You will see the available previous versions of the drive or folder. You can select any version and then click on the Restore button. Keep in mind that it will make changes to the original drive and folder. But if you want to restore the previous version separately, click on the down arrow of the restore button and click on Restore To. Select the location where you want to save the old version.
Windows File Recovery (For Windows)
Windows has its own recovery tool called Windows File Recovery. It is the official tool for Windows users. But it is not present on the system by default. You need to install it from the Microsoft Store.
It is a command line, and you need to enter a command to recover the files or folders you have lost.
Step 1: Install the tool from the Microsoft Store. Then lunch it You will see a command line. The interface is quite similar to the command prompt because it basically works on it.
Step 2: You need to use the following command, but a few changes are required before using the command.
winfr Src: Dest: /mode of recovery /switches
Replace “Src” with the drive letter of the source and “Dest” with the drive letter of the destination. Write “regular” or “extensive” in the mode of recovery. The last option of “switches” is for entering the file type or file path. You can also leave it if you want to recover the whole drive.

Step 3: Enter the command and hit Enter. Press “y”, and the process will start; wait for its completion. After that, check the destination for your lost folder.
Using Time Machine (Mac)
Mac also has a built-in feature of backing up the data. It is called Time Machine, and it creates a backup of all your data in the backup drive, which is usually an external drive. You can restore the data from the backup drive and recover all your deleted files that are not in the recycle bin.
This method will only work if you have ever created a backup using Time Machine.
Step 1: First, connect your Time Machine backup drive to your computer. Then, you are ready to go.
Step 2: On the top, click on the menu button. Click on Enter Time Machine.
Step 3: You will have the Time Machine window. The backup will have all your files. You can look for the files using the search bar. Then, select the files you want to recover and click on the Restore button. It will restore all the deleted files and folders you have selected.
Why are My Deleted Files Not in the Recycle Bin and How to Solve This Problem?
There are various reasons your files do not end up landing in the recycle bin.
- If the files are deleted from the external drive, USB flash drive, or any other external storage, the files will not go to the recycle bin.
- If you press the Delete button along with the Shift button, the files will be deleted directly without landing in the recycle bin.
- If you used CMD (command prompt) to delete the files, there is no way you can find them in the recycle bin.
- The computer was shut down unexpectedly while performing delete.
- The recycle bin was emptied accidentally.
- If the size of the file is larger than the default size of the recycle bin, it will not land there.
- The option of moving the deleted files to the recycle bin was disabled.
The solutions to these problems are different. First, make sure the option of moving the deleted files to the bin is checked. You can do it in the Recycle Bin properties. You will also see the default size of the recycle bin in the properties, and it is better to keep that value in mind.
While deleting the file, make sure you do not press the shift key. Secondly, avoid deleting the files using CMD.
When the computer is performing delete, do not turn it off. If the power is interrupted, you will lose your file.
Another thing that you should keep in mind is that the files from the external storage never land in the recycle bin. So, be careful while deleting files.
FAQs about Deleted Files Not in Recycle Bin
01 How to Recover Deleted PDF/Word/Excel/Photos Not in The Recycle Bin?
Another thing that you should keep in mind is that the files from the external storage never land in the recycle bin. So, be careful while deleting files.
02 How to Recover Deleted Files from Flash Drives Not in the Recycle Bin?
The files deleted from the flash drive do not land in the recycle bin. For this, you need a data recovery tool, such as iMyFone D-Back. The tool will recover the deleted files and repair photos and videos if they are corrupted.
03 Where Do Deleted Documents Go If Not in the Recycle Bin?
If the documents do not go to the recycle bin, they are either permanently deleted from the drive, or their space is available for the upcoming files, but they are still there.
04 Can You Recover Accidentally Deleted OneDrive Files not in the Recycle Bin?
When you delete files from OneDrive, they land in the OneDrive’s recycle bin (not the recycle bin on your computer). The files on OneDrive recycle bin stay for 30 days, and you can recover them without any hassle.
Conclusion
If your deleted files are not in the recycle bin, you can still recover them. Sometimes, the files do not land in the recycle bin due to the reasons we have discussed. But you can recover those files and folders using various methods. You can try the methods we have mentioned in Part 2, but the best method is using a data recovery tool, iMyFone D-Back. The software will recover all your files in a few simple steps, and the success rate is commendable.