


Fixing the Undoing Changes Made to Your Computer Loop & How Long You Should Wait
Category: iOS Data Recovery

5 mins read
“I got stuck on the screen saying "undoing changes made to your computer" and had no idea how long it would take. The waiting felt endless, and I was desperate to find out how to fix the "undoing changes made to your computer" error once and for all. ”
It's a common issue that can leave you feeling anxious and helpless, especially when you don't know why it's happening or how long it will take. This message usually appears after a Windows update fails to install correctly, forcing your system to roll back.
But don't panic. This comprehensive guide will explain exactly what this message means, clarify how long you should wait, and provide 7 proven methods to fix the "undoing changes made to your computer" error permanently.

In this article:
- Part 1. First Things First: How Long Should "Undoing Changes" Take?
- Part 2. What Causes the "Undoing Changes Made to Your Computer" Error?
- Part 3. 7 Proven Methods to Fix "Undoing Changes Made to Your Computer"
- Method 1: Run Startup Repair (The Automatic Fix)
- Method 2: Enter Safe Mode to Bypass the Error
- Method 3: Uninstall Recent Updates from Safe Mode
- Method 4: Use System Restore to Go Back in Time
- Method 5: Repair System Files with SFC and DISM
- Method 6: Before You Reset - Secure Your Data with iMyFone D-Back
- Method 7: The Last Resort - Reset Your PC
- Part 4. How to Prevent the "Undoing Changes" Error in the Future
First Things First: How Long Should "Undoing Changes" Take?
This is often the first question users ask when faced with this screen. In most normal cases, the "Undoing changes made to your computer" process should take anywhere from 30 minutes to an hour. During this time, your Windows operating system is simply rolling back the changes it tried to apply. It's a built-in safety mechanism, allowing your computer to return to a stable state.
However, if your computer has been stuck on this screen for more than 2-3 hours, it's a clear sign that the process is not completing as it should. At this point, your system is likely in a loop, and you'll need to intervene manually to resolve the issue.
What Causes the "Undoing Changes Made to Your Computer" Error?
The "Undoing changes made to your computer" message is Windows' way of telling you that a recent update or system modification couldn't be completed successfully. Instead of crashing, your system attempts to revert to its previous, working configuration. Several common reasons can trigger this error:
- Corrupted Update Files: The downloaded update files themselves might be damaged or incomplete.
- Software Conflicts:Other installed programs, especially antivirus software, might interfere with the update process.
- Driver Issues: Incompatible or outdated device drivers can prevent updates from applying correctly.
- Insufficient Disk Space: Windows updates require a certain amount of free space. If your drive is too full, the update might fail.
- Sudden Power Loss: If your computer loses power during an update installation, the process can be interrupted and trigger the rollback.
7 Proven Methods to Fix "Undoing Changes Made to Your Computer"
When your PC is stuck, patience is key, but so is knowing when to act. Here are step-by-step solutions, ordered from simplest to most comprehensive, to get your computer working again.
01 Method 1: Run Startup Repair (The Automatic Fix)
This is the easiest first step, letting Windows try to fix itself, you can easily complete this.
1. Force Shutdown: If your computer is stuck, hold down the power button for about 10 seconds until it turns off.
2. Repeat: Power on your computer, and once you see the manufacturer's logo, immediately force it off again. Repeat this 2-3 times. This should trigger the Windows Automatic Repair environment.
3. Access Options: Once in the "Automatic Repair" screen, select "Advanced options."
4. Run Startup Repair: Choose Troubleshoot > Advanced options > Startup Repair. Let Windows diagnose and attempt to fix any startup issues.

02 Method 2: Enter Safe Mode to Bypass the Error
Safe Mode starts Windows with only essential drivers and services, often bypassing the problem that causes the update loop.
1. Access Advanced Options: 4. If you can enter Safe Mode, you can then try other troubleshooting steps from within Windows.
2. Startup Settings: Select Startup Settings > Restart.
3. Choose Safe Mode: After your PC restarts, you'll see a list of options. Press F5 to select " Enable Safe Mode with Networking."
4. If you can enter Safe Mode, you can then try other troubleshooting steps from within Windows.

03 Method 3: Uninstall Recent Updates from Safe Mode
If the issue started right after an update, removing that specific update can often resolve the problem.
1. Enter Safe Mode: Follow Method 2 to boot your PC into Safe Mode.
2. Access Control Panel: Right-click the Start button, then select Run and type appwiz.cpl and press Enter
3. View Installed Updates: In the Programs and Features window, click "View installed updates" on the left panel.
4. Uninstall Update: Sort by "Installed On" date. Right-click the most recent Windows update (or the one you suspect is causing the issue) and select "Uninstall." Restart your PC after it's done.
Note
Before uninstalling, confirm which update caused the issue by checking the install date. Removing important security updates may risk your system, so reinstall them after fixing the problem. If unsure, create a system restore point first.
04 Method 4: Use System Restore to Go Back in Time
System Restore is a powerful tool that can revert your system files, installed applications, Windows Registry, and system settings back to a previous point in time. Your personal files (documents, photos) will not be affected.
1. Access Advanced Options:Get to the "Advanced options" menu (from Method 1).
2. System Restore: Select System Restore.
3. Follow Prompts: Choose a restore point created before the problem started and follow the on-screen instructions to complete the restoration.

05 Method 5: Repair System Files with SFC and DISM
Corrupted system files are a frequent cause of update failures. The System File Checker (SFC) and Deployment Image Servicing and Management (DISM) tools can repair them.
1. Open Command Prompt: From the "Advanced options" menu (Method 1), select Command Prompt.
2. Run SFC Scan: Type sfc /scannow and press Enter. This will scan for and attempt to repair corrupted system files. Wait for the process to complete.
3. Run DISM Commands: If SFC finds issues it can't fix, or if the problem persists, run these DISM commands one by one, pressing Enter after each:
DISM /Online /Cleanup-Image /CheckHealth
DISM /Online /Cleanup-Image /ScanHealth
DISM /Online /Cleanup-Image /RestoreHealth
4. Restart your computer after all commands have finished.
06 Method 6: Before You Reset - Secure Your Data with iMyFone D-Back
When other methods fail, a PC reset might be your last option. However, even with the "Keep my files" option, there's always a slight risk of data loss, or you might need to erase everything. Before taking such a drastic step, safeguarding your important data is critical.
This is where a reliable tool like iMyFone D-Back becomes invaluable. It allows you to create a bootable USB drive, access your computer's hard drive even when Windows won't start, and safely recover all your important files to an external drive before you attempt a full system reset. This ensures that no precious photos, documents, or personal data are lost forever.

Create Bootable Media: On a working computer, install D-Back and create a bootable recovery USB drive or CD/DVD.
Boot from Media: Insert the bootable media into your stuck PC and configure your BIOS/UEFI to boot from it.
Recover Data: Follow iMyFone D-Back's on-screen instructions to scan your hard drive and recover your files to a separate external storage device.
07Method 7: The Last Resort - Reset Your PC
If all else fails, resetting your PC can resolve deep-seated system issues.
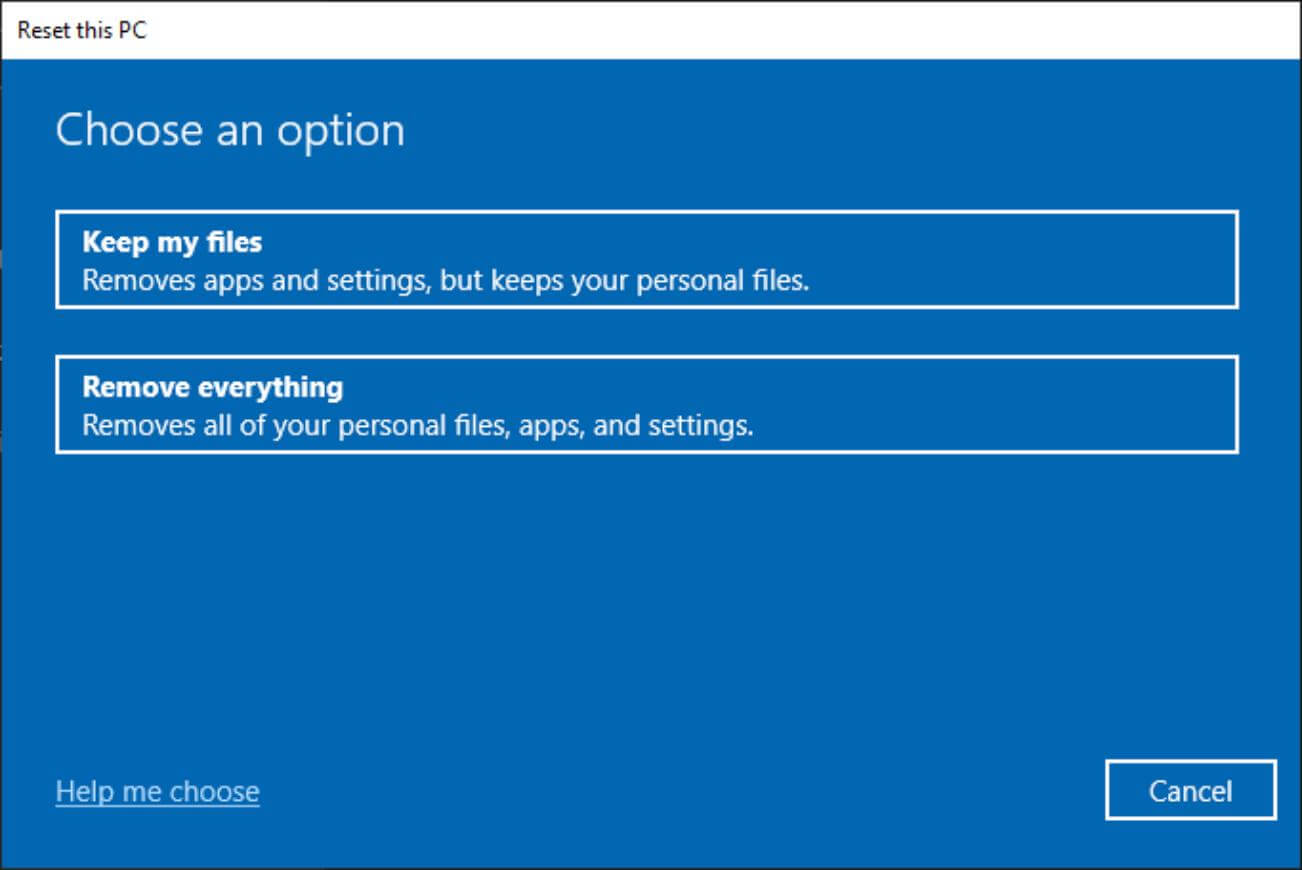
Access Reset Option: From the "Advanced options" menu (Method 1), select Reset this PC.
Choose Option:
"Keep my files": This removes apps and settings but keeps your personal files.
"Remove everything": This completely wipes your drive and reinstalls Windows. Use this if you plan to give away or sell your PC, or if you want a completely fresh start.
Follow the on-screen prompts to complete the reset. Remember, if you didn't back up your data with AnyRecover, choosing "Remove everything" will lead to permanent data loss.
How to Prevent the "Undoing Changes" Error in the Future
Preventing this frustrating error is better than fixing it. Here are some proactive tips:
- Keep Drivers Updated: Ensure your device drivers are always up-to-date, preferably by downloading them directly from the manufacturer's website.
- Ensure Sufficient Disk Space: Always maintain at least 20-30 GB of free space on your system drive for updates and temporary files.
- Create System Restore Points: Regularly create manual system restore points before installing major updates or software.
- Allow Updates to Complete: Never force a shutdown while Windows is actively installing updates.
- Run Disk Cleanup: Periodically use the built-in Disk Cleanup tool to remove temporary files and old update files.
Conclusion
Encountering " Undoing changes made to your computer" can be an alarming experience, but it's a fixable one. By understanding how long to wait and systematically applying the 7 proven methods to fix "undoing changes made to your computer", you can resolve this common Windows issue.
Remember, patience is key, and taking preventative measures can save you from future headaches. If all else fails, a reliable data recovery tool like iMyFone D-Back can ensure your precious files remain safe before a full system reset.
(Click to rate this post)
Generally rated 4.9 (256 participated)
Rated successfully!
You have already rated this article, please do not repeat scoring!