


 January 12, 2023
Did you get a really important audio message and you want to save it on your iPhone but don't know how? Well, there is no clear-cut way to save an audio message on your iPhone although there are ways to around this problem and save the message for future reference.
In this article, we are going to be looking are two ways you can save audio messages on your iPhone so you can have a backup for them. One of these two ways is more effective and less time-consuming than the other.

Method 1. Save the Audio Message as a Voice Memo on iPhone
While this method may not be as effective or simple, it is one of the ways to have a backup of and save the audio message. Here is what you need to do.
- When you receive the recording in iMessages, press and hold on to it and a few options including Copy, Save and others will appear.
- Select "Save" and the audio will now be saved as a voice memo in the Voice Memos app. From the Voice Memos app, you can tap on the Share button to send it as an email attachment.
You can also get it on iTunes when you connect the device to the computer and sync with iTunes.
Note: This method is not practical on iOS 12. If you are using iOS 12, it does not show in the Voice Memos app.

Method 2. Selectively Save Audio Message Sent/Received with iPhone to PC
If the above method seems tedious and time-consuming, you need to use a simpler, more efficient way to save audio messages that you receive to a safer place - your computer. That method comes in the form of a third-party data exporter tool known as iMyFone D-Back (iPhone data extractor). It is easy to use and allows you to selectively save the audio messages if you only want part of them. Some of its features that make it the ideal tool for the job include the following.
Key Features:
- 3 ways to find and locate audios messages: directly from iPhone, from iTunes backup, and from iCloud backup.
- It can save audio messages individually or in batches. The only 1-click operation needed.
- Even deleted audio messages on your iPhone can be accessed and saved.
- Fully supports iOS 14/13/12/11/10/9/8/7 and iPhone XS (Max)/XR/11.
- It also offers a free trial version and 30-day money-back guarantee for all users.
Steps to Save Audio Message Sent/Received with iPhone via iMyFone D-Back
Step 1: Install the program on the computer and then launch it. From the main window, select "Recover from iOS Device".
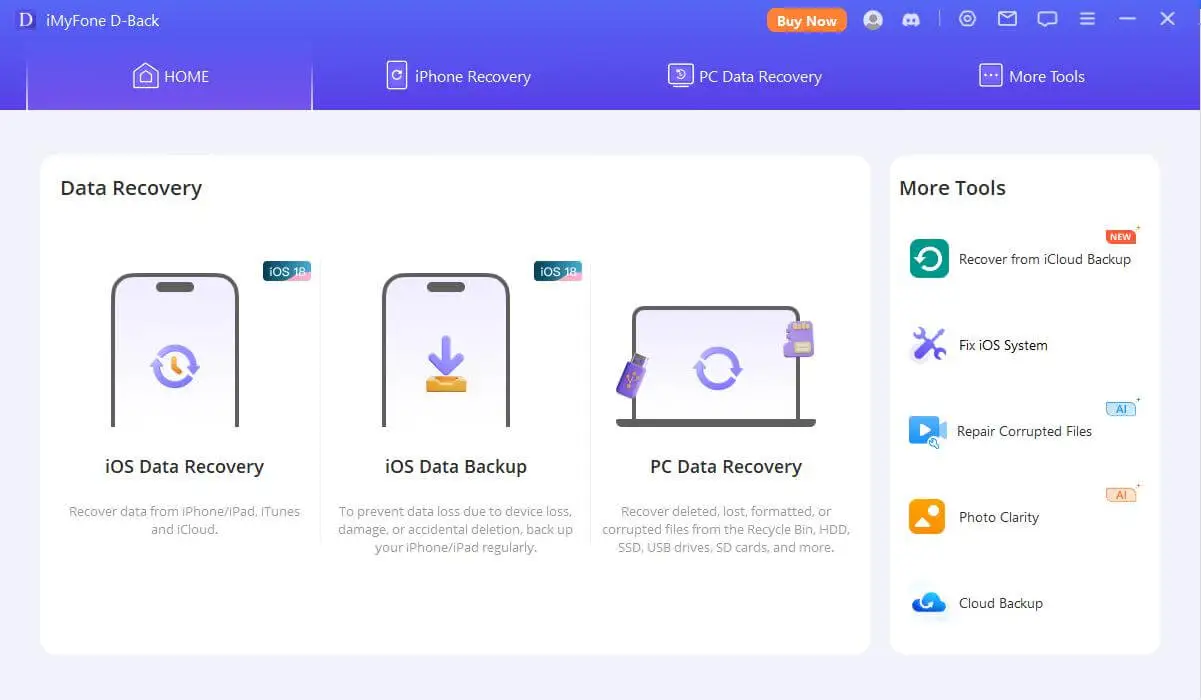
Step 2: In the next window, select "Message" since the audios were received as a message attachment. You will then be requested to connect your iPhone to the computer using a USB cable. Once the device has been detected, click on "Next" and the iMyFone program will start to scan the data on the iPhone.

Step 3: Once the scan is complete, all of the messages on the device along with their attachments will be displayed in the next window for your preview. If you cannot find the audio files in Message or Message Attachment tab, you can go to Voice Memo. After that, click "Recover" to save them to the computer.

Try Free Trial version of iMyFone D-Back iPhone data extractor now to access your audio messages on iPhone data and save to PC/Mac easily!
Many users have already left their positive feedbacks on this program and here is one of them:

Bonus Tip: How to Permanently Save Your Audio Message
If you are using iOS 8 or above version, lucky for you because a new option is offered in "Messages" to select the expire time.
Simply follow below steps to save your audio message permanently.
- Step 1: Go to"Settings" and find "Messages" App on your iPhone;
- Step 2: Tap on "Expire" under "Audio Messages" section;
- Step 3: Click "Never" to avoid your audio message from being deleted.
PS: You can also try to email some important audio messages by going to "info" and then "Attachments" under a specific message conversation.
