iPhones come with a lot of fascinating features that enhance user experience. However, sometimes functionality can offer a bad experience. The perfect example is when you can't transfer mov files from iPhone to PC. It must be a simple process like exporting any other video but needs some extra steps. So, here we have the best solution for you to try.
Table of Content [Hide]
- Part 1. Export MOV Files from iPhone to PC in Real Quick

- Part 2. Sync MOV Files from iPhone to PC with iCloud
- Part 3. Transfer MOV Files from iPhone to Computer Using Photos App
- Part 4. Export MOV Videos from iPhone to Computer via File Explorer
- Part 5. Transfer MOV Files from iPhone to Computer with AutoPlay
Part 1. Export MOV Files from iPhone to PC in Real Quick
If you do not have iTunes on your PC or want to learn how to transfer MOV files from iPhone without iTunes, then iTransor Lite is the tool you need to use. It can help you export any MOV file from your PC in no time with the following benefits:
- Compatibility with every iOS version, including 7.0 and above.
- Easily exports more than 18 types of data.
- Export from the device as well as iCloud backup.
So, whenever you need to quickly export mov files from your iPhone, know that iTransor Lite from iMyFone is your best solution.
Part 2. Sync MOV Files from iPhone to PC with iCloud
The next solution you can try is also pretty easy, and sometimes it provides a seamless experience for you. However, it may not be the best choice for those who do not have a good internet connection plan.
Additionally, having enough iCloud storage space is necessary to upload all the MOV files you want to transfer. If you meet all of these requirements, you can easily sync your MOV files across your iPhone and PC using the following steps:
- Sign in on iCloud on your iPhone and PC using the same account.
- Connect both devices with a good internet connection, and turn on the iCloud Photos feature on both devices.
- When setting up iCloud Photos on a PC, you only need to go to Options and click Done. There will be no special settings that you have to configure manually.
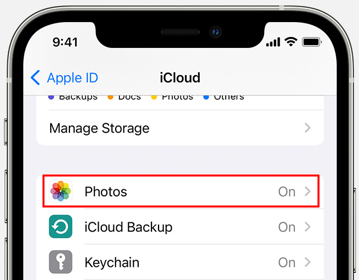
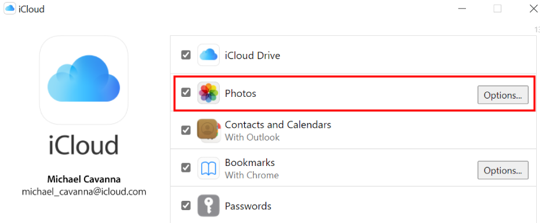
After you set everything up right and have a stable Wi-Fi connection, your mov files will automatically sync from your iPhone to your PC without doing anything extra. So, whenever you need any mov file on your PC, you can download it directly from iCloud Photos.
Part 3. Transfer MOV Files from iPhone to Computer Using Photos App
Windows 10 and 8 come with a lot of new features and apps. One of those apps is Photos App. This application is usually used for viewing pictures present in the offline storage of the PC. However, the interesting thing is that this app makes it extremely easy to import MOV files from your iPhone to your PC. Below are all the steps that you need to follow for using the Photos App on Windows PC to transfer MOV files from iPhone to PC:
- Unlock your iPhone and connect it to your computer using a USB cable. Trust your PC on your iPhone if the iPhone prompt appears.
- Now start the Photos application on your PC. On the right top, you will see the Import button. Click on it and select From a connected device.
- Now the Photos app will search for your iPhone.
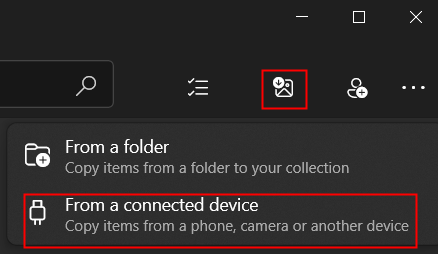
After the complete search, all the images and videos will appear on the Photos app. You can select those MOV files that you want to transfer. After selecting, you can import the selected MOV files with a button.
Part 4. Export MOV Videos from iPhone to Computer via File Explorer
The good old method of transferring images and videos from iPhone to PC is using the file explorer. There is no setup process for this method to work. However, if you are looking to transfer more than a few mov files, it will be a hectic process for you because of how it works. Below are the steps that you will need to follow to export mov videos from your iPhone to your computer using File Explorer:
- Unlock your iPhone and connect it with your PC using the data cable. If the trust prompt appears, hit trust.
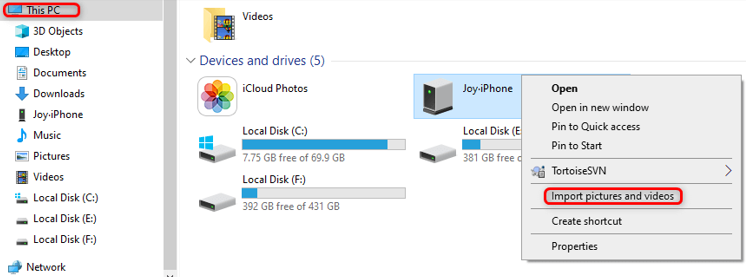
- Open the file explorer on your PC, and you will see iPhone appearing in the Drives section.
- Right-click on iPhone and then select import pictures and videos.
- Now you will have to select all the MOV files you want to export from the iPhone. The process can get extremely long if there are a lot of mov files and they are spread across different sections.
- Just select, copy, and then paste the required MOV file into some folder on your PC storage.
After you copy the MOV files, you can disconnect your iPhone, and you will be done with the transfer.
Part 5. Transfer MOV Files from iPhone to Computer with AutoPlay
If you are using Windows 7, then using AutoPlay is the best choice for you. It is a built-in feature that allows you to transfer different picture and video formats to your PC from your smartphone. Using the AutoPlay feature is pretty simple and below are all the steps that you may need to follow:
- Get the USB data cable and connect your smartphone to your computer after unlocking it.
- Wait for a moment, and the AutoPlay window popup will appear. Select the Import pictures and Videos option.
- Now create a folder in the location where you want to transfer those MOV files.
- Select the MOV files that you want to import from your iPhone to your PC.
- Click on Import, and the process will start on your PC.
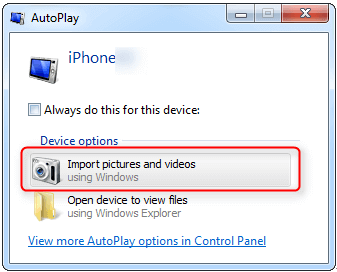
Using the AutoPlay feature on Windows 7 makes things extremely easy. However, this method may not work for every user because not everyone uses a PC with Windows 7 these days. After all, it is extremely slow now and lacks features compared to the latest Windows. So, if you are still using a PC with Windows 7, this AutoPlay method of transferring MOV files might be just right for you.
Conclusion
Now that you know 5 different ways on how do I transfer mov files from iPhone to computer, you can easily select the best one. For the best experience, you can choose a solution that requires the least setup while offering the best experience and shortest transfer time. This way, whenever you need to transfer a mov file from your iPhone, you can do that effortlessly without going through different solutions.


 July 5, 2022

