


 August 3, 2022
If you have a lot of photos in the Photo Vault app, you might wonder how to transfer them while switching your iPhone. There are different ways to transfer photos from Photo Vault to another iPhone, and here we will be exploring the top three. So, you can see which is best for you and go for the most efficient one.

Table of Content [Hide]

Part 1. What Is Photo Vault App?
Photo Vault is an application that you can install on your smartphone, and it will keep all your images private. Not only will it keep those images hidden from other applications, but it will also have a locking option.

It means you can hide and lock your private images when you store them away from all other applications on your phone. Giving your smartphone to others to see something will be carefree with this application because people will not be able to check the images you have kept private.
You can use this amazingly secure application to hide images taken from your camera and other images you got on your phone from other sources.
Part 2. How to Transfer Photo Vault to Another iPhone without Data Loss
The most efficient way to transfer your Photo Vault to another iPhone without losing data is through iTransor. It is a software from iMyFone that goes on your PC and lets you deal with backup and restore like no other tool. It packs many more features than just those available on iTunes, so you get a more in-depth data transfer.


Features:
- Back up everything on your iPhone, including SMS and WhatsApp messages.
- Selectively backup or restore backups from iTunes and iCloud.
- Works with more than 18 types of data on iOS device.
- Choose the iCloud backup file that contains the missing notes.
- Compatible with iOS 15 and above.
Steps to Transfer Photo Vault from iPhone to iPhone:
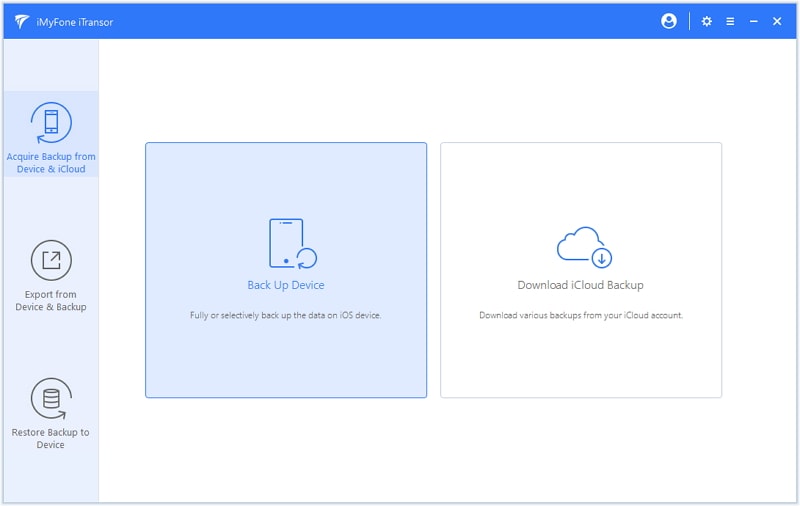
Step 1.Install and start iTransor on your PC and select Acquire Backup from Device & iCloud option. There select Back Up Device.
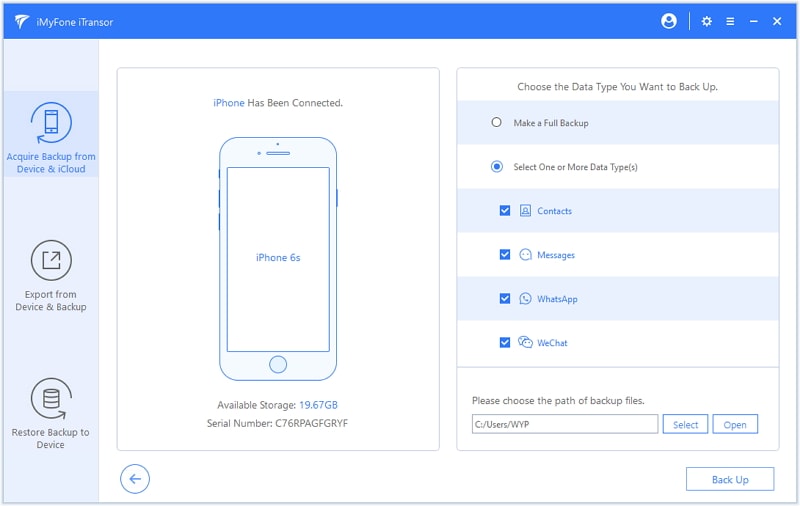
Step 2.Connect your old iPhone with a USB wire and proceed with the backup by selecting all the data that you want to include in the backup.
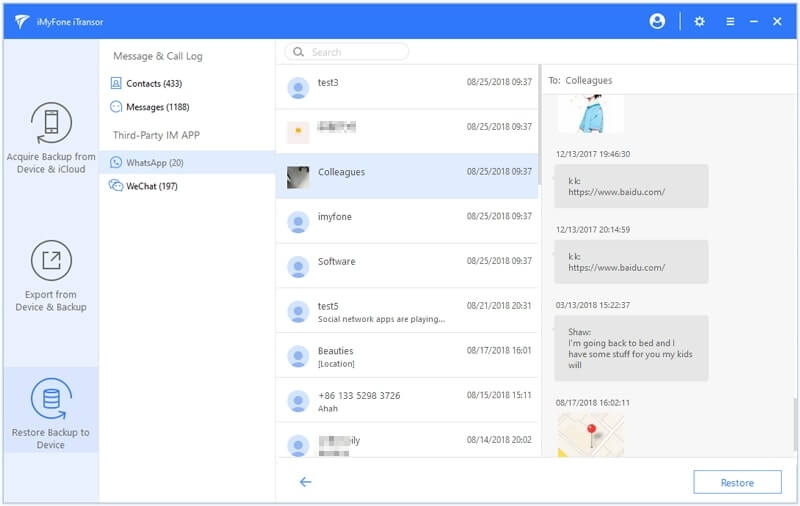
Step 3.After the backup is complete, you can connect to the other iPhone and select Restore Backup to Device.

Step 4.Preview and select the data that you want to export and proceed with the process.
Part 3. How to Transfer Photos from Photo Vault to iPhone with iCloud
Another method that you can use involves iCloud usage. As iCloud gives 5GB of free storage, you can use it if you have that available. Otherwise, you will need to purchase additional iCloud space, and then you can proceed with the process. This method may not be very quick, but it is a good choice if you do not have a PC to go for a wired transfer.
The following steps explain how to transfer Photo Vault from iPhone to iPhone:
- On your previous iPhone, you will need to enable cloud vault from the settings.
- The app will start a cloud backup that you will need to complete.
- Start your new iPhone, and on the Apps & Data screen, select iCloud backup.
- Let the iCloud backup restore your new iPhone, and you will get the Photo Vault app and your backup data on the new iPhone.

Depending on the number of photos in the Photo Vault app and your internet connection speed, this process can take a few minutes or hours to complete. So, if you opt for this method, be patient, so you do not accidentally lose any important data.
Part 4. How to Transfer Photo Vault from iPhone to iPhone with iTunes
iTunes backup is also a good option for transferring your photos from Photo Vault on one iPhone to another. However, for this method, it is necessary to have a computer and the latest iTunes version installed on your PC. This method is also quick because of the wired transfer of data from your PC to your iPhone.
For using iTunes to transfer Photo Vault across your iPhones, you need to follow these steps:
- Connect your old iPhone to iTunes running on your PC.
- Restrict all other devices from syncing automatically in the devices section present under the Preferences tabte.
- Now go to Summary and then create a backup of your iPhone. Let the backup complete before you disconnect your iPhone.
- Now connect your new iPhone and go to the device, then summarize.
- Click on Restore Backup and select your backup with Photo Vault data in the backup part. Let this restore process complete, and you will have all that data on your new iPhone.


With this process, you can create and restore the backup with iTunes, and it will transfer your Photo Vault data from one iPhone to the other iPhone easily.
Conclusion
Whether you want to hide some images from your family members or friends, Photo Vault is an amazing application from which you can benefit. It is very useful until you switch from one iPhone to another. In that case, you never want to lose your images, and you can use one of the methods we discussed here.