


[2023 Updated] A Step-by-Step Guide on How to Take Screenshots on Mac
Category: PC Data Recovery

5 mins read
Are you a Mac user who wants to capture a moment on your screen? Whether it's to save an important image, document a bug, or share information with others, knowing how to take a screenshot on your Mac/MacBook is a valuable skill. In this article, we will explore different methods and techniques for taking screenshots on Mac, and a reliable screenshot recovery solution. So, let's dive in and learn how to take a screenshot on Mac!

In this article:

Part 1: How to Take A Screenshot on Mac?
1 Mac screenshot shortcuts
Command + Shift + 3: To take a screenshot of your entire screen on Mac, press Command + Shift + 3. A preview of the screenshot will appear in the corner for editing. Turn the feature on/off using the screenshot menu.
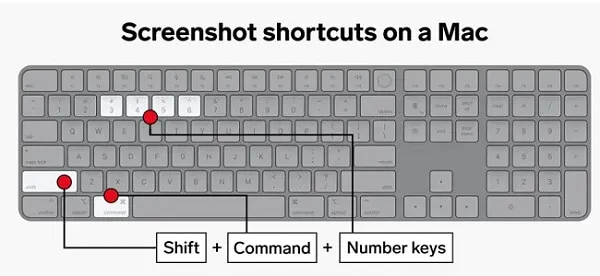
Command + Shift + 4: To capture a specific section or window on Mac, press Command + Shift + 4 and drag the crosshair to select the area. Press spacebar to capture a window and hold spacebar to lock the size. Hold Shift to adjust the height and width of the box.

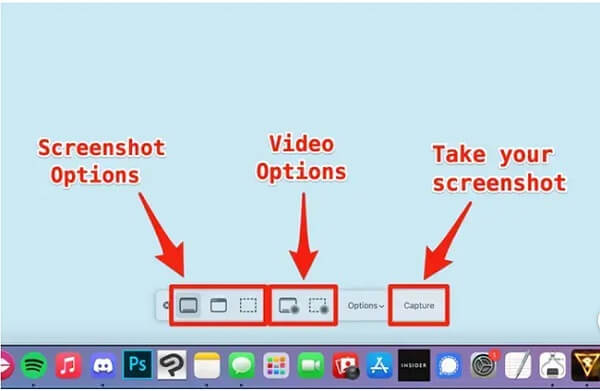
Command + Shift + 5: To use the Screenshot app on Mac, press Command + Shift + 5:. Choose a screenshot option from the icons on the left and click Capture to take the screenshot.
The Options menu allows customizations for saving and timing settings.
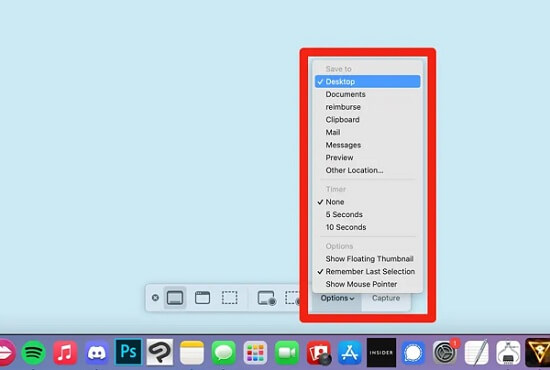
The Options menu includes the Show Floating Thumbnail option that displays a thumbnail after taking a screenshot. Click the thumbnail to edit the image, draw, crop, or share it through your Apple ID account.

2 Capture an image of the Touch Bar
If you have a Mac with the Touch Bar feature, you can capture a screenshot of it by pressing Command + Shift + 6. This is useful for sharing what's on your Touch Bar with others. However, not all Macs have this feature.
3 Apps for MacOS screenshots
Third-party apps for macOS screenshots offer additional features and capabilities beyond the native screenshot tools. These apps can include advanced editing options, easy annotation, simplified sharing to social media, and customizable screenshot management. Using a third-party app can enhance your ability to capture and manage screenshots on a Mac..
Part 2: How to Recover Deleted or Lost Screenshot on Mac?
As we discussed earlier, capturing screenshots on Mac is a useful feature for various purposes. However, sometimes you may accidentally delete or lose screenshots due to various reasons like accidental deletion, system crashes, or hardware failures. But don't worry, there are solutions available to recover those lost or deleted screenshots on your Mac. One such powerful tool is iMyFone D-Back.
iMyFone D-Back
Restore lost screenshot on Mac/MacBook with One Click.
iMyFone D-Back is a data recovery software for Mac that can help you recover deleted or lost screenshots on your Mac computer. It can retrieve lost data from various sources such as hard drives, memory cards, iPhones, iPads, and more. With its user-friendly interface, you can easily scan your device for lost data and preview the recoverable files before restoring them. IMyFone D-Back Hard Drive Recovery Expert supports various file formats, including photos, videos, documents, and more, making it a reliable solution for recovering your lost screenshots. iMyFone D-Back
![]()
How to Recover deleted or Lost Screenshot on Mac with iMyFone D-Back?
Step 1:Download and install iMyFone D-Back on your Mac computer.
Step 2:Launch the software and select a hard drive or Desktop, then click on it from the main interface.
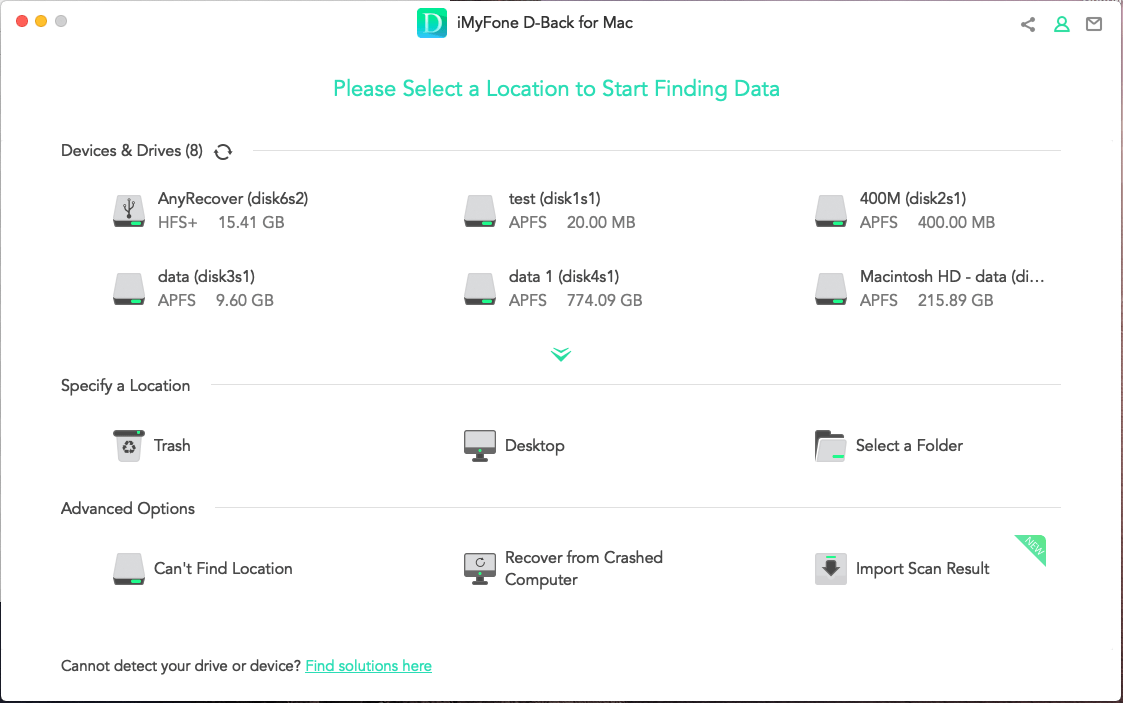
Step 3:Select the location where you lost or deleted the screenshots and click on the "Scan" button to start the scanning process.

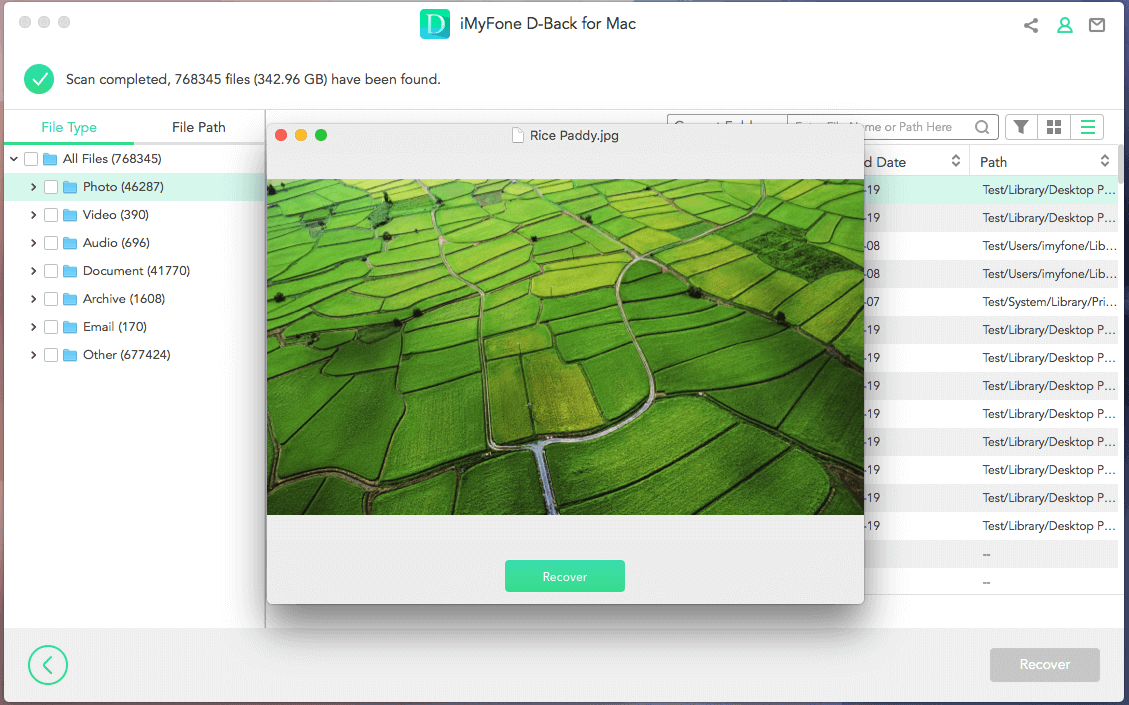
Step 4:Once the scan is complete, you will be able to preview the recoverable screenshots.
Step 5:Select the screenshots you want to recover and click on the "Recover" button to save them back to your Mac.
iMyFone D-Back is a powerful and user-friendly tool that can help you recover lost or deleted screenshots on Mac with ease. Its advanced scanning technology, compatibility with various file formats, and additional features make it a reliable choice for Mac users who need to recover valuable screenshots. Whether you accidentally deleted a screenshot or lost it due to a system crash, iMyFone D-Back can help you retrieve those precious screenshots and ensure that your important data is not lost forever.
Part 3: Why can't I take a screenshot on my Mac?
There are several reasons why you might not be able to take a screenshot on your Mac.
- First, if you're trying to take a screenshot of a protected window, such as a movie or a DVD player, the screenshot feature may be disabled.
- Second, if you don't have enough free space on your Mac's hard drive, you might not be able to take a screenshot. You should check your available storage space and free up some space if necessary.
- Third, if you're running an older version of macOS, the screenshot feature may not work properly. You should update your operating system to the latest version.
- Finally, there might be a problem with your keyboard, or a software issue that's preventing you from taking screenshots. In this case, you can try restarting your Mac or contacting Apple Support for assistance.
Part 4: FAQs about Taking A Screenshot on Mac
1 What is The Shortcut to Take A Screenshot on A Mac?
The shortcut to take a screenshot on a Mac is Command + Shift + 3. This captures the entire screen and saves it as a PNG file on the desktop. Alternatively, you can press Command + Shift + 4 to capture a specific area of the screen. Pressing the space bar after using Command + Shift + 4 allows you to take a screenshot of a specific window. The screenshots are saved in PNG format by default.
2 Where Do Screenshots Go On A Mac?
By default, screenshots on a Mac are saved on the desktop with the file name "Screen Shot [date] at [time].png". However, you can also choose to save them in other locations by using the Screenshot app or changing the default save location in the Terminal app.
3 Can You Take A Screenshot on Mac Without Saving?
No, it is not possible to take a screenshot on a Mac without saving it. Once you take a screenshot, it is automatically saved as a file on your Mac's hard drive or the desktop, depending on your settings. However, you can use the Preview app to quickly view and edit the screenshot before deciding whether to save or discard it.
Conclusion
Taking screenshots on a Macbook is a useful feature for capturing important information, sharing content with others, or troubleshooting issues, but sometimes the files can get lost or accidentally deleted. In such cases, iMyFone D-Back is a powerful data recovery tool that can help to recover lost or deleted screenshots on Mac. Its easy-to-use interface and advanced features make it a reliable and effective tool for data recovery.
(Click to rate this post)
Generally rated 4.7 (256 participated)
Rated successfully!
You have already rated this article, please do not repeat scoring!