


iMyFone AnyTo is a virtual location software that allows you to modify the GPS location on iOS and Android devices. It is available on four platforms: Windows, Mac, Android, and iOS.
The PC version of iMyFone AnyTo includes both Windows and Mac versions, both of which support changing the GPS location on iOS and Android devices.
Note
- You can check the App Version guide for each platform (support changing location on iOS/Android without using a PC):
- iOS App Version: https://www.imyfone.com/location-changer/ios-guide/
- Android App Version: https://www.imyfone.com/location-changer/android-app-guide/
Here is the user guide for the PC version.
- 0:12 Teleport Location with Teleport Mode
- 1:09 Simulate GPS Movement with Two-spot Mode
- 1:46 Simulate GPS Movement with Multi-spot Mode
Preparation
1 Launch & Activate AnyTo
Install and launch iMyFone AnyTo on your computer. Click Get Started.

2 Connect Diveces to PC
For iOS
First connection: Connect your iOS device to the computer via USB cable. Next, unlock the device. Tap Trust on your iPhone when it asks you to Trust This Computer. Enter the screen passcode again to complete this process.

Second connection: After successfully connecting the device via USB cable for the first time, you can directly choose to connect your iOS device to the computer under the same WiFi network next time.
Note
- The iOS device and the computer should be connected to the same WiFi.
- Always keep your iPhone/iPad/iPod touch screen on when connecting to WiFi. (how to keep iOS screen always on)

For Android
You can choose USB connection or Wifi connection.
- USB connection: Connect your Android device to the computer via a USB data cable to select the USB connection.
- WiFi connection: Make sure the Android device and computer are connected to the same WiFi network, then you can choose WiFi connection.

After choosing the device, please open USB debugging according to the guide in the program.
Ensure that the mobile phone's USB connection mode is Media Transfer Protocol (for LG mobile phones, it should be set as Picture Transfer Protocol). The steps to set USB connection mode maybe different among different phone brands. Generally speaking, you can fall out of the notification bar, and then find the USB connection mode option.

Then, tap 7 times Build Number (or "System versions") to open the developer mode, and then enter Developer option, find and open USB debugging (Some Android phones will also need to turn on "Allow to install apps via USB").

Confirm Allow USB debugging on your mobile phone.

If the popup is not shown on your device, click Show Again and you can see it.

Mode Selection
Once the device connects, you'll reach the mode selection screen. Choose the mode you need.
1 For iOS: Mode Selection
Universal Mode
Click the Universal mode entry to enter Universal mode. When the map starts loading, it means you have entered this mode!
Note
Universal mode works with most location-based apps, such as social apps and AR games. Social apps include Google Maps, Facebook, WhatsApp, etc.

Special Game Mode
Check the disclaimer and click the Special Game Mode entry to enter the game mode.
Note
Special Game mode supports most LBS games, such as Pokemon GO and Monster Hunter Now.

In this mode, you can choose Bluetooth or USB/WiFi connection method.
Method 1: Bluetooth connection
AnyTo's unique Bluetooth connection method is safer and allows you to change location directly in the official version of the game without installing the cracked version of the game. It is suitable for most LBS games. This connection method is applicable to the official version of Pokemon Go and MHN, and also supports game peripherals such as PG Plus.
Note
Do not disconnect the Bluetooth connection during use.
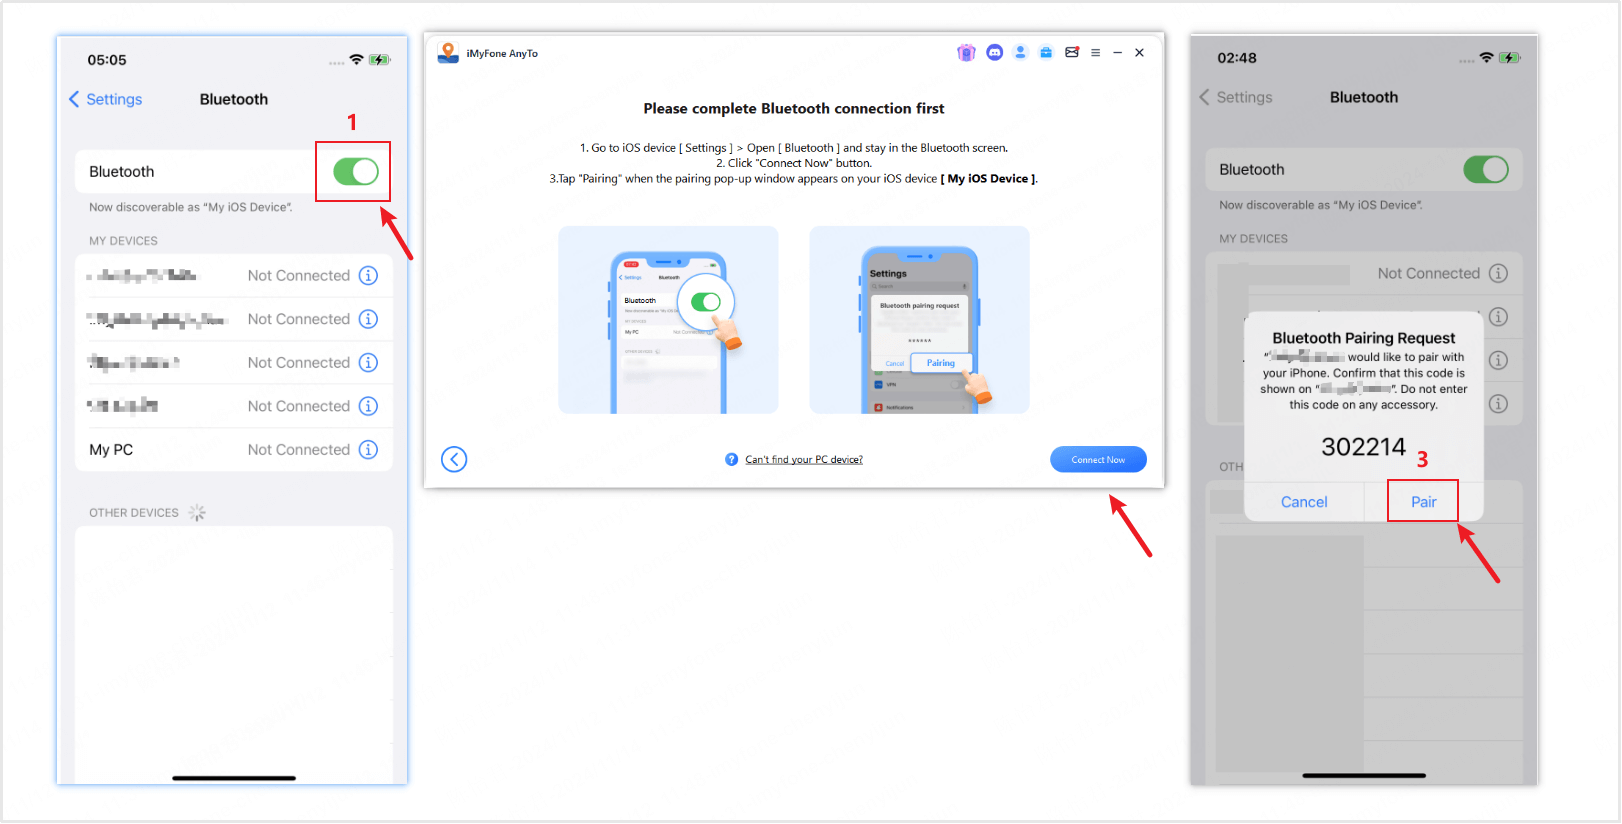
Click the Bluetooth option to begin the connection.

To modify the location at a long distance (>20km), you need to complete the DNS configuration process first.
Restart the device: Restart the device before Bluetooth connection to ensure the phone’s location is set to the real position. If you’re sure the phone’s location is already accurate, you can choose to skip this step.
DNS Configuration:
Scan the QR code with your iPhone to install iGoHotspot (use the latest version iGoHotSpot V1.2.0).
(First-time use) Open the app > [Me] > [Feedback] > Enter the keyword "iGo" and your email address, then submit.
Open the app > [Me] > [Toolbox] > Turn on the DNS switch.
Go to [Settings] > [General] > [VPN & Device Management] > [DNS] > Select iGoHotspot.
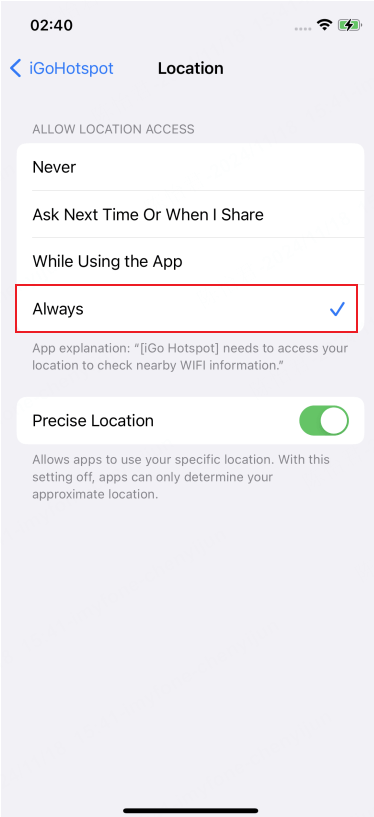
[Privacy & Security] > Turn off [Location Services] > Wait 3 seconds, then turn it back on.
[Location Services] > [iGoHotspot] > Set [Always] to allow location access.
Notes:
For subsequent use, simply open iGoHotspot, turn on the DNS switch, and refresh location services.
Make sure not to disconnect Bluetooth or DNS during use, and keep iGoHotspot running in the background.
Configuring DNS may affect Apple services, so you can turn off DNS after use.


How to Bluetooth pair an ios device with a computer?

Method 2: USB/WIFI connection
Choose USB or WiFi connection, which only supports customized PoGo games. After entering the map, follow the instructions to install the latest customized game version via PoGo Assistant for easier connection.
Make sure not to disconnect the USB or WiFi during use.
Click the USB/WiFi option to begin the connection.

Once the connection is successful, the map will begin loading. After it fully loads, you will see your location on the map.

2 For Android: Mode Selection
Universal Mode
Click the Universal mode entry to enter Universal mode. When the map starts loading, it means you have entered this mode!
Note
Universal Mode can work with most location-based apps, such as Google Map, Facebook, WhatsApp, etc.
Click Universal Mode entrance into the universal mode.

Wait a moment, the program will installed GPS Assistant on your mobile phones. (GPS Assistant will not appear on the mobile phone under Android 10. It doesn't need to manually start or operate at any time. Just keep on the phone.)
After the installation is completed, find Select mock location app in Developer Options, and select GPS Assistant.

Specific Game Mode
Note
This mode supports Pokémon Go/Monster Hunter Now and Dragon Quest Walk).
Check the disclaimer, select a specific game (the default is Pokémon Go), and click the Specific Game Mode selection option to enter the game mode.

Note
Gaming mode is not always available. When the server is being maintained or updated, users will see a text prompt, and unable to enter Gaming mode. In this case, please wait for a few minutes to several hours, to see it again.
Then the program will start the loading process and provide the progress bar. At this time, please wait for a moment. Some mobile phones need to confirm and give some permissions, so please keep a close watch on your mobile phone.
You're all set!
Once the loading is complete and you see the "You're All Set!" pop-up, it's recommended to adjust your location on the map before launching the game to avoid cooldown penalties.

Why can't I see any of the items in game when I encountered into a map?


Then you're good to go! For your convenience, please keep these permission Settings for next time.
Location Changing
1 Teleport Mode
Step 1. Select a Destination on the Map
Choose Teleport Mode at the upper right corner. Now you can zoom in and out the map by scrolling the mouse, and select a destination. Or you can enter the address/GPS coordinates at the upper left corner to search your destination, for example, Vancouver.

Step 2. Change GPS Location with 1-Click
As you select a destination, the sidebar will pop up. It shows you the destination information including the place name, coordinates, and the distance. Click Move.

Your location will be changed to Vancouver immediately. The all location-based applications onyour iPhone will be changed to Vancouver as well.
Note
If you want to restore your location, simply click the "Reset Location" button on the right sidebar to revert your device's location without restarting the device.
2 Jump Teleport Mode
Step 1. Choose Jump Teleport Mode
If you want to customize the jumping teleport route, you can select Jump Teleport Mode.

Step 2. Plan Your Jump Teleport Route
Select different jumping teleport spots one by one on the map that you want to pass by. Or enter address/GPS coordinates to set the spots.

After selecting a route, click Move to jump to the next point, and you can switch between the previous point and the next point at will.

Also, you can tick Auto-jump after cooldown before starting the route, and the checked route will automatically jump to the next point based on the cooldown timer until the route is completed.

3 Two-spot Mode
Step 1. Choose Two-spot Mode
If you want to customize a route, you can select Two-spot Mode at the upper right corner.

Step 2. Plan Two-spot Route
Pinpoint a location on the map as your destination. You can also choose a destination by entering the address or coordinate in the Search box. The chosen destination will be added in the sidebar. You can see the place names and the coordinates of your current location and the destination.
You can now set up the number of times for the virtual route to move back and forth between the two places. Drag the Speed bar to customize your moving speed.

4 Multi-spot Mode
Step 1. Choose Multi-spot Mode
If you want to plan a route with multiple spots, you can select Multi-spot Mode at the upper right corner.

Step 2. Plan Your Multi-spot Route
Select different spots one by one on the map that you want to pass by. Or enter address/GPS coordinates to set the spots.
Set the number of round trip times by entering the number. And set the speed by dragging the Speed bar. After the Times and Speed are set up, click Move to start the journey.

The default mode is Straight Line Mode, which means the route will be traveled in a straight line. You can also switch to Navigation Mode, where the route will be planned based on your set speed. For example, if you set walking speed, the route will be planned for walking.

5 GPS Joystick Mode
Step 1. Choose Joystick Mode
If you want to mock your GPS location with joystick, you can select Joystick Mode at the upper right corner. One click to Move automatically.

Step 2. Simulate 360° Directional Movement
Position Movement: Use the joystick's small ball to select a direction, then click the directional button to move one unit. Alternatively, use the W, A, S, D keys or the ↑, ↓, ←, → arrow keys to control GPS point movement.
Real-Time Movement: Click the Move button, the joystick center start button, or press the spacebar to begin real-time movement. Control the GPS point direction using the A, D keys or the ←, → arrow keys. Adjust movement speed by dragging the speed slider or using the + and - keys on the keyboard.

Game Assist Features
1 PoGo Map Atlas
In PoGo Tools, click on PoGo Atlas to view nearby Pokémon, Raids, G-Max, D-Max, Routes, PokéStops, Gyms and Field Research Quests on the map. Simply select the desired data and click the Go button to choose a location. You can then simulate movement to catch Pokémon, participate in Raids, G-Max, or D-Max battles, complete route tasks, collect items at PokéStops, battle in Gyms, or claim Quests.

Except for the route feature, all other functions support one-click generation of data routes. You can follow the generated route for gameplay actions and can pause the movement at any time.

By turning on the route feature, you can view the route data near your current location. Hovering over the route will display information, and you can click the "Move" button to view the route and simulate movement along it.

Both the game and the AnyTo program follow the same mission route. After completing the simulated journey, you can earn route badges and other in-game rewards. Along the way, you may encounter specific Pokémon.

2 PoGo Search
View nearby PoGo data
In PoGo Tools, click on PoGo Search to view nearby Pokémon, Raids, or Field Research Quests data. By heading to the coordinates, you can:
Catch Pokémon
Participate in Raids
Complete Field Research Quests to earn generous rewards.

Global search for specific Pokémon
To globally search for a specific Pokémon, enter the Pokémon's number or name (e.g., "Pikachu") in the Pokémon list to quickly locate the target Pokémon's data. Once found, click the Go button to head towards it and catch it.

Tip: Want to get the latest IV 100 Pokémon data? Turn on the IV100 switch, and it will push the location of IV 100 Pokémon in real-time!

Global search for specific Raids
Search for Raids by Raid level (such as "T1", "T3", "T5") in the Raids list to find corresponding Raid data. Once you find your target, click the Go button to head to the location and participate in the Raid.

Global search for specific Quests
In the Quests list, enter the name of a game item (such as "Super Potion") to search and locate the corresponding reward tasks. Click the Go button to head to the specified coordinates, where you can spin the PokéStop disc in the game to receive Field Research tasks. Open the telescope icon in the bottom-right corner of the game to view task details, and complete the tasks as required to earn rewards.

Tip: Click the question mark button on the interface to learn more search tips and methods!
3 Cooling Timer Function
In PoGo Tool, you can click to toggle the Cooldown Timer switch. Once you select the desired location and click to move, the timer will calculate the necessary wait time based on the distance to avoid cooldown. It is recommended not to perform any other actions before the countdown ends to avoid being soft-banned by the game.

When you select the desired location and click to move, the timer will calculate the corresponding cooling time according to the distance. It is recommended that you do not perform other actions until the countdown is over to avoid being under house arrest by the game.
Learn More: [Full Guide] Pokemon GO Cooldown Chart
In addition, the jump teleportation mode can choose to automatically jump after cooling down.
When you finish selecting points and choose to automatically jump after cooling down, click the move button, and it will automatically jump to the next point according to the cooling down countdown time until the route is completed.

When you don't want to use the cooldown timer, simply click the cooldown timer button again to turn it off.
4 Go Finder (Auto-Catch/Auto-Spin)
Select iOS Game Mode - USB/WiFi, connect your device and enter the map. You'll find the Go Finder feature in the right sidebar.
To enable Go Finder: Tap on "Go Finder" > Launch and log in to the latest version of the PoKo app > Tap the "Completed" button.
Note
The PC version of GO Finder only works with a WiFi or USB connection. If your last connection was Bluetooth, the system might default to that, preventing the GO Finder button from appearing. Please reconnect using WiFi or USB.

Connect the Virtual Go Plus:
PoKo APP > Settings > Connected Devices and Services > Accessory Devices , click [ Pokémon Go Plus ] to complete pairing.
Auto-catch will consume Poké Balls. You can choose the preferred type of ball to use first.
The available orders are:
1. Poké Ball > Great Ball > Ultra Ball
2. Great Ball > Poké Ball > Ultra Ball
3. Ultra Ball > Poké Ball > Great Ball
For example, if you select Poké Ball, balls will be used in the order: Poké Ball → Great Ball → Ultra Ball.

Note
1. Please ensure you're using PoGo Assistant version 3.0.0 or above and have installed the latest PoKo APP to access the Go Finder feature.
2. If connection fails, try closing the game app and retrying.
3. The virtual Go Plus can spin up to 2,400 PokéStops and catch up to 4,800 Pokémon per day.
4. Go to “Member Center > My Benefits” to purchase the Go Finder add-on service under your existing plan and enjoy the Virtual Go Plus experience.
Other Features
1 Collect Spots and Routes
Save Locations and Routes: In the left sidebar, you can click the star icon to save locations and routes. By turning on the "Favorites Map Collection" switch in the right sidebar, you can visually view all saved points on the map.

Favorites: By opening the Favorites, you can easily view your history, saved locations, and route information for quick reference. Click the Go button to quickly select a location or apply a route.

Note
To ensure your data is safely stored in the cloud and to prevent any loss, it is recommended to go to Membership Center > My Benefits List. Under the purchased benefits section, you can add cloud storage services to enjoy more secure data protection.
2 Realistic Mode
After checking the "Realistic Mode" option, your movement speed will randomly fluctuate within ±30% of the selected speed range, changing every 5 seconds to simulate a more realistic route movement experience.

3 Fluctuation Mode
After checking the "Fluctuation Mode" option, the virtual location point will randomly fluctuate within a few meters of the selected position, simulating a more natural movement trajectory.

4 Eye Tracking Mode
After checking the "Eye Tracking Mode" option, the map will real-time follow your movement, ensuring that your current location stays within the view, allowing you to always stay updated on your progress.
![]()
5 Circle Route
Under Multi-spot mode, when the starting point and the end point are nearby, the program will automatically ask if you need to create a circle route. Click Yes, it will align the starting point and the end point; click No, the end point will keep the exact coordinates.

6 Returns or Loops
When the number of simulated route repetitions is greater than 1, you can choose from the following two movement modes:
Loop around: The route will go from the starting point to the endpoint, then return to the starting point along the same path.
Example: If the original route is A→B→C, after selecting the round-trip mode, the route will become A→B→C→B→A. This is suitable for GPS virtual location scenarios that require simulating back-and-forth movement.
Repeate route: The route will go from the starting point to the endpoint, then restart from the starting point and repeat the same path.
Example: If the original route is A→B→C, after selecting the loop mode, the route will become A→B→C, A→B→C. This is suitable for GPS virtual location scenarios that require simulating a repeated path.

7 Multi-Device Control(Include iOS & Android)
Click the icon on the right panel to open the Device Management Panel, where you can easily manage connected devices. You can disconnect or stop controlling a device at any time. Click the "+" button in the top-right corner to add a new device. To ensure stable device connections, it is recommended not to connect more than 10 devices simultaneously.

Note
VIP Benefits: The PC version includes 5 available devices.
SVIP Benefits: The PC version includes 10 available devices.
If you need more devices: Please go to Membership Center > My Benefits List, and purchase additional devices under the purchased benefits section.
8 Import/Export GPX File
Import and Export Single Route
Import Route: Click the "Import" icon on the right, select a GPX file to load the route onto the map.
Export Route: Click the "Export" icon on the left panel to export the current route as a GPX file.

Export Multiple Routes
Open the "Favorites" > "Favorite Routes List" > Click the "Manage" button > Check the multiple routes you want to export > Click the "Export" button to batch export the selected routes as GPX files.

9 Screen Mirroring
Click the Screen Mirroring button on the right sidebar to mirror your device screen to the computer. In the casting window, you can use mouse control, take screenshots, record the screen, and perform one-click Pokéball throws.
One-Click Pokéball Throw
This is a special feature designed for Pokémon players. When you click the One-Click Throw button, a white cursor and a throwing button will appear on the screen. Simply tap the Pitching button to throw the Pokéball and catch Pokémon instantly. You can also drag the white cursor to aim at the target for improved throwing accuracy.
Note
1. Only one device can be mirrored at a time. If multiple devices are connected, you can select one to cast.
2. Do not disconnect the USB/Wi-Fi connection while using the feature, or the casting window will close.
3. Go to "Member Center > Rights and Interests" and purchase the Screen Mirroring add-on under your existing benefits to enjoy the screen casting experience.
