


If you’ve ever forgot your screen lock passcode, and you want to unlock your iPhone passcode without losing data, you're not alone. With 12+ years in solving iPhone problems, iMyFone LockWiper will provide effective 5 methods to help reset or unlock iPhone passcode without losing data.

In this article:
- Can You Unlock iPhone Without Losing Data? [Apple Answered]
- Real Methods to Unlock iPhone Without Erasing Data
- Using Password Reset Feature to Unlock iPhone without losing Data
- Use iTunes with Backup
- Use iCloud Backup
- Use iMyFone LockWiper
- Contact Apple Support
- Possible Methods to Unlock iPhone Passcode Without Losing Data
- FAQs about Unlocking iPhone Without Erasing Data
Can You Unlock iPhone Without Losing Data? [Apple Answered]
The answer to the question is: yes! According to the Password Reset feature officially introduced by Apple in iOS 17, after changing your passcode on iOS 17, iPadOS 17, or later versions, the "Password Reset" option allows you to continue using your previous passcode to access your iPhone or iPad for up to 72 hours. If you unlock your device using this method, the system will immediately prompt you to change your passcode again.
So, you can still unlock iPhone with previous passcode after changing it in 72 hours.
Other methods will be using iTunes/Finder and iCloud to reset your iPhone and restore all data from your backup. Besides, iMyFone LockWiper can also be helpful to unlock your iPhone passcode.
Real Methods to Unlock iPhone Without Erasing Data
Using an iPhone data backup can fix how to unlock iPhone passcode without erasing it, and in this section, we'll look at 5 tested and effective methods.
1Using Password Reset Feature to Unlock iPhone without losing Data
If your iPhone runs iOS 17 and later version, you can still use previous passcode to unlock iPhone after changing it in 72 hours, and your data won’t loss.
Below are the steps involved:
Step 1: When the "iPhone Unavailable" prompt appears on your iPhone, tap "Forgot Passcode?" in the bottom-right corner of the screen.

Step 2: Tap Enter Previous Passcode.

Step 3: And enter your old passcode, then follow the on-screen instructions to set a new passcode.
However, if the iPhone passcode changing is more than 72 hours, there're still 4 tested methods to reset iPhone passcode without losing data.
2Use iTunes to Unlock iPhone Passcode Without Losing Data
To use this method, you must first back up your iPhone's data to iTunes, this way you can remove forgot iPhone passcode without erasing the device and use the backup to recover data on your iPhone.
Step 1: Connect your iPhone to your computer and then launch the latest iTunes. If it asks for a passcode, reboot the iPhone while still connected to the computer.
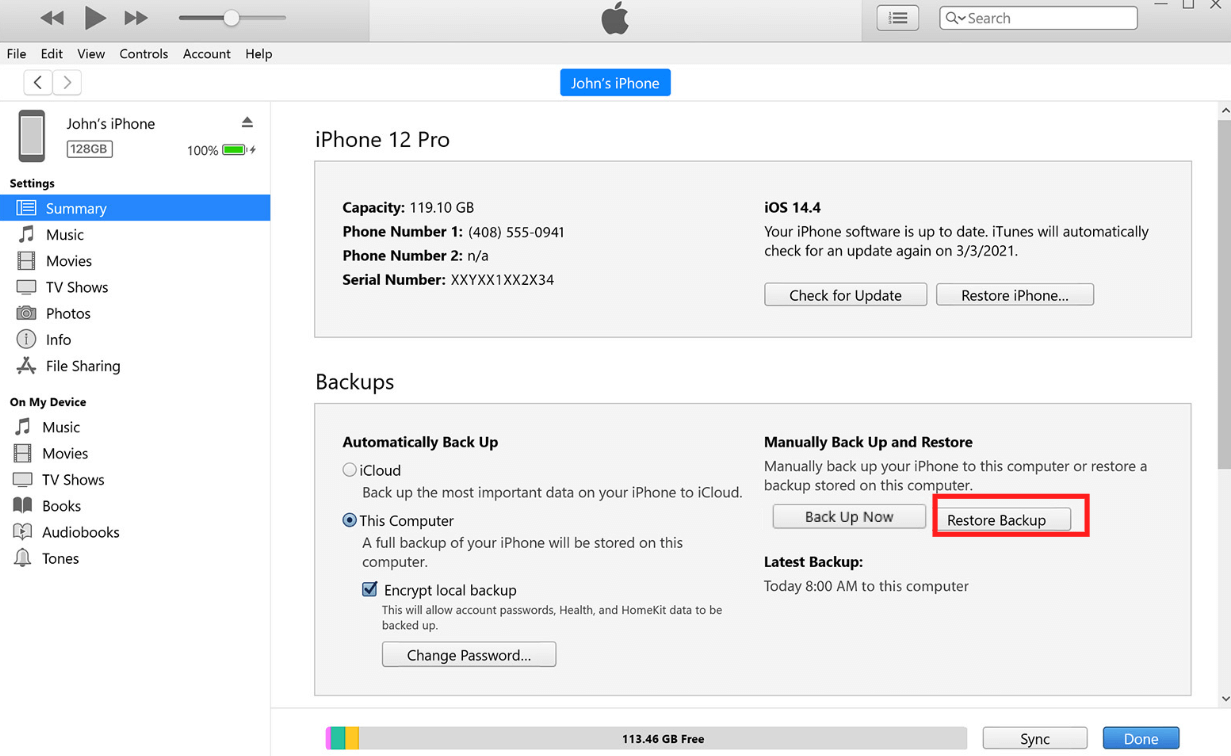
Step 2: On the iTunes window, select your iPhone and then click on Restore Backup.

Step 3: The next window brings up a series of backups. Pick the most recent and click Restore. If it asks you for a password, provide the one for your encrypted backup.

If asked to switch off Find My. At this point, you will need to initiate Recovery Mode.
The operation is as follows:
- iPhone 8, iPhone X, or newer: Press and hold Volume Down + Volume Up + Side Button.
- iPhone 7 or iPhone 7 Plus: Press and hold Volume Down + Side Button.
- iPhone 6s and older: Press and hold Home + Top (Side) Button.
Keep holding the buttons until you see the Recovery Mode screen as the picture shows below.

A recovery message will pop up in iTunes, so click Restore and Update and wait for the process to complete, or you can try restoring iPhone without updating in Recovery Mode.
However, all of these methods work only if you have a backup.
3Use iCloud to Unlock iPhone Without Losing Data
This way reset your iPhone and then use the backup on your iPhone iCloud to restore your data to solve how to reset iPhone passcode without losing data.
Necessary conditions for the use of the method:
- iPhone Enable Find My
- Have iCloud backup
- A Strong Wi-Fi
- A USB Cable
- A Computer with iTunes
First, reset your iPhone with iTunes.
Step 1: Connect your iPhone to the computer with iTunes.
Step 2: Initiate Recovery Mode on your iPhone.
Step 3: Click Restore and Update and follow the on-screen instructions to download the latest iOS version.
Then open your iPhone and reach the Apps & Data page.
Note
If prompted for Apple ID and password, provide them. You should expect a few reboots during the process.
Step 4: When you reach the backup stage on your iPhone, tap Restore from iCloud Backup.

Step 5: Select your latest backup, and click Restore.
Make sure the Wi-Fi signal is stable throughout the process and wait for a few minutes for your device to restore the backup in iCloud.

How to unlock iPhone without erasing data? This method is also a practical and workable answer, provided the conditions of use are met.
iMyFone LockWiper
Download LockWiper to remove forgot iPhone passcode and unlock iPhone in 5 minutes without passcode and backup.
4Use iMyFone LockWiper to Unlock Forgot iPhone Passcode
If above methods cann’t meet your demand, or you don’t have a extra computer to connect iTunes, you can try the all-in-one iPhone Unlocker---iMyFone LockWiper to unlock iPhone, just in easy 4 steps, your iPhone will be unlocked.
iPhone Security Lockout Unlocker
- Unlock iPhone without passcode in 5 minutes and simple steps without tech skills.
- Remove all kinds of screen passcodes, including 4/6 digit, pattern, Touch ID, Face ID, etc.
- Bypass second-hand, disabled, unavailable, security lockout iPhone with 99% success rate.
- No password is required to delete your Apple ID and iCloud account.
- Reset your iPhone and clear all data and settings with 100% security.
- Support all iOS versions and devices, including iOS 27 and iPhone 17.
Here is a video tutorial for using LockWiper to reset forgot passcode on iPhone:
Here is a text guide for you to use LockWiper to unlock iPhone without passcode:
Step 1: Download and open LockWiper on your PC/Mac. Then select Unlock Screen Passcode mode.

Step 2: Click Start and connect your iPhone to the computer using the USB cable.

Step 3: Download the firmware package for your iPhone.

Step 4: When the package extraction is finished, click Start Unlock.

Wait less than 2 minutes for the passcode to be automatically removed from your iPhone.

The whole operation process of using LockWiper only requires you to click a few times to complete the unlocking and solve the problem of how to unlock iPhone without passcode, and its success rate is as high as 99%, surpassing many devices on the market, it's worthwhile for you to try it.
Note
We suggest you make a backup with iTunes before using LockWiper to unlock forgot iPhone password. Otherwise, your data will have chances to be lost after removal.
5Contact Apple Support
If methods mentioned above cann’t unlock iPhone without losing data, we recommend you to make a Genius Bar reservations at your nearest Apple Store for a in-person support. It may provide support to connect your iPhone to Mac to restore you iPhone. You can make an online appointment by clicking Get started.

Possible Methods to Unlock iPhone Passcode Without Losing Data
There are some non-Apple provided, but user-proven methods to remove forgot iPhone passcode without restore, which are not always guaranteed to work, but are worth a try.
1Try to Backup Without Unlocking Screen
This method does not require unlocking the screen, but it does require you to meet the following conditions for it to work.
- Have a computer with iTunes installed and an iTunes-synchronized iPhone.
- For iOS 11.4 and earlier, you can try to do this way directly.
- For iOS 11.4.1 or later, you have to make sure the USB Accessories is enabled.

Step 1: Connect your iPhone to your computer and open synced iTunes.
Step 2: Wait for the pop-up window to appear and click Back Up Now.

Step 3: Wait for the backup to complete and then click Restore Backup.
This has some chance to back up successfully, unlock the screen without losing data, and solve the problem of how to bypass iPhone passcode without losing data.
2Use Make Noerase IPSW (An Unauthentic Way)
Perhaps you have heard of this program called Make Noerase IPSW. They claim that it supports unlocking screens and retaining data for iPhones with iOS 10 and below.
We have tested it for you, it can NOT remove forgot iPhone passcode successfully. So we suggest you give up this method and don't waste your time.
FAQs about Unlocking iPhone Passcode Without Losing Data
1 Is it possible to unlock an iPhone without passcode without losing data?
Yes, it's possible to do do. If your iPhone runs iOS 17 or later version, you can use Passcode Reset feature to unlock iPhone without losing data. Besides, if you have an iCloud or iTunes backup, you can bypass the iPhone passcode by wiping the device and then restoring the iPhone data from the backup.
If your iPhone is running between iOS 8 and iOS 10, you can also use Siri to access a locked iPhone without losing data. Additionally, you can contact Apple Support Center for help.
2 What if I forgot my iPhone passcode without a computer?
You can go to iCloud.com on a borrowed smartphone or tablet, sign in with your Apple ID and password, and choose “Erase iPhone” from “All Devices” list, to permanently remove your iPhone so that your passcode will be reset.
3 Security Lockout iPhone how to unlock without losing data?
1. Restore using backup: If you have created iCloud or iTunes backup before, you can bypass the iPhone security lock by wiping the device and then restoring iPhone data from the backup.
2. Siri trick: If your iPhone is running between iOS 8 and iOS 10, you can try to use Siri to access the locked iPhone, which can bypass the security lock without losing data.
3. Contact Apple Support: If the above methods don't work, you can contact Apple Support Center, they may provide more help or suggestions to solve the problem.
Conclusion
Unlocking iPhone without losing data and remove forgot iPhone passcode doesn't have to be impossible. Choose the right way in the above methods of how to unlock iPhone passcode without losing it, regaining access to your iPhone is achievable.
If you're looking for the most secure method with the highest success rate, look no further than iMyFone LockWiper, which unlocks your iPhone password in just 5 minutes!
![]()
![]()
As an iOS expert who has more than five years of in-depth research on iOS unlocking-related issues, Daniel is highly praised for his effective and helpful solutions to users from all over the world.
-
[2025] How to Use iforgot.apple.com Unlock Apple ID?
iforgot.apple.com can unlock Apple ID and reset Apple ID password. Let's see how it works to help you regain control of your device.
3 mins read -
What Is iOS 18 iPhone Inactivity Reboot Feature? How Does It Work?
Do you know the feature of iPhone inactivity reboot after 3 days in iOS 18.1? What is it and how does it work? This article tells you all!
2 mins read -
[2026] 4 iPad Unlock Software [Free Way Included]
Looking for solutions to unlock ipad for free? This post introduce 4 ipad unlock software,including the free ipad unlock tool to you. Check it out!
4 mins read -
[2025] What Is iOS Account Manager & How to Remove It
What is iOS Account Manager? Can I remove it? This guide will explain what does iOS Account Manager mean and provide steps for you to remove it with ease.
3 mins read -
How to Fix This Apple ID Is Not Valid or Supported
This guide focuses on explaining and resolving why this apple id is not valid or not supported issues to help you fix Apple ID not working on iPhone problems.
3 mins read -
Easy Fix! Cannot Create Apple ID at This Time
If you are facing the dilemma of cannot create apple id at this time and don't know how to solve it, read this guide for an exhaustive solution.
3 mins read
Was this page helpful?
Thanks for your rating
Rated successfully!
You have already rated this article, please do not repeat scoring!