


 March 29, 2023
SONY voice recorder is typically used to record voice in both PCM and MP3 formats. This voice recording is quite worthy when you want to record any lectures, virtual meetings, memos, and live music of your favorite singer. Moreover, it does not require cables to connect with the PC as they come with a built-in USB feature. You simply need to plug the cable into a recorder and connect the other end of the cable to your system to transfer files.
Therefore, it is quite possible that you may lose some of the essential files but don't worry. There are specific tools and simple techniques that can help you to recover deleted files from SONY voice recorder within no time. This article will list several ways to recover your voice files.
Part 1. How to Recover Deleted Files from SONY Voice Recorder
To recover deleted files from SONY voice recorder, iMyFone D-Back is here to help you. It is one of the famous and widely used restoring software. This software can help you retrieve your lost recordings without any fuss. Moreover, it is shielded software so that you can trust it without worry.
Here are some of the fantastic features of the iMyFone D-Back:
- This recovery software allows you to recover your files with the help of any storage device, like hard drives, USB drives, memory cards, and much more.
- All-rounder and deep scanning attributes allow finding all your lost and destroyed files, so you don't need to worry about the files that you lost a long time ago.
- One of the uniqueness of this software is that it allows you to preview the files before you recover them.
- It is algorithm-based software, so it typically scans data faster, and you can pause or stop the scanning process anytime you want to.
- There is an option for the filter. With this option, you can find the particular lost file with the time and date. In this way, your time will not be wasted.
Here are some of the simple steps to recover deleted files from SONY voice recorder:
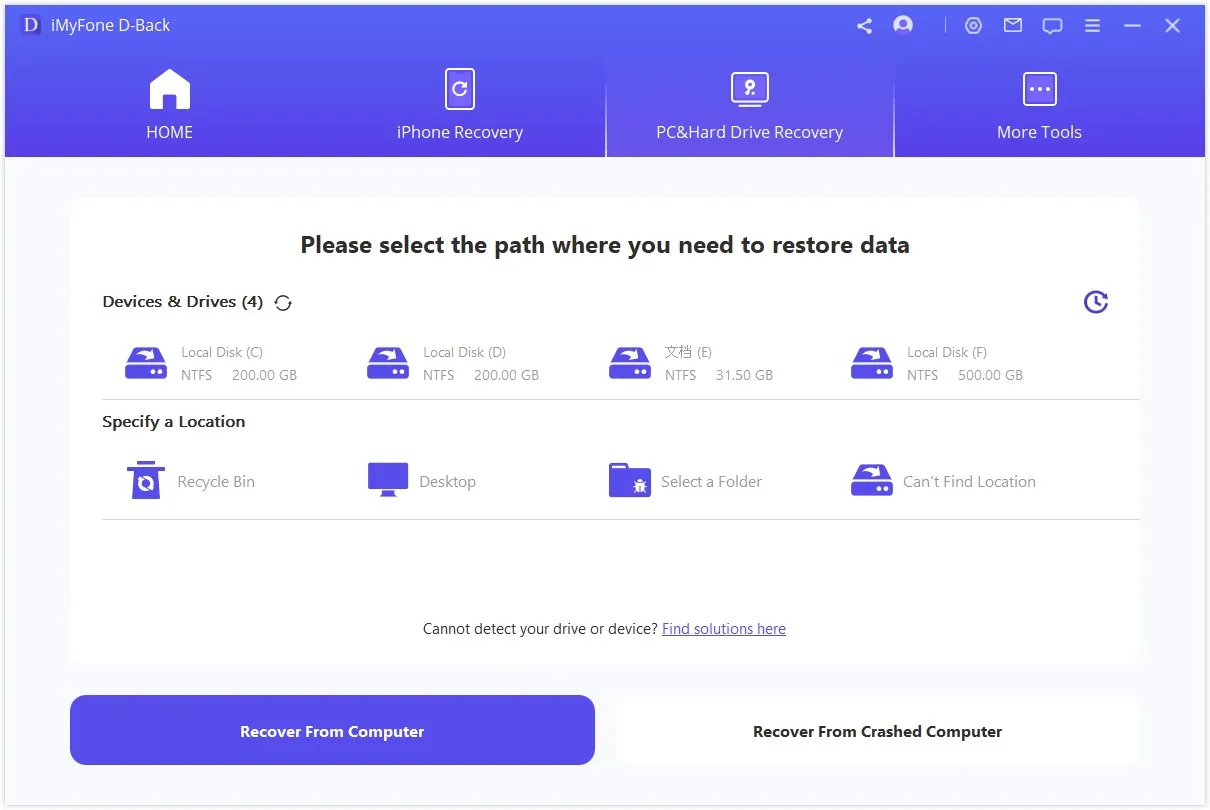
Step 1: Choose File Location for Recovering Data
The first step is to download the iMyFone D-Back and then choose a location where you wish to retrieve your file or data.
Step 2: Scanning the Device
After selecting the location, the self-scanning process will initiate.
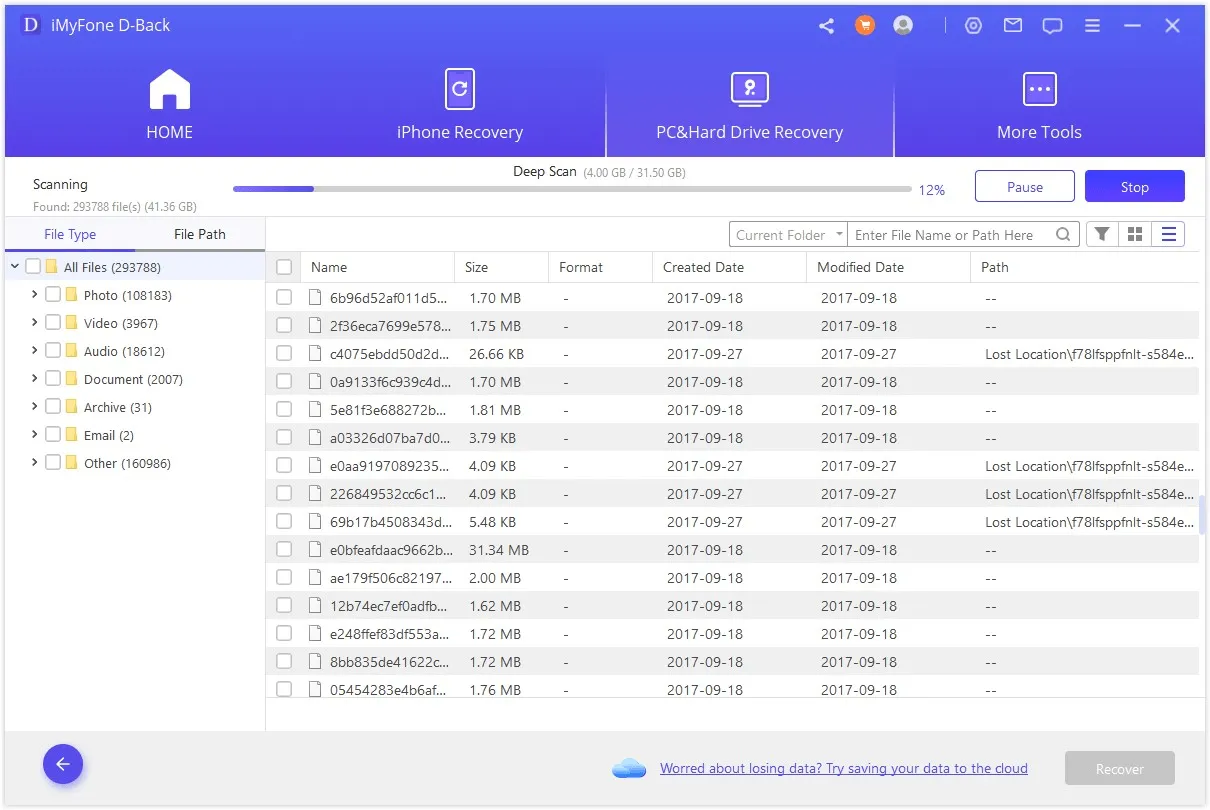
Step 3: Retrieve Your File and Save a Specific Location
Once the scanning process is complete, you will find a list of files, select the one you want to recover, and preview the file before retrieving it. Finally, select the recover button, which will save the file to the desired location you selected.

Part 2. Pro Tip about SONY Voice Recorder
There are many valuable tips and tricks related to the SONY voice recorder. Here we have listed down some of the essential information and tips:
2.1. How to Transfer Recordings from SONY IC Recorder to Computer?
It is straightforward to connect the SONY ic recorder transfer to computer system. You just need to copy the required data or files from the ic SONY recorder to your system. Let's see how it happens:
Step 1: The very first thing you need to do is to connect your SONY recorder with the system.

Step 2: After the recorder is connected to the PC, copy all the files that you want to transfer to the system's local disk.

Step 3: Once you transfer all the necessary files, make sure you disconnect the recorder from the computer.
2.2. How to Connect SONY IC Recorder to Computer?
If you don't know how to connect your SONY voice recorder, here are simple steps to help you out:
Step 1: First, grab the cable and attach the small end of the cable to the headphone jack of your voice recorder.

Step 2: Now connect the significant end of the cable with the computer.

Step 3: After connecting with the PC, open the application that carries the audio recording and select your computer's desired OS system.
Step 4: Finally, touch the play button located on your recorder and start the playback recording that you wish to record on your computer.
2.3. How to Clear Recordings from SONY Voice Recorder?
If there is no more space to make a recording and you wish to clear from SONY clear voice recorder, here are some of the valuable tips:
Step 1: First, press or slide the power button to start the SONY recorder. After that stop mode screen will appear.

Step 2: Now, select the file you wish to remove provided in the playback mode and then press the Erase option.
Step 3: Use the up and down arrow on the recorder to select "execute."

Step 4: With the help of the right or forward button, the erasing option appears on the recorder screen, select the file, and it will be deleted.
2.4. How to Turn on/off SONY IC Recorder?
If you want to know how to turn off SONY ic recorder, then here are simple steps to help you out:
Step 1: The SONY ic voice recorder is provided with a slider button for turning on and off the device.
Simple slide down the button in the direction of power; it will turn on.
Step 2: Similarly, if you want to turn off the device, slide the button again towards power and hold for two seconds, and your device will be turned off.
Conclusion
SONY IC devices are beneficial for recording important messages, notes, and others, but sometimes you find yourself in a problematic situation where all or some of your recordings are lost. So you don't need to worry iMyFone D-Back Hard Drive Recovery Software will help you to get SONY ic recorder recover deleted files in no time. You just need to follow three simple steps to help you recover deleted files from SONY voice recorder. But make sure you preview the files before retrieving any of them files.