March 12, 2024
Have you been looking for the right information on how to delete notes iPhone? Deleting notes from iPhone iOS 13 can be confusing to new users of Apple iPhone. Even, longtime users of iPhone are still finding it difficult to remove notes from their device.
Perhaps, you have tried different methods to delete the notes by looking for the notes app, and you were not sure what to do with it. If that is the case, would you like to know the easiest steps to delete those iPhone iOS 13 notes? This piece will help you to know what to do to delete the notes and erase them permanently so that no recovery tools can recover them if you want to.

How to Delete Notes on iPhone iOS 13 Manually (Recoverable)
1. Start by launching the notes app from the home screen of your iPhone.
2. Proceed to open the note you want to delete from the app after launch.
3. Next, tap on the Trash can button and touch the note title at the far right.
4. While holding onto it, swipe it to the left to show the Delete button.
5. Finally, touch the Delete button and the notes will be gone?
How to Permanently Delete Notes on iPhone (Unrecoverable) - iOS 13 Supported
The above are the simple steps to delete iPhone notes. However, the above steps do not permanently erase the deleted files/notes. You need a software called “iMyFone Umate Pro or iMyFone Umate Pro for Mac ” to get rid of the deleted notes.

First, if you want to know if it is possible to recover these deleted notes iPhone, just scan your iPhone with the software, and you will discover that they still can be find out. This means that the notes are not permanently deleted yet. To erase the deleted files permanently, follow the steps below.
How to Delete Notes iPhone iOS 13 Permanently
Step 1. Download iMyFone Umate Pro, and connect your device to a computer via cable.
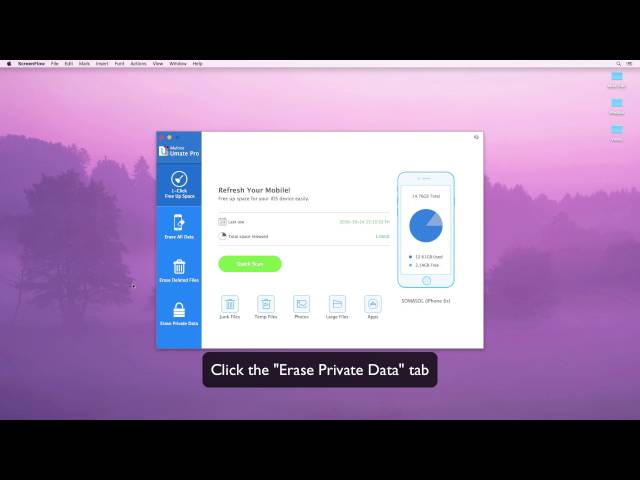
Step 2. After you connect iPhone to a computer successfully, select “Erase Private Data” to erase your current notes, or choose “Erase Deleted Files” to erase your deleted notes iPhone.

Step 3. When prompted, type "delete" into the box to confirm you want to erase.

Step 4. Once you have typed 'delete' into the box to confirm your intention, just click "Erase Now" and the data will be removed from your device permanently.
To delete notes iPhone permanently is not difficult, at least, you can find your deleted notes by running a scan with the software. However, the moment you delete those notes using iMyFone Umate Pro, everything is gone forever. You cannot recover the data with any recovery software. For this reason, iMyFone Umate Pro has 4 erase modes that may help you to choose how you want to wipe out your data.
Mode 1 Erase Deleted Files
This is the mode that gives you the option to erase files permanently. File or data deleted with this mode cannot be recovered. If you want to see deleted files before you use iMyFone Umate Pro to delete permanently, scan your device with the software and then select Delete. Bear in mind that there is no chance of recovery even with latest recovery tools after this.
Mode 2 Erase Private Data
This is another option to make sure that private information on your iPhone is completely deleted. This mode will destroy private data with 100% unrecoverable, thereby keeping your personal information secure.
Mode 3 Erase All Data
This is about removing your data and files completely from your iPhone and this can be done by using factory reset option. However, factory reset option is not enough to delete all files permanently, and that is why iMyFone iPhone is more suitable for this need.
Mode 4 1- Click Cleanup
This erase mode helps you to remove junk files/ temporary files. You can also compress and delete unwanted photos, and manage your apps in just one click. 1-Click Cleanup can free up your iPhone and your device will perform at optimal speeds.
Note: Data deleted by this mode can be recovered.
So, if you want to delete notes iPhone permanently, choose iMyFone Umate Pro.