


 September 14, 2021
“I cracked my iPhone and I'm getting a new iPhone X. someone at the mac store told me to back up my iPhone on my computer first, but what I want most is to back up Viber messages as I have tons of Viber data saved on the device, help??”
Viber is a social chat app which works similarly to WhatsApp and Facebook messenger. Many iPhone users choose Viber as their first choice to keep in touch with colleagues and friends. And they store their chat history on their iPhone including messages, photos and more. However, data loss could happen in our daily life for various reasons such as iPhone damaged or lost, mistaken operations, update to the latest operation system (iOS 13/12/11 for now), and so on. We know how important your Viber history is so here we offer three ways on how to transfer Viber history from iPhone to the computer for you to keep Viber history safer.
1. Transfer Viber Messages from iPhone to Computer by Email
Viber offers users the method to transfer Viber conversations from the iPhone by its own with simple steps shown below.
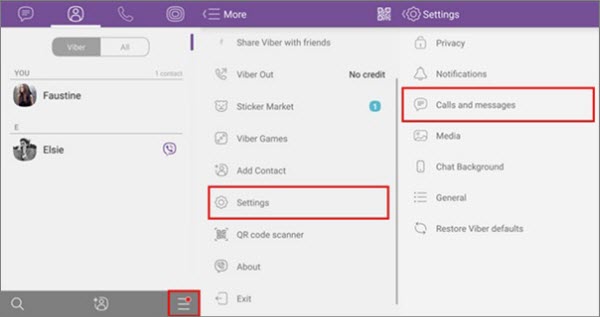
Step 1. Open Viber app on your iPhone.
Step 2. Hit More option to get the Viber system setting.
Step 3. Select on Settings and the menu will give you the long list of options.
Step 4. Choose Calls and Messages and then choose Email Message History.
Step 5. You can email the created backup to yourself.
Step 6. And then you can log in your email account to download the attachment.
Note
2. Transfer Viber Conversations from iPhone to Computer by iTunes
You can choose another backup method in case you require an alternative backup. Yes, here we can back up Viber messages by iTunes. Just follow few easy steps and to transfer your message history to PC or Mac.

Step 1. Connect your iPhone to your computer and open iTunes.
Step 2. Click the iPhone icon appears in iTunes.
Step 3. In the Summary option, you will see your iPhone information in the upper part. And in the lower part is the backup options.
Step 4. Click on Back up Now you will have the iPhone with Viber messages be backed up.
Step 5. Wait several minutes for it to finish the backup process.
Note
With more or fewer disadvantages, both of the two ways are not perfect. Here we offer the third way to users.
3. Transfer Viber History from iPhone to PC Completely or Flexibly
How could users transfer Viber history completely? Not only messages but also pictures and videos sent or received? And how could users transfer Viber history according to their own mind? Can they decide what to transfer and when to transfer? Well, iMyFone iTransor Lite iPhone Data Exporter (renamed from D-Port) is the last solution we offer to users. As an excellent data exporter that can back up data on iOS devices, the software is easy and user-friendly which comes with helpful features.
![]()
500,000+ Downloads
Key Features:
- Transfer not only Viber messages, but also Viber attachments such as photos and videos.
- Export other IM apps such as WhatsApp, WeChat and Kik data on iPhone/iPad/iPod touch.
- Make a full backup of your iPhone or back up only messages, WhatsApp data, and WeChat data.
- Offer 30-day money-back guarantee and free trial version to both Windows and Mac users.


Easy Steps to transfer Viber Data to Computer Using iMyFone iTransor Lite
Step 1: Select Back Up & Export from Device
Select "Back Up & Export from Device". Connect your iPhone to the computer via a USB cable and make sure that your device is detected by the program. Then click on Export Data.

Step 2: Select File Type
Hare are all file types supported on this screen. Now we choose Viber. And then click the "Next" button to scan Viber history on your iPhone.

Step 3: Preview and Export Viber History
Once the program finishes scanning the device, it will display all the Viber messages and attachments on the preview interface. You can preview the content and select what you need. Then click Export and a pop-up window will open asking you to select the destination to store the Viber files. Wait until the program finishes exporting from your iPhone to PC/Mac.

Conclusion
Now, transferring Viber history from iPhone (with all iOS versions including the iOS 13/12) to computer won't be a problem anymore and you can use free trial version of iMyFone iTransor Lite iOS Data Exporter which is offered in iMyFone free download center to figure out whether your Viber history can be detected.