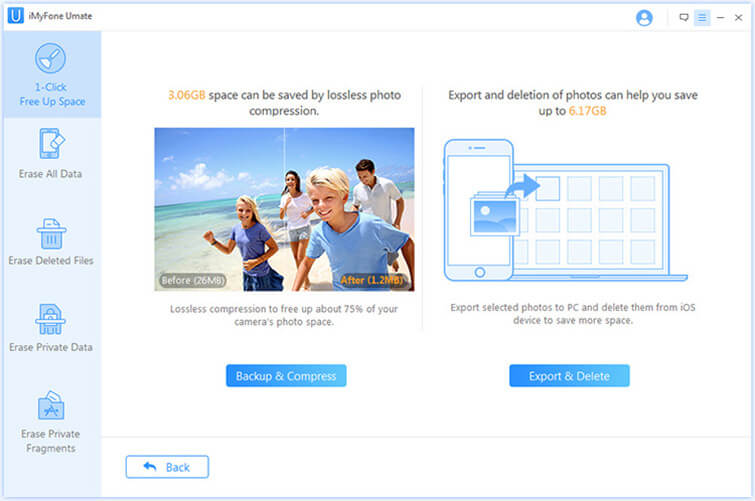
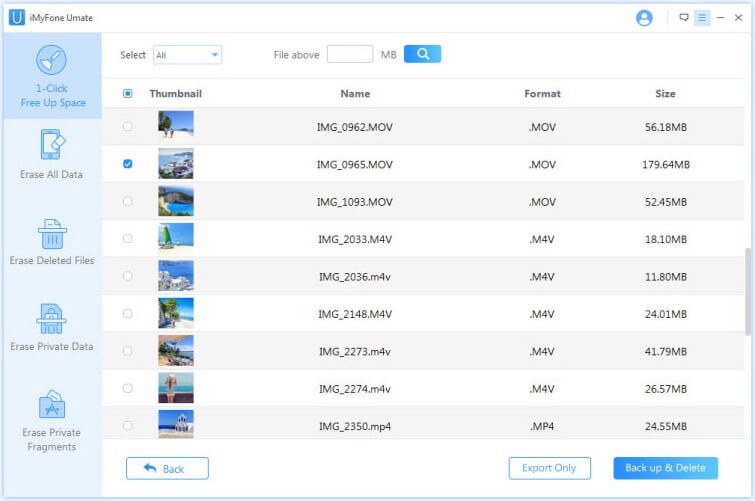
Indeed, photos on iPhone can occupy a lot of storage and which will make your device become sluggish and slow. For many old iPhones, there is very limited iPhone storage and seldom can satisfy your huge data storage demand. For this situation, many people will try to move photos from iPhone to iCloud storage. If you are in that category, this article is an effort to bring it to the fore.

1. How to Move Photos from iPhone to iCloud Storage

Moving photos to iCloud from your iOS devices is not a difficult task. It can be easily done by using the iCloud Backup. Before you move photos from iPhone to iCloud, please note that only 5 GB of free space is allocated to every iCloud account. Therefore, if you have exhausted this storage and have a lot of photos to upload, then you might consider upgrading your iCloud account or go to the next part in this article to find another way to get more free space.

Now follow the steps below to know how to move photos to iCloud.

Step 1: Go to “Settings” on your device and select the “iCloud” option.

Step 2: Turn on “iCloud Backup” option from here and you can tap on the “Back Up Now” button to take a backup of your device right away to move photos to iCloud.

moving photos to icloud

The Limitations of Saving Photos to iCloud

Though it seems easy to put iPhone photos to iCloud, it has some limitations on iPhone data syncing indeed. You can check the list below.

  • To move photos to iCloud can not truly solve the shortage of iPhone storage.
  • The deletion of photos on iPhone will also delete it from iCloud, the same on all iOS devices which have enabled iCloud Photo.
  • iCloud has only 5 GB free storage.

Just because the listed limitations above, we are going to introduce a free way to reduce photo storage for your iPhone.

2. Alternative Way to Save More Storage to Store More Photos [FREE]

Given the large amount of photos that we have today, our phone’s memory soon gets filled before you know it. But because the limited iCloud storage and the complex operation of iTunes backup it's better to find a way to clean iPhone and optimize iPhone storage in the long term run.

Instead of moving the iPhone photos to iCloud, you can take full advantages of iMyFone Umate's free features to release the space. iMyFone Umate can manage your photos on iPhone/iPad/iPod Touch well. Here we are going to introduce the 3 free options for you.

iMyFone Umate is actually simple and easy to use, it receives lots of positive reviews from macworld.co.uk, Makeuseof.com , Cultofmac.com etc. You can download and install it first.

Windows version Mac version

Steps to Clear Photo Caches, Compress Photos or Export Photos from iDevice with iMyFone Umate (iOS 15 Supported)

You can manage your photos on iDevice with 3 options and the first step you should do is run the program on your PC or Mac, then connect your iOS device to it for scanning.

You can use all these wonderful features totally free, you won't need to pay for it!

Option 1: If you just want to clear the photos caches, choose the "Photos" option from "1-Click Free Up Sapce" tab.

clean photos caches on iphone

Option 2: If you want to compress all your iPhone photos, click on the "Backup & Compress" button. This will reclaim 75% of your photo space.

compress and export iphone photos

Option 3: Or you can mass delete or export photos to PC, just click "Export & Delete" button to free huge space for your iPhone. In this way, all your original photos will be backed up on your PC, so you can even skip the step of removing photos to iCloud, as you will have a backup on PC.

erase photo

Tip

There are some advanced features for the Pro version which you can upgrade through the product.

  • Erase All Data: iMyFone Umate Pro supports deleting everything on your iPhone, iPad and iPod Touch. The data will be wiped out totally and everything stored on the device will be gone once you select this option.
  • Erase Private Data: iMyFone Umate Pro will delete the account information, private photos, browsing history, emails, or other personal information on your mobile devices. It can make sure the private data will be rendered unrecoverable.
  • Erase Deleted Files: Erasing deleted files can make sure that the files you previously deleted are no longer accessible or recoverable. If you want to ensure previously deleted data is unrecoverable then this option will suits you.
  • Erase Private Fragments: Erasing incomplete private fragments can find out all private traces produced by third-party apps and permanently destroy them. No need to worry about the safety of your private data then.