


Best Hard Drive Data Recovery Software
- Recover deleted files from hard drives, USB flash drives, SD cards, SSDs, cameras, etc.
- Supports 1000+ file types, including photos, videos, office documents, archives, and more.
- Preview recoverable hard drive data before final recovery.
- Windows partition recovery, such as raw partition, formatted partition, corrupted partition, etc.
Tell Us What You Think
![]() 100% Safe
100% Safe
![]() 30-Day Money Back Guarantee
30-Day Money Back Guarantee
All-in-one Solutions for a Variety of Data Loss Scenarios
D-Back for Windows hard drive data recovery software is the best free data recovery program for recovering lost files, photographs, documents, and more after formatting, wiping, partition loss, disk damage, virus attacks, and more. Committed to providing you with the best hard drive data recovery service.
-
 Deleted Files Recovery
 Deleted Files Recovery
Quickly recover various types of files accidentally erased from a variety of devices.
-
 Emptied Recycle Bin Recovery
 Emptied Recycle Bin Recovery
D-Back for Windows best hard drive data recovery software can still recover deleted files from an empty recycle bin in a timely manner.
-
 Formatted Data Recovery
 Formatted Data Recovery
Data lost from a formatted drive can be recovered straightforwardly, saving both your valuable documents and your time.
-
 Lost Partition Recovery
 Lost Partition Recovery
When your partition is lost or not recognized by the operating system, it is tough to recover data, but D-Back for Windows makes it feasible.
-
 External Device Data Recovery
 External Device Data Recovery
Recover lost data from a variety of devices: external hard drive, flash drive and memory card, etc., easy and safe.
-
 Virus Attack Recovery
 Virus Attack Recovery
Get your data back quickly if it has been lost or destroyed by a virus such as a computer virus, worms, or other unknown malware.
-
 System Crash Recovery
 System Crash Recovery
If your system fails and you don't have time to save your data, D-Back for Windows best hard drive data recovery software will assist you in recovering your lost files.
-
 RAW Partition Recovery
 RAW Partition Recovery
When your hard disk or flash drive goes RAW, you can't access the data on it. D-Back for Windows hard drive recovery software can assist you in recovering the data quickly.
Recover Data From Different Types of Devices
With this best hard drive data recovery software for Windows 11, 10, 8, 7, XP, or Vista, you may recover deleted files from nearly any sort of storage media. Internal hard drives, external USB drives, and other storage devices are also supported. SD and CF cards, other memory cards, digital cameras, solid state drives (SSD), flash drives, etc.
-
 PC/Laptop
 -
 Hard Drive
 -
 External Disk
 -
 SSD
SSD -
 USB Drive
 -
 Micro Card
 -
 Memory Card
 -
 Camcorder
 -
 Digital Camera
 -
 Music Player
 -
 Video Player
 -
 CF/SD Card
 -
 Zip Drive
 -
 Other Devices
Recover Whatever You Need: 1000+ File Types Supported
-

 Documents
TXT, DOC/DOCX, XLS/XLSX/XLSM/XLSB, PPT/PPTX, PDF, CWK, HTML/HTM, INDD, EPS, XML, PLIST, RTF, PUB, , CSV, etc.
-

 Graphics
JPG/JPEG, PNG, GIF, TIFF/TIF, BMP, PSD, CRW, CR2, NEF, ORF, RAF, SR2, MRW, DCR, WMF, DNG, ERF, RAW, ICO, CUR, SVG, ICNS, PBM, PGM, PPM, SVGZ, TGA, WBMP, WEBP, XBM, XPM, etc.
-

 Videos
AVI, MOV, MP4, M4V, WMV, 3GP, 3G2, MKV, ASF, FLV, SWF, MPG, RM/RMVB, MPEG, etc.
-

 Audio Files
AIF/AIFF, M4A, MP3, WAV, WMA, APE, MID/MIDI, OGG, AAC, RealAudio, VQF, etc
-

 Emails
PST, DBX, EML/EMLX, MSG, etc.(from Outlook, Outlook Express...)
-

 Archive and Others
Archives (such as ZIP, RAR, SIT, ISO etc.), exe, html, SITX, etc.
Why D-Back for Windows is the Best Choice for Hard Drive Data Recovery
We are committed to delivering the best results possible. You will have a quick and smooth recovery. In a few clicks, you may recover deleted files from hard drive.
More Than Data Recovery But Corrupted Video Repair Involved
D-Back for Windows hard drive data recovery software provides an add-on feature to repair corrupted videos, which uses powerful video analysis techniques. Due to corruption, the recovered films and photographs may no longer be useable. In such cases, the software can be used to fix the corrupted films and photographs.

Scan and match your video fragments.
Merge the fragments from the same video.
Recover and repair unlimited video files without corruption including MP4, MOV, MKV, MTS, FLV, M4V.
Recover corrupted videos from all cameras and camcorders including DSLR, Drones, Action Cameras, Dashcams, SD card, PC, HDD, etc.
Free Trial VS Full Version
Free Trial
$0-
Recover unlimited data (100M only) from computer
-
Deep scan deleted data
-
Preview data before dinal recovery
-
Multiple files recovery
-
Multiple devices recovery
-
Lost partition recovery
-
Raw data recovery
Full Version
$49.99-
Recover unlimited data from computer
-
Deep scan deleted data
-
Preview data before dinal recovery
-
Multiple files recovery
-
Multiple devices recovery
-
Lost partition recovery
-
Raw data recovery
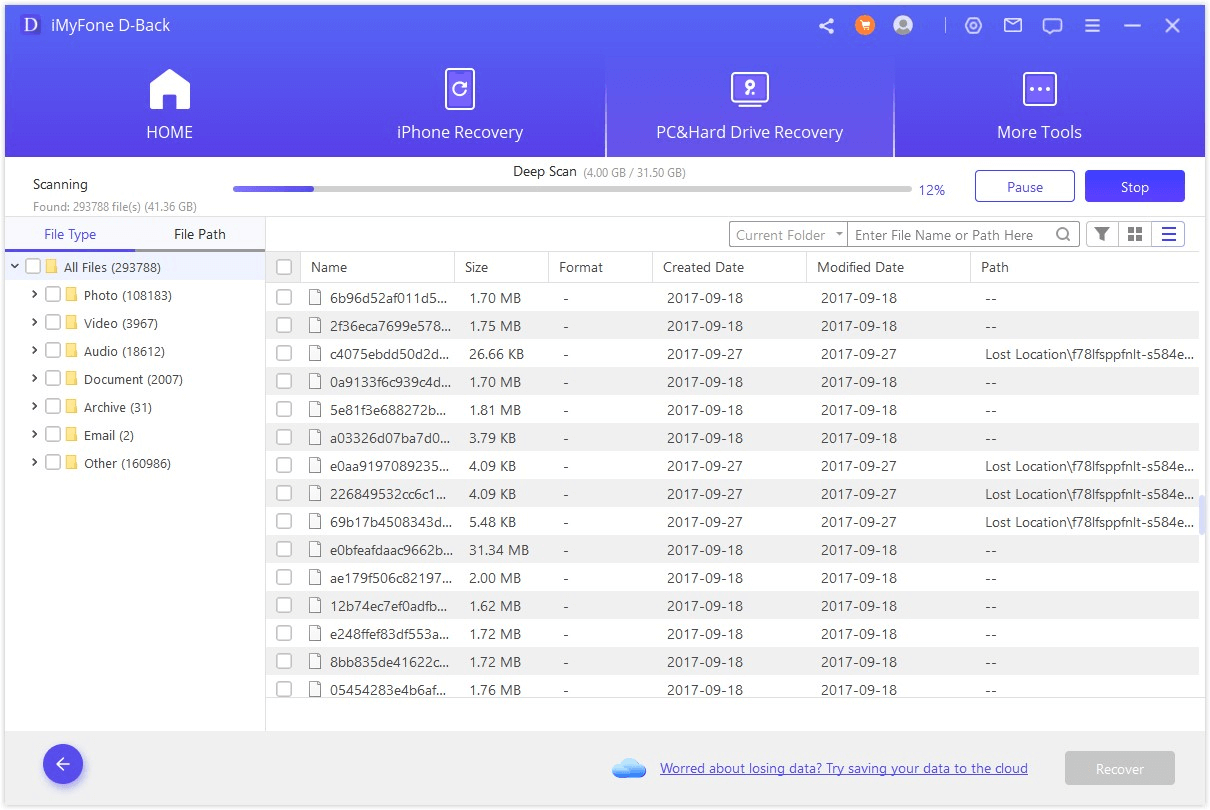
How to Use D-Back for Windows Hard Drive Data Recovery
Are you ready to recover deleted files from hard drive on Windows? Try D-Back for Windows hard drive data recovery software if you prefer a simpler interface with fewer options. With only three steps, recovering deleted Windows data has never been easier. You may easily select any individual item and save it to your PC. That's really cool!

Trusted by Leading IT Experts

"It's never been easier to recover lost data on Windows. Whether you need to recover data from hard drives, USB flash drives, SD cards, SSDs, cameras, or other devices, iMyFone D-Back for Windows best free hard drive data recovery software is designed to make the procedure as simple as possible."
"The software supports over 20 data types, ensuring that you will be able to recover not just your images, but also a wide range of other file types such as videos, office documents, archives, and more."
"iMyFone D-Back for Windows best free hard drive data recovery software is an excellent solution if you need to recover data from your hard drive, sd card, or external hard drive. iMyFone D-Back for Windows is really easy to use, and it puts you on a limited, focused path so you don't become overwhelmed by all of your recovery possibilities. You can recover your data at any stage along the procedure with only a few clicks."

"It appears to be effective. It is the most effective method for recovering deleted photos or movies on Windows. It helped me regain my photographs after I purchased it last week. After trying the trial version and seeing that it did really display my lost photos after scanning, I decided to buy it.Glad that it works! Thank you!"
Kenzy
"To be honest, this is the second time I've attempted a data recovery program. For whatever reason, the first one did not function on my PC. However, iMyFone D-Back for Windows best free hard drive data recovery tools did an excellent job.What I want to retrieve were the deleted files, and the worst part was that I didn't have a backup of them. D-Back Hard Drive Data Recovery thankfully delivered on its promises.. "
Kate
"It's quite simple to insatll and use.customer support response to my questions quickly. I was provided with a clear instruction and explanation to my queries regarding recovering my lost files."
Johansson5,474,854+ users have successfully recovered data with D-Back for Windows Hard Drive Data Recovery
Best hard drive data recovery software
![]() 100% Safe
100% Safe
![]() 30-Day Money back guarantee
30-Day Money back guarantee
Tech Specification
CPU/Processor Win: 1GHz (64 bit) or above Mac: 1GHz Intel or above
RAM Win: 256 MB or more of RAM (1024MB Recommended) Mac: 512 MB or more
Hard Disk Space 200 MB and above free space
Operating System Supported: Windows 11/10/8/7 Windows Server 2022/2019/2016/2012/2008/2003
Files System Supported: FAT(FAT12,FAT16,FAT32)/exFAT/NTFS/NTFS5/ext2/ext3/HFS+/ReFS
-
How Long Does the Recovery Process Take?
The total duration depends on the size of your hard drive and the speed of your computer. If the hard drive is modest, a few minutes will suffice. However, if you're scanning a large drive, please be patient; your patience will be worthwile.
-
Can I Recover Files Deleted A Long Time Ago?
Yes of course. The D-Back for Windows best free hard drive data recovery software will perform a thorough and all-around scan of your device to retrieve the data. Many of our customers have managed to retrieve their data lost long time ago.
-
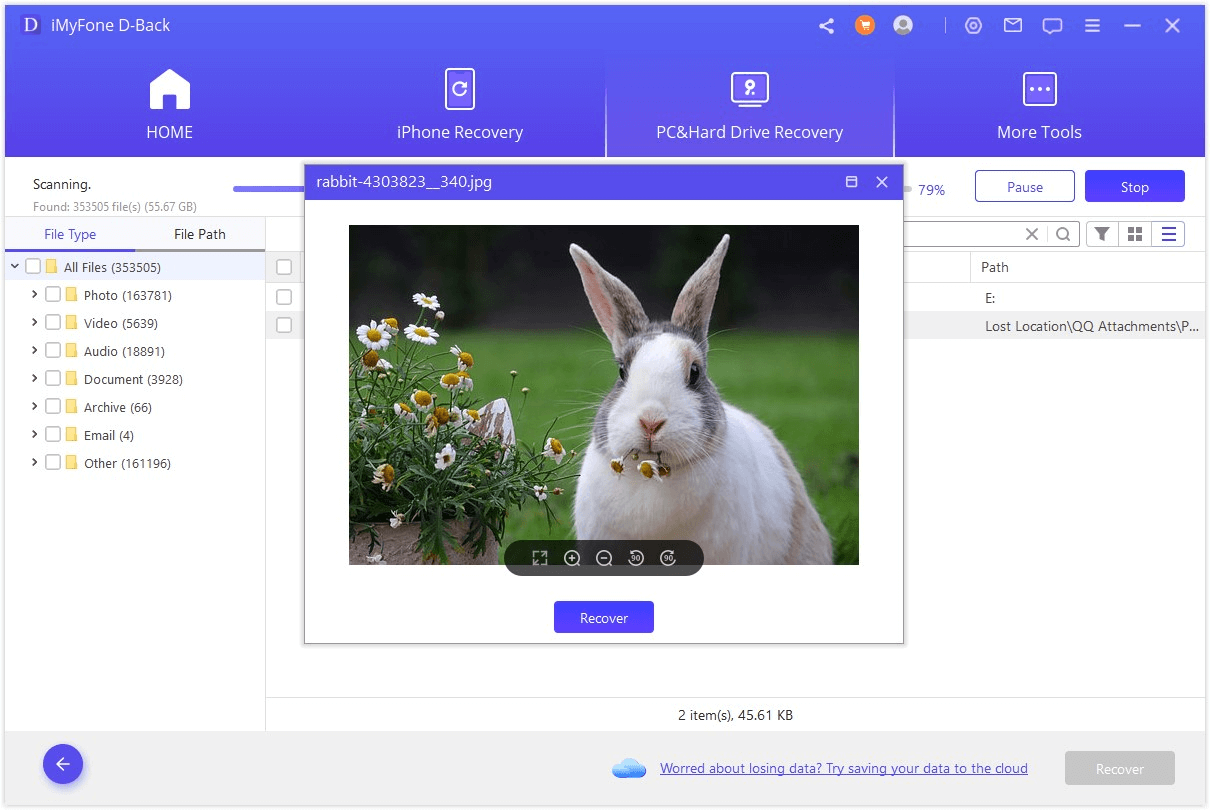
How Can I Check If My Data is Recoverable before Purchase?
Before making a purchase, we offer a free scan and preview option. You can use this to scan your system and preview the files you desire, ensuring that it is capable.
-
Why Can’t Some Files be Previewed?
Even though the software cannot preview some data, they can still be recovered. Also, for your convenience, D-Back for Windows can preview the following formats for Windows and Mac. You can use the mouse to change the size of the preview window or maximize it. For Win: Pictures: JPG, JPEG, PNG, BMP, TIF, TIFF, ICO, CUR, SVG, ICNS, PBM, PGM, PPM, SVGZ, TGA, WBMP, WEBP, XBM, XPM,GIF, etc. Audios: WAV, MP3, WMA, M4A, AIF, AIFF, etc. Videos: MP4, SWF, MOV, AVI, MKV, MPG, ASF, WMV, 3GP, etc. Documents: TXT, XML, PLIST, RTF, PUB, XLSM, XLSB, CSV, DOC, DOCX, XLS, XLSX, PPT, PPTX, PDF, etc. Emails: EML, EMLX, MSG, etc. For Mac: Documents: TXT, XML, PLIST, RTF, XLSM, CSV, DOC, DOCX, XLS, XLSX, PPT, PPTX, PDF, HTML, KEY, numbers, pages, etc. Pictures: JPEG, JPG, PNG, BMP, TIF, TIFF, ICO, CUR, SVG, ICNS, PBM, PGM, PPM, SVGZ, TGA, GIF, PSD, CRW, CR2, NEF, ORF, RAF, SR2, MRW, DCR, WMF, DNG, ERF, RAW, AI, HEIC, etc. Audios: WAV, MP3, M4A, AIF, AIFF, etc. Videos: M4V, MP4, MOV, 3GP, MPG, etc. Emails: EXL, EMLX, etc.
-
How to Recover Data from External Hard Drive?
People frequently use external hard drives due to a lack of storage capacity. However, what would happen if your external Hard drive lost data? D-Back for Windows best free hard drive data recovery software can get them back from the external hard drive. No matter how you lost the files, they can be recovered quickly. It can be used with hard disks, SSDs, USB flash drives, cameras, and nearly all kinds of storage devices. It works in a variety of situations, including inadvertent file deletion, formatted drives, virus attacks, abrupt drive failure, partition loss, and computer crashes. Its sophisticated algorithm restores your data quickly. This tool is simple enough for beginners to use because it only has three steps-Select > Scan > Preview & Recover. Without any difficulty, your data will be retrieved.
-
How to Recover Data from a Damaged/Dead Hard Drive that Won't Boot?
It's difficult to recover data from a non-booting hard disk, but it's feasible with the help of a strong data recovery tool. The program thoroughly examines the hard drive and restores all of the data. The data will be recovered even if erased from the hard drive. Just following these steps: Lunch the software and select the hard drive that you want to recover. Then the scan process will begin and you can preview files through the process. After scanning select the data as you need.
What's more, Your images and videos can also be repaired with iMyFone free Hard Drive Recovery Software. It recognizes and repairs files throughout the recovery process. As a result, you receive your data safe and sound.
-
How to Recover Deleted Files from Formatted Hard Drive ?
Users who have formatted their hard drive may be able to restore it unless the data has already been overwritten. Take action right away to prevent the drive from being used. There are three methods to help you recover your data.
The first method is using Windows file history. By typing File History into the Windows search box and selecting 'Restore files using File History,' you can achieve this. Firstly, go to the folder where you saved your files before they were erased. Secondly, When you right-click within the folder, choose Properties from the context menu. Select the previous version and tap "Restore."
The second method is using Time Machine (Mac). Time Machine, an Apple backup tool, can automatically back up your Mac's data to a USB device or an external hard disk. Firstly, go to the location where you last saw your deleted files. Second, The most current version of the folder will be displayed by Time Machine. Tap the right buttons, find the most recent version, and click restore.
The third method is using iMyFone D-Back for Windows best free hard drive recovery software. You don't need to backup files at all. We strongly recommend it because of its convinence. Just follow the user guide to recover your data as you need.
- How to Recover Deleted Files from USB Flash Drive
- How to Recover Deleted Photos on Windows 10/11/Mac
- How to Recover Data from Corrupted SD Card (Damaged)
- How to Recover Unsaved PowerPoint File in Windows 10/8/7
- How to Recover Deleted/Lost Safari History on Mac
- How to Recover Deleted Files from SD Card
- How to Fix/Repair Corrupted/Damaged SD Card Android
- Top 10 Best Free SD Card Recovery Software Android/Mac/PC
- Best SDHC Card Recovery Software Free
- How to Recover Data from External Dead Hard Drive
- How to Recover Deleted Files from a Damaged/Broken/Dead USB
- How to Recover Deleted Videos from SD Card Free
- How to Recover Deleted Photos from SD Card
- How to Recover Deleted Files from Recycle Bin after Emptying