


 March 29, 2023
Outlook creates files in OST and PST formats. These files are hidden and not shown in the folders. OST files are located in the default location that depends on the version of Windows and Outlook you are using. However, we will discuss how to locate the OST files and how we can change their location on a Windows PC.

Part 1. How to Find the Location of Outlook OST Files on Windows 10/11/8/7/Mac?
1.1 Browsing the Default OST File Location
Firstly, you can find the location of the Outlook OST file on Windows in the default locations. The default location depends on the version of Outlook and Windows. Here is a simple table explaining the default location of the OST file on Windows.
MS Outlook Version | Windows Version | Default OST File Location |
Outlook 2007 | Windows 7/8/10 | C:\Users\User Name\AppData\Local\Microsoft\Outlook |
Outlook 2010 | Windows 7/8/10 | Documents\Outlook File\ |
Outlook 2013/2016/2019 | Windows 7/8/10 | C:\Users\Admin\AppData\Local\Microsoft\Outlook |
1.2 Finding OST File Location with Outlook Options
This method will work on Windows 10/11/8/7.
Step 1: Open Outlook and go to “File > Info > Account Settings”.
Step 2: Click on the “Data Files” tab and click on “Open File Location”. It will display the location of the OST file location on your PC.

1.3 Directly Open the OST File Location via Outlook
This is the most straightforward method that you can use to open the location of Outlook OST files.
Step 1: Open Outlook and right-click on the email.
Step 2: Click on “Open File Location”.
Step 3: It will open the Windows File Explorer and display the location of OST files.
Part 2. How To Change Outlook OST File Location?
Method 1: Create a new Outlook Profile and then change the location of the .ost file
The first method to change the Outlook OST file location is by creating a new profile and changing the location of the OST file.
Step 1: You need to locate the original location of the OST file and paste it into the desired location you want.
Step 2: Then open “Control Panel” and navigate to Mail options. Click on the Mail Setup Dialog box and click on the Show Profiles tab. Enter a new profile name and hit “OK”.
Step 3: Enter the details on your email to create a new Outlook profile. Hit “Next” and wait for Outlook to process. Open Server Settings and go to More Settings. Navigate to “Advanced Settings” and click on Outlook Data File settings.
Step 4: Search for the location of your new OST file and open it. Click on “Finish”. Now, go to “Control Panel > Mail”. Select Always use this profile and choose the new profile you created. Apply and save the new changes.
Method 2: Set the ForceOSTPath registry entry to change the location of the .ost file
The second method to change the Outlook OST File location is to set the ForceOSTPath registry entry and change the location of the OST file. It is a Windows Registry Key that can help you to change the location of the Outlook OST files. It works in almost all the versions of Outlook, whether 2003, 2007, 2010, 2013, 2016, or 2019.
Step 1: Open the RUN command by pressing “Windows + R”. Type “Regedit” and hit enter.

Step 2: You will see the Registry editor. There are different keys for different versions of Outlook, so you need to find them accordingly.
Step 3: Right-click on the Registry Editor and choose “New > Expandable String Value”. In the dialog box, enter ForceOSTPath and the new location for OST files. Hit “OK”.

Step 4: Close the Registry Editor and restart Outlook.
Method 3:Use Outlook Email Client
Another method to change the location of the Outlook OST files is by using the Outlook Email Client. However, bear in mind that this method only works on Outlook 2013, 2010, 2007, and 2003. For this method, you need to know the default location of OST files.
Step 1: To change the location of OST files, go to “Account Settings > Data Files”.
Step 2: Choose “Exchange Server Account” and go to “Settings”. Go to “Advanced” and uncheck the box “Use of Cached Exchange Mode”. Hit “OK”. Also, go to “Disable Offline Use > Yes”.

outlook-data-file-setting
Step 3: Go to Outlook Data File Settings and select the option “I want to move the old file”. Click on “Browse” and then “Offline Outlook Data (OST)”. Open it, and Outlook will create a new OST file.
Step 4: Lastly, go to the Advanced section and now check the box “Use of Cached Exchange Mode” and hit “OK”. Restart your Outlook email client and hit “OK” again.
Method 4: Apply Symbolic Links to Repoint OST Location
The last method to change the location of the Outlook OST file is to apply Symbolic Links to Repoint the OST location.
Step 1: Move the OST file from the default location to a new location.
Step 2: Open CMD prompt with administrative rights.
Step 3: Type mklink “C:\old-path” “D:\New path”. Hit enter. A new symbolic link will be created. A shortcut will be created at the default location of the folder. If you delete this, the link will be broken.
Part 3. Bonus Part: How to Find and Recover Deleted Outlook OST File?
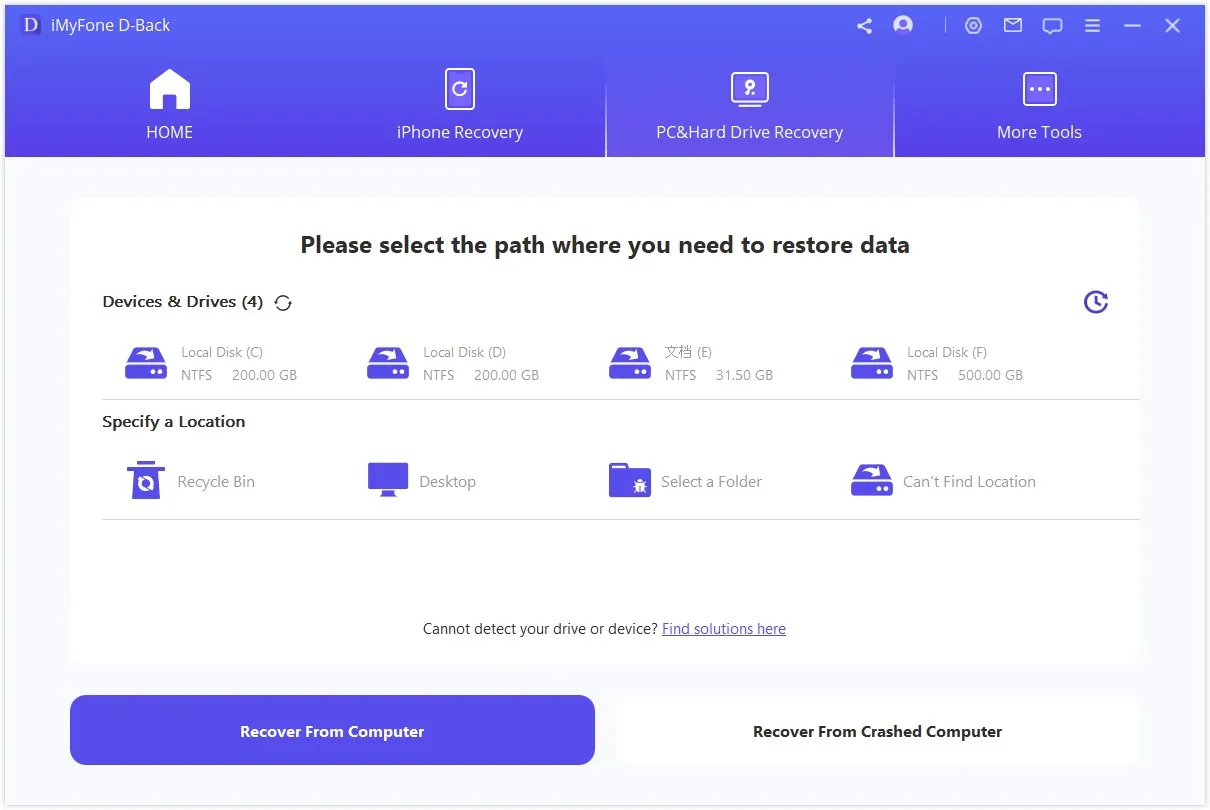
We have discussed different ways to find the location of Outlook OST files, but we don’t know how to recover them if they are deleted. iMyFone D-Back is an advanced tool that helps you to recover any kind of lost or deleted data. It has a high success rate of data recovery and works with high speed. iMyFone D-Back is compatible with both Windows and macOS. It doesn’t require any technical expertise to use as it has a user-friendly interface.
Step 1: Open the tool after installing iMyFone D-Back. Choose the drive in which the Outlook OST file was previously stored.
Step 2: Scan the drive and wait for the scan to finish. You can view all the recoverable files here.
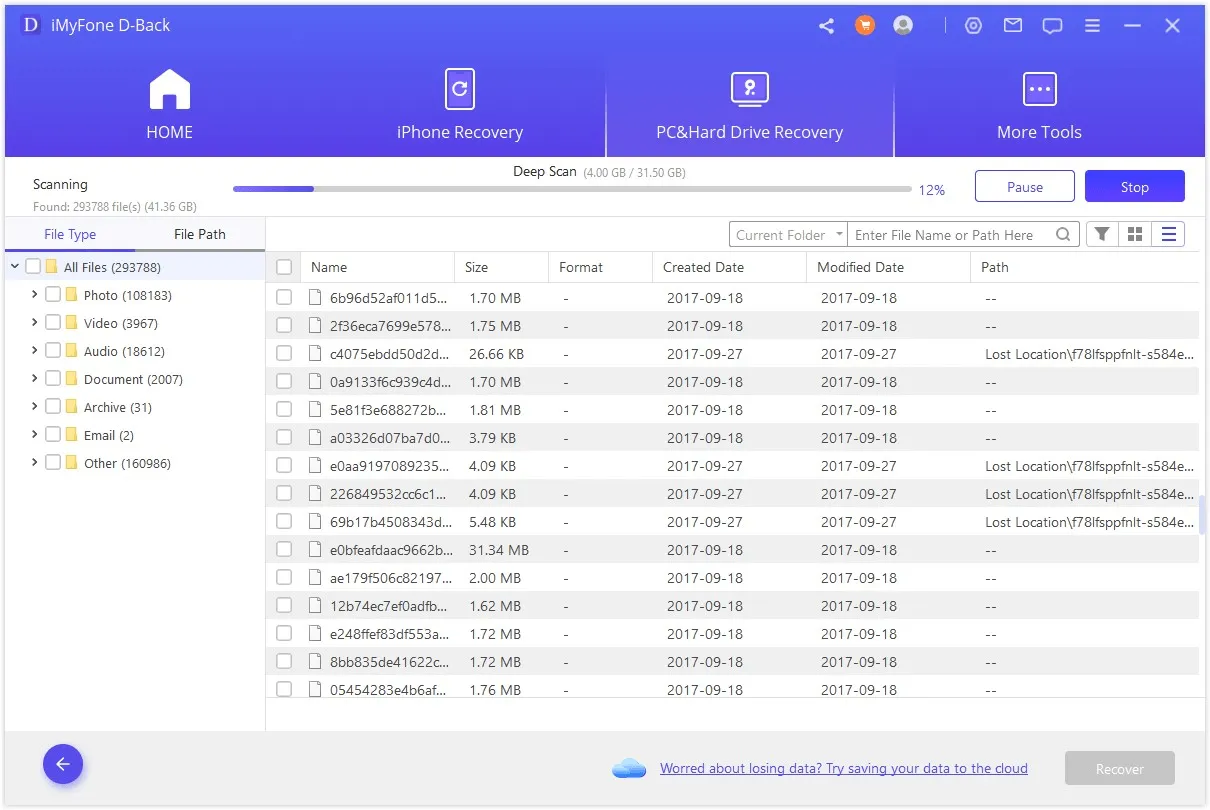
Step 3: Choose the files that you want to restore and click on “Recover”. Select a path where you would like to save these restored files, and they will be recovered.

Conclusion
In this article, we have discussed all the ways to locate the Outlook OST file location and how we can change its default location to a new one. It takes different methods and steps to perform this task. However, you can use iMyFone D-Back to recover deleted OST files. It is a powerful recovery tool that can help you to restore the deleted or lost Outlook OST file from your computer.