


 March 28, 2025
If you encounter this problem and you are wondering why won’t Instagram let me post? In this article, we will talk about some of the reasons why this problem occurs and we will also look at how to fix it.
Part 1: Why won’t Instagram Let Me Post
When you encounter this problem, there are a number of reasons that could be responsible for it. Below are some of the reasons why Instagram won’t let you post- If your internet connection is not valid or quick enough, then it can result in your Instagram crashing and not letting you post;
- If you post something that violates the community guidelines of Instagram. Instagram has AIs that can detect posts that violate their guidelines, and you run the risk of your account being banned if you post inappropriate content.
- One other reason could be that the file you are trying to upload is too large. This happens frequently with 4K images and HQ videos also. At times, it could just take a longer time to completely upload, or it might just not work in some cases or not just work at all.
- A reason that could lead to you not being able to upload photos anymore on Instagram could be that something is wrong with the cache memory Instagram stored on your phone. This reason is usually from Instagram’s side and it is one of the most common reasons why this problem always occurs.
- If you also post too many pictures on Instagram at a time, then they may block you from posting temporarily. If you post photos consecutively, Instagram may see you as a bot and then block you.
Part 2: Solutions for Instagram won't Let Me Post
There are some solutions that you can attempt to solve this problem whenever you encounter it and in this part, we will look at some of those fixes that you can apply to some of the issues that result in this problem.2.1 Fix Your Internet
We have already established that if you have an unstable internet connection that could be one of the reasons why you are unable to post on Instagram. Refreshing your network connection could help you solve that problem. So first of all, refresh your network and check if that will solve the Instagram not refreshing feed and posting problem.If the source of your network connection is a router, then ensure that internet connectivity is being received from the router by your device.
Incorrect PSK provided for network SSID error is one of the common issues that may occur if you are making use of Instagram on your PC via a router connection.
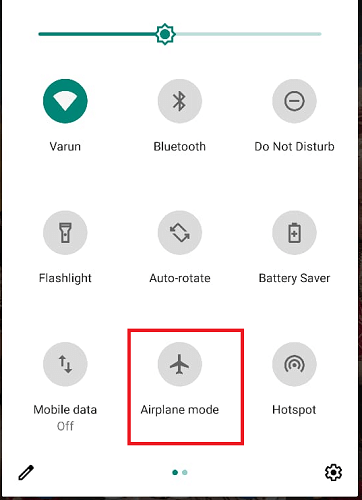
If you are making use of your phone, check if the internet connection of your phone is enabled. If the connection is enabled, then tap flight mode and after some seconds, disable the flight mode. It will restart your connection. You can also just turn your data on and off or try to reconnect if you are using Wi-Fi.
2.2 Clear Instagram Cache
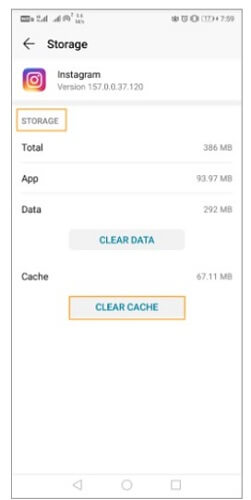
When Instagram is running, it generates and stores cache on your phone. The cache contains metadata from previous entries relating to your account, and it can cause an application to misbehave and could be a major reason for you not being able to post or play videos on Instagram. If you are experiencing this problem, when you clear the cache most time, it solves the issue. The process of doing this on an Android device is different from that of an iOS device and they are both listed below.
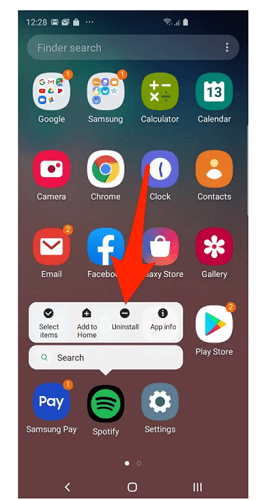
Android
- Go to Settings and then select App settings.
- Then from the list of apps, find Instagram and tap on it.
- Then tap on “Storage” and choose “Clear Cache”.
iPhone
- Open Settings and then click on “General”.
- When inside General, tap on “iPhone Storage”.
- From the list of apps, you’ll see, tap on Find Instagram.
- Then tap on “Offload App” to clear the cache of the Instagram app. You can also delete the app and this will delete all the data related to Instagram.

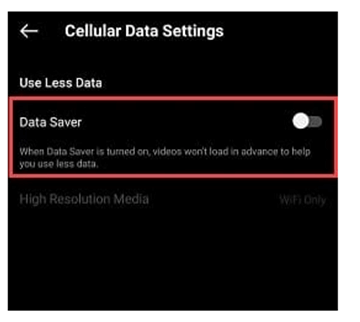
2.3 Turn Off Data Saver
There is a data saver setting on Instagram that attempts to save your data by disabling some of the features for uploading bulk content. It prevents the user from sharing a lot of posts at once.If you encounter the problem of not being able to upload on Instagram, you should check if your data saver setting is enabled as this could be a possible cause of the problem. When you are in your Instagram account, you can disable the data saver setting inside the mobile data settings. The steps to do this include
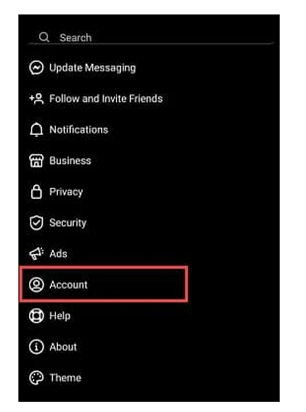
- Select “Settings” when you are in your Instagram profile.
- When you are inside Settings, click “Account”.
- Then find “Cellular data usage”.
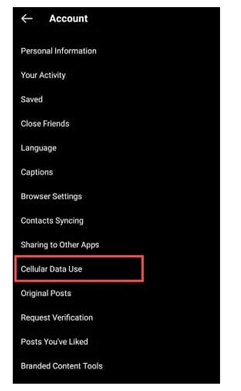
- Then turn off the option for data saver.
2.4 Empty Your Phone Storage Space
If storage space on your phone is full, then you might be faced with this problem. You can try freeing up space on your phone by deleting apps and content that you no longer need.
- Go to settings on the Instagram app.
- Then tap on account.
- Then open Original post settings.
- Then check the three options that are there.
- Ensure to disable save posted photos and save posted videos.
2.5 Update Instagram
If your Instagram app has not been updated to the latest version, it can also result in this problem. This is because the updated version might contain fixes to some bugs that the previous version had and it might also have improved performance.
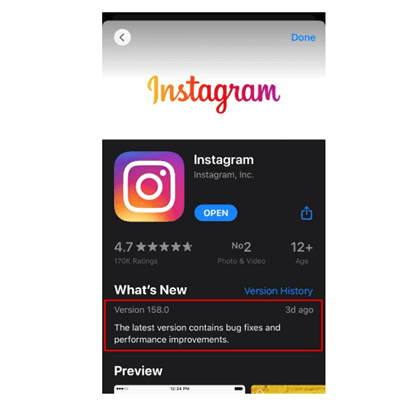
- Visit the App Store then at the top right of the screen, tap on the profile icon.
- Find the Instagram app from the list of apps and then check for an option to update. If there is, tap on it to update the app.
To update the Instagram app on an Android device
- Visit Google Play Store and then go to the options toolbar and choose “Apps and Games”.
- Look for the Instagram app and then if there is an option to update it, tap on it.
Then you can attempt to post again and see if the problem has been fixed.
2.6 Use Another Account
If you still can’t post on Instagram after you have tried all these processes, then you can make use of another account to post the content you want to post. Try logging in to another account into your Instagram app to see if you can make a post successfully. If you can, then you would be able to narrow down the problem with your own account.Part 3. Fix Instagram won't Post with Fixppo
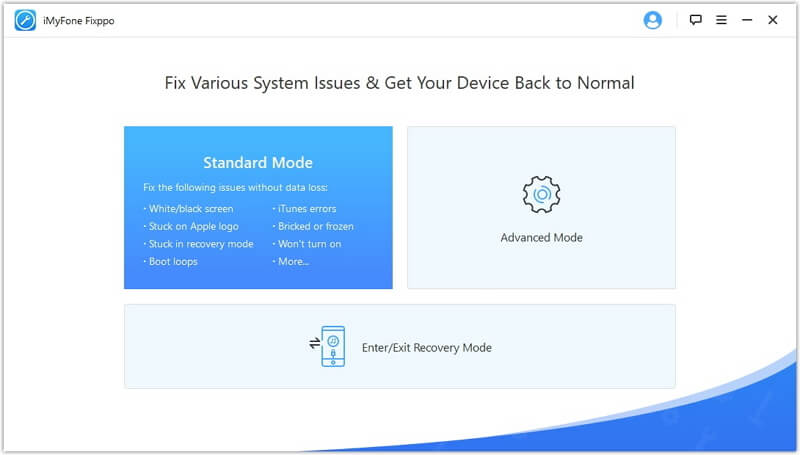
iMyFone Fixppo is a software that can help you fix iOS devices/Apple TV issues. Some of the issues it can handle include your device being stuck on the Apple logo, restarting loop, Recovery/DFU Mode, etc. The software has 3 modes namely the Standard Mode, Advanced Mode, and then Enter/Exit Recovery Mode. The first and last modes do not affect data on the device, but the Advanced Mode will wipe out all your data.To fix the issue of not being able to post on Instagram with iMyFone Fixppo
- On your computer, open iMyFone Fixppo.
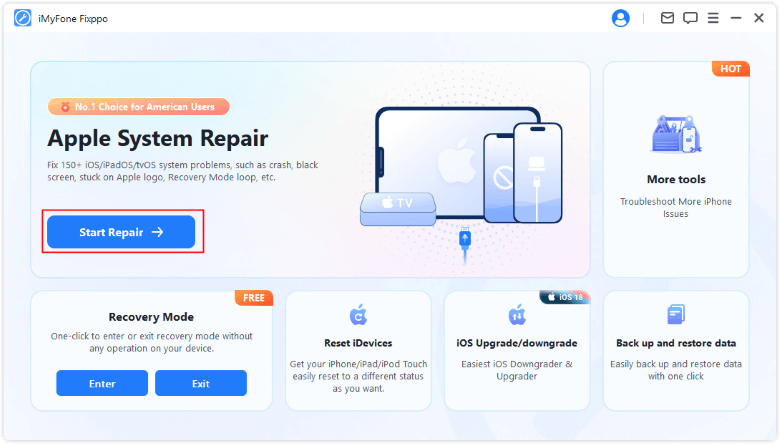
- Then choose the Standard Mode.
- Connect your device to your computer after selecting the Standard Mode, and then click “Next”.
If your device is locked and it runs iOS 16/17/18/26 or later, it may not be recognized by the program. Ensure to unlock your device before clicking on Next.
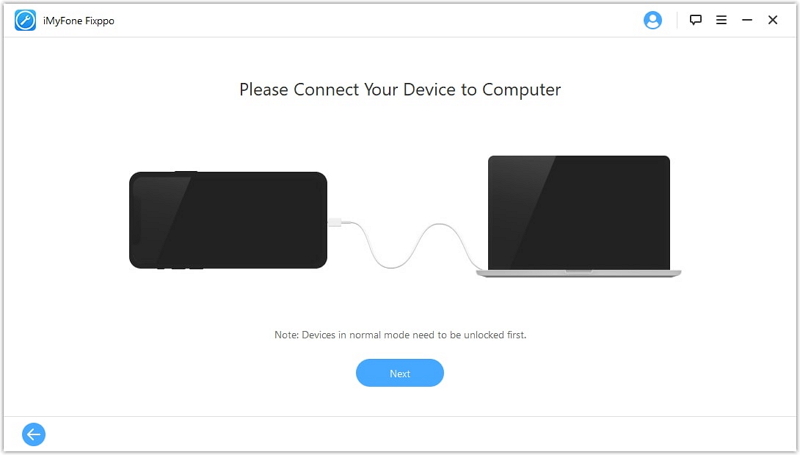
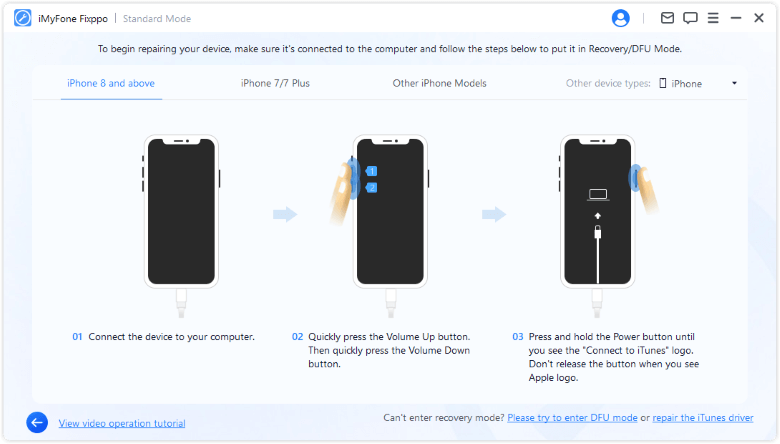
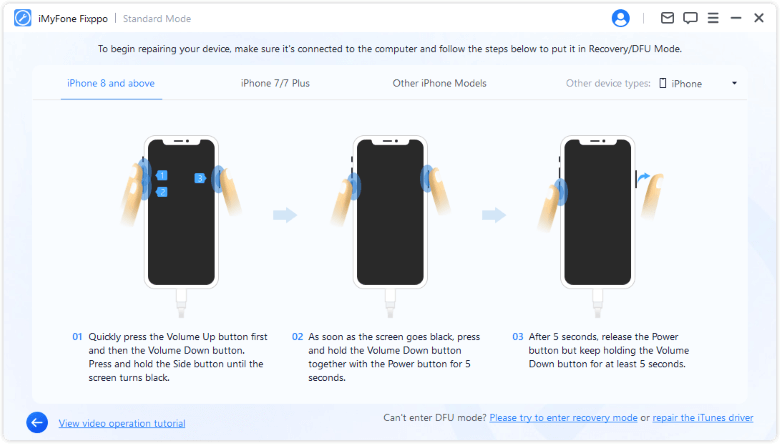
- If the program can detect your device, it will move to the next step after clicking on Next, if not, it will request that you put your device in DFU or Recovery Mode before it can proceed.
To put your device in DFU mode, follow these instructions:
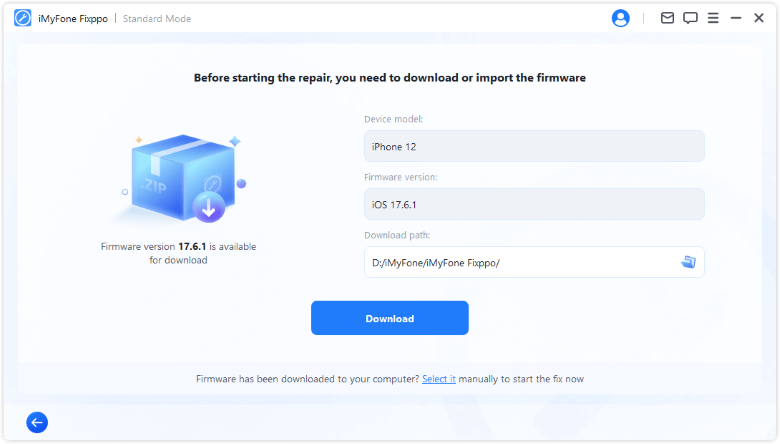
- Downloading the firmware is the next step. Automatically, the program will detect your device’s model and present you with a list of all the firmware available. Click “Download” after you have chosen the version you want.
If the program gives you an older version, then you can choose to downgrade your iOS or tvOS. If there is no older version, then you can’t downgrade the OS.
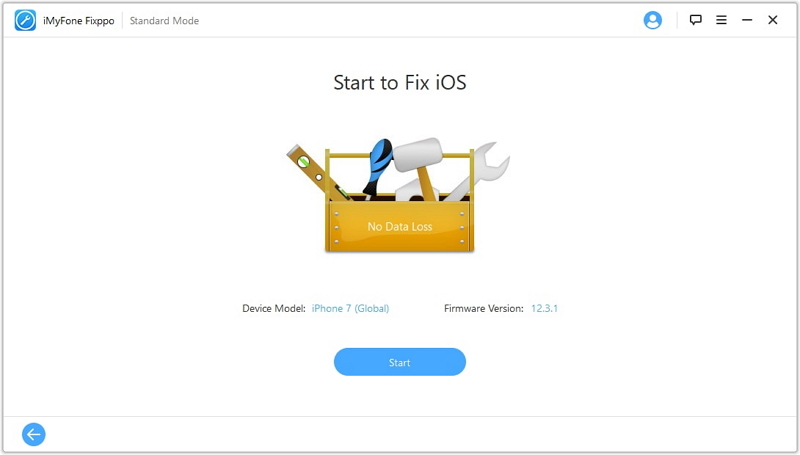
- When everything has been prepared, you can then start fixing your device. Click on “Start” after checking the information of the firmware and the device, and confirming that everything is correct. Generally, an older firmware won’t affect the process, but in the event that the process fails, you can attempt it again with a newer version because there could be compatibility issues.
- Automatically, the program will begin fixing your device. Ensure that your device remains plugged during the entire process as unplugging it could result in the device being bricked.
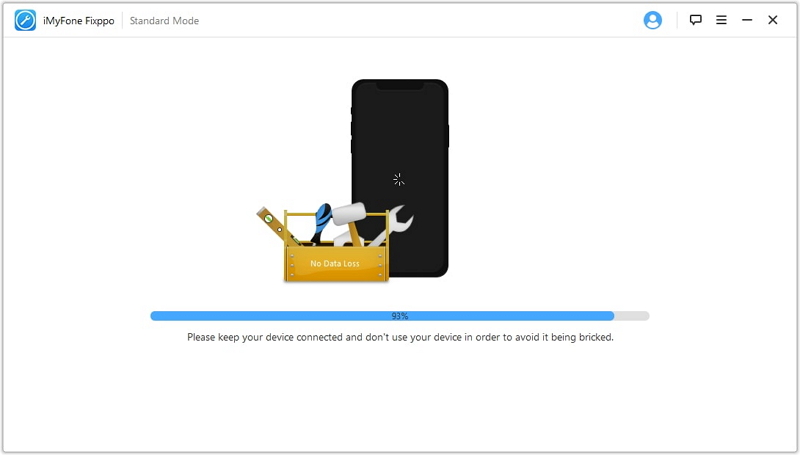
- This process will not take too much time, and you can confirm if your device can restart as it normally does after the fix.
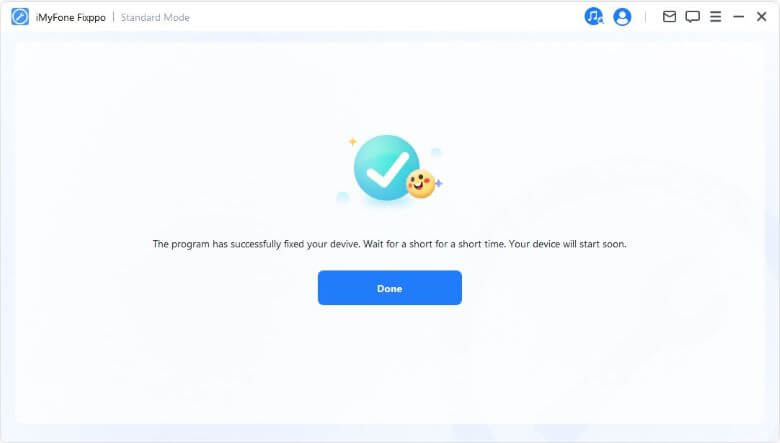
- You can try doing the entire process again or go for the Advanced Mode if it fails.