


 August 3, 2022
Professional cameras like Panasonic Lumix are trending these days. People are using these cameras for both personal and professional use. We know that after taking the photos, it is common that we copy these pictures to our phones so that it is easier to share. In this article, we will talk about different methods to transfer photos/videos from Panasonic Lumix camera to iPhone.

Table of Content [Hide]

Part 1. How to Transfer Videos from Lumix Camera to iPhone with TunesMate
Transferring data to an iPhone is never easy. The iOS operating system has security restrictions that not every transfer tool can handle. This is the reason we need to use a professional data transfer tool that can easily transfer data to the iPhone. If any user wants to transfer photos or videos from Lumix camera iPhone, then the first procedure would be to transfer the media files from the SD card to the computer. Then use a tool like TunesMate to import the images to the iPhone.


To copy photos/videos from the Lumix camera to the computer, take out the SD card and put it in a card reader. Mount this card reader on your computer. Once detected, copy the image and videos from the SD card to your computer. Now, the first half of transferring data to the computer is done.
Let us see TunesMate features and how TunesMate can help us to transfer this data from computer to iPhone.
Features:
- The user can transfer data from iPhone to computer and vice versa.
- It can also help the user to rebuild a corrupted or damaged iTunes library.
- TunesMate allows the user to sync data without removing previous data.
- It is compatible with both Windows and macOS.
Steps to Use TunesMate:
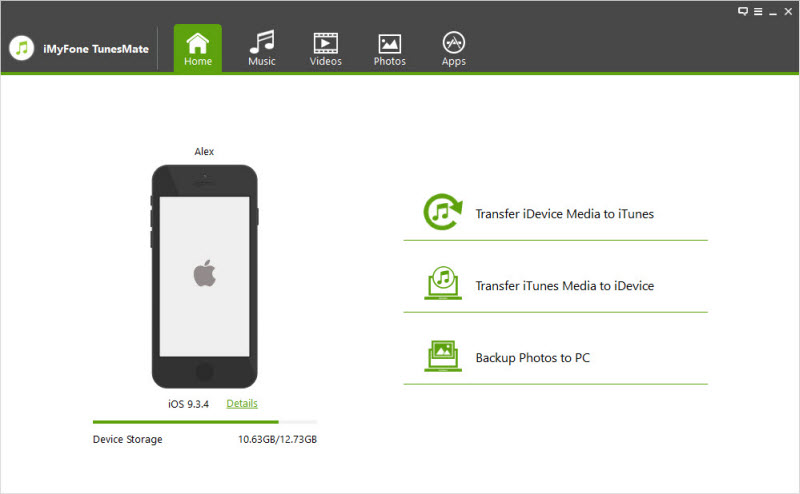
Step 1.Go to the iMyFone website and download TunesMate. Install the tool and open it. Connect your iOS device or iPhone to the computer. Wait till it's detected by the tool.
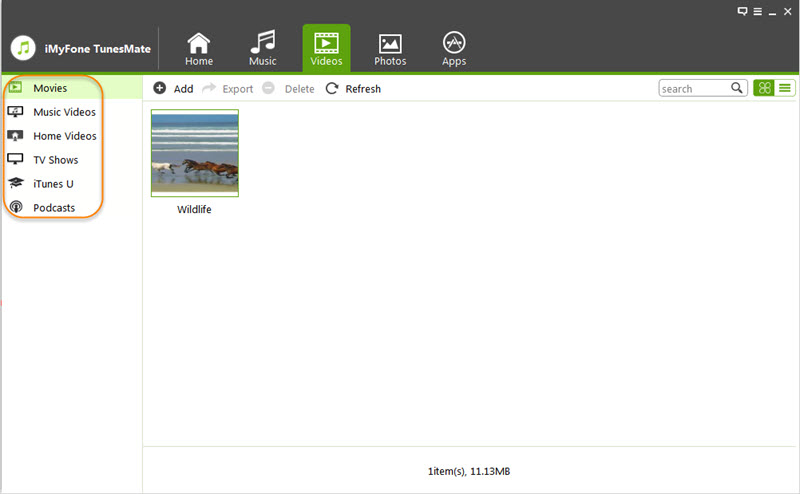
Step 2.To transfer the videos, tap on the Videos option on the top bar of the tool. You will see different video types here, including music videos, home videos, tv shows, and more. Click on the type of video that you want to upload.
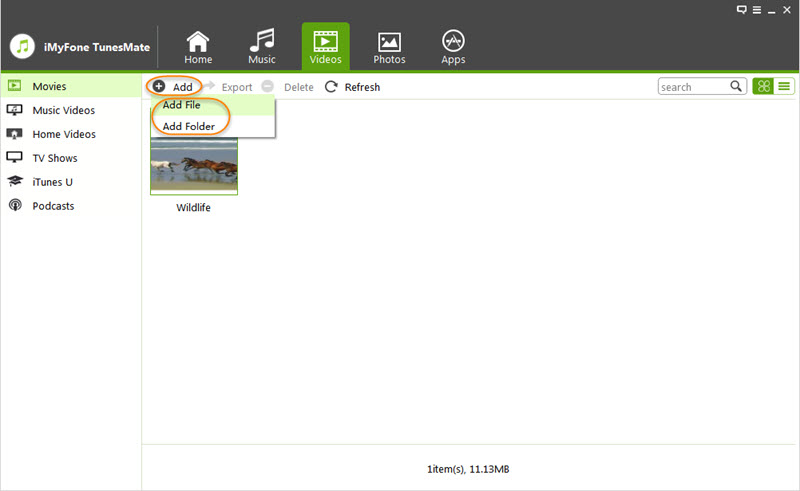
Step 3.Now, tap on Add and then on Add File. Or you can also select Add Folder if you want to transfer multiple videos to your iPhone in a single go. Browse the videos that you want to transfer and click on Open. It will be transferred to your iPhone.
Part 2. How to Transfer Photos from Panasonic Lumix to iPhone with Panasonic Image App
In the previous part of the article, we have discussed how one can transfer photos or videos from a Lumix camera to a computer and then use a third-party transfer tool to transfer them to any iPhone or iOS device. However, there is another way in which the user can transfer photos from the Lumix camera to the iPhone, but it does not require any third-party tool.
Panasonic Lumix has an application from which the user can transfer photos easily to an iPhone. But this method has certain requirements and restrictions. Let us see how one can use Panasonic Image App to transfer photos from camera to iPhone.
Step 1. Go to the App Store and download Panasonic Image App.

Step 2. On your camera, open up settings and go to Set up > Wi-Fi > Wi-Fi Function > New Connection. Here, you will see an option of Remote Shooting & View on your camera, click on it, and you will see an SSID and a password. Or the user can also use a QR code appearing on the screen.

Step 3. On your iPhone, go to settings and connect to the camera's Wi-Fi SSID and enter the password appearing on the camera. This will generate a Wi-Fi connection between the iPhone and the camera.
Step 4. Now that both of the devices are connected, you can easily transfer the data from the camera to the iPhone using the Panasonic Image App.

FAQs: More About Panasonic Lumix Camera You May Want to Know
1 Does Panasonic Lumix have Bluetooth?
Yes. All the new models of Panasonic Lumix cameras have Bluetooth, as it makes it easy for the user to establish a connection between the camera and smart devices.
2 How do I transfer photos from the Lumix camera to the computer using Wi-Fi?
To transfer photos from the Lumix camera to the computer using Wi-Fi, you first need to establish a connection between two devices. It is slightly different from connecting to a phone.
- Open the settings on your camera, and go to the Wi-Fi option, click on New Connection.
- On your PC, open the network and sharing option from the settings. Click on Set up a new connection or network. Then click on Manually connect to wireless network.
- Enter the SSID in the tab of Network Name and select WPA2-Personal as the security type. Then enter the password and tap on Next.
- If everything is done as instructed, you will get a notification that your camera is connected to the computer. Now, you can transfer photos from the Lumix camera to a computer over Wi-Fi easily.
Conclusion
Transferring photos from the Panasonic Lumix camera to an iPhone is not an easy task, especially when you don't have a transfer tool. However, we all know that we can transfer photos to a computer with the help of an SD card reader. To proceed forward and transfer these photos from computer to iPhone, we need a tool like iMyFone TunesMate. It is a professional data transfer tool that has a high success rate of transfer between computers and iOS devices. It supports all the files, and the user can download the tool for free.