


10 Fixes: iPhone Not Connecting to Wi-Fi after iOS 17/18/26 Update
Category: iPhone Issues

4 mins read
Are you having problems with your iPhone not connecting to Wi-Fi after iOS 17/18/26 update? Probing for an internet connection usually means your iPhone is trying to connect to a Wi-Fi network. If you just updated your iPhone to iOS 17/18/26, you can see a problem when trying to connect to the Wi-Fi settings.
If your iPhone is not connecting to Wi-Fi after the update, this article will give you a quick guide on how to fix this problem so that you won't be worried and your device stays connected. Some basic Fixes are free as well!

In this article:
- Part 1. Why is My iPhone not Connecting to Wi-Fi?
- Part 2. 9 Ways to Fix iOS 17/18/26 iPhone Won't Connect to Wi-Fi
- 2.1 Check your Wi-Fi Router
- 2.2 Toggle Wi-Fi Off & On
- 2.3 Toggle On & Off Airplane Mode
- 2.4 Disable the VPN
- 2.5 Forget and Reconnect Network
- 2.6 Change the Current DNS
- 2.7 Try Force Restart iPhone
- 2.8 Delete All Network Settings
- 2.9 Erase iPhone Data of All
- Part 3. Fix iPhone Not Connecting to Wi-Fi after Update without Data Loss

Part 1. Why is My iPhone not Connecting to Wi-Fi?
Though it's urgent for you to fix the iPhone not connecting to Wi-Fi problem, taking a look at what caused this weird issue is also important to prevent it from showing up again.
Part 2. 9 Ways to Fix iOS 17/18/26 iPhone Won't Connect to Wi-Fi
Given that you may have read these reasons, you can check and solve them one by one with useful solutions that will be discussed later. And make sure to try them all if one can't function because the fixes may apply to different situations.
1 Check your Wi-Fi Router
If you are experiencing iOS 17/18/26 Wi-Fi not working problem, the first thing you need to check is your Wi-Fi router. If the router is too hot to withstand, then it's likely that the router is not stable enough for you to establish a Wi-Fi connection. Also, if the light on it won't flash as normal, it means your Wi-Fi is disconnected. Check the cable and make sure that it's firmly connected to the socket.
2 Toggle Wi-Fi Off & On
If the router is 100% not problematic, you can switch off the Wi-Fi on your iPhone and then turn it on to identify whether the problem of the iPhone not connecting to Wi-Fi can be solved. Also, you can turn to Cellular and see if the signal is stable. If not, you can seek other spacious places before trying these methods. Follow the given instructions.
- 1. Open the Settings app on your iOS device find the Wi-Fi option and turn off it.
- 2. Tap the switch to restart the Wi-Fi after waiting for 30 seconds. Now, join your Wi-Fi network using your iPhone.

You can try to connect your iPhone to another Wi-Fi network, if one is available, see if the issue is with the network or your iPhone.
3 Toggle On & Off Airplane Mode
If your iPhone not connecting to Wi-Fi because your iPhone not accepting Wi-Fi password, it's also advised to restart the network by first activating airplane mode on your iPhone and then disabling it. Though it's quite simple and works for some people, it can easily fail. If this happens, you can try 4-5 times and give it enough time to search and retrieve the signal for your iPhone. To do this, take the following actions:
- 1. Swipe down from the top of your screen (For iPhone with the Home button, this should be seen by bringing up the control center from the bottom of your screen).
- 2. Tap the airplane icon to turn it on and stay still for 15 seconds or so, then tap it again to turn it off, and don't connect your iPhone until it fully obtains the signal.

4 Disable the VPN
If you have the habit of turning on the VPN all the time, it's time to give it a break since it may interrupt your device and that's why your iPhone won't connect to Wi-Fi. Switch the VPN off for a few minutes, or you can log into the router's admin dashboard and then switch it off from there to deactivate the VPN. If this is not the solution you're looking for, please keep reading.
5 Forget and Reconnect Network
To further know about the issue, you should disconnect from the faulty Wi-Fi network and re-join it. A brief config error or networking problem might cause you a lot of difficulties. Before forgetting the Wi-Fi password, make sure to keep it in mind. For that:
- 1. On your iPhone, open the Settings app and select Wi-Fi.
- 2. From the list, tap the name of the Wi-Fi network. Then click the "i" next to it. Then click Forget This Network.
- 3. Wait for a few minutes and once again connect it with the password.

6 Change the Current DNS
You can also try changing the DNS on your iPhone. It may assist in resolving the iPhone not connecting to Wi-Fi after the update issue. To change to Google DNS, follow the steps below.
- 1. Open the Settings app on your iPhone, navigate to Wi-Fi, and tap on the Wi-Fi network to which you wish to connect.
- 2. Tap Configure DNS and then turn to the Manual option. Then, click on the Add Server item under DNS servers and fill it with Google DNS (8.8.8.8).

7 Try Force Restart iPhone
Here comes the almost fit-all solution, which is to force restart your iPhone. When it comes to minor iPhone glitches that can't be fixed with simple and common solutions, this method can always save you without effort but with great results. Follow the steps:
For iPhone 8/X/11/12/13/14/15/16/17:
- For the Volume Up and Down buttons, you should quickly press then release them.
- Then quickly press the Side button for the screen to completely turn black and bring you the Apple logo.
For iPhone 7/7 Plus:
- Press and hold the Side and Volume Down button for the screen to show the Apple logo only.
For iPhone 6 and later:
- Press and hold the Side and Home buttons until your device starts to display the Apple logo.

8 Delete All Network Settings
Since this iOS 17/18/26 Wi-Fi not working issue keeps pestering you, here is another solution: reset network settings. You can try this one when other relatively simple ways can be done smoothly and give you positive feedback. Though you have to re-pair and re-connect after that, it's still worth trying to fix many network problems including this iOS 17/18/26 internet issues.

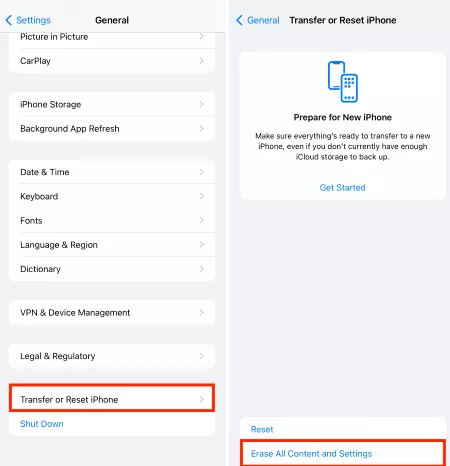
9 Erase iPhone Data of All
If none of the above methods solve your Wi-Fi issue, you will need to reset your iPhone completely. It is another chance to resolve the problem. However, before you do a reset, making a backup first is preferred. Resetting your iPhone will wipe all data and settings and restore the operating system to the latest. As a result, restoring your iPhone may resolve your iPhone not connecting to Wi-Fi trouble.
Part 3. Fix iPhone Not Connecting to Wi-Fi after Update without Data Loss
If you're still having trouble with your iOS 17/18/26 Wi-Fi not working problem, iMyFone Fixppo can be your another choice. With its Standard Mode, you can not only solve this iOS system problem in no time but also get your iPhone back to work without spending extra Cellular data.
With the user-friendly interface, everyone can use Fixppo with 100% security as it works by simply clicking on its main interface.
iMyFone Fixppo
- 4 easy steps to fix iPhone not connecting to Wi-Fi but other devices are.
- Standard Mode allows you to solve the problem without data loss and with 100% security.
- Free enter/exit Recovery Mode is offered in case you should need it via iTunes.
- Compatible with all iPhone models and iOS versions (iOS 17/18/26 supported).
- Supports to fix iPhone problems such as iPhone stuck in guided access, iPhone Wi-Fi turns on randomly easily.
Limited Time 10% OFF Coupon Code for iMyFone Fixppo: FARTT91
You're welcome to watch how Fixppo fix iPhone won't connect to Wi-Fi
Step 1: Download and install Fixppo to the desktop. Launch it to select Standard Mode so that you can start to fix it without data loss.

Step 2: Take a lightning cable to connect your iPhone to the computer. For some devices, Fixppo can detect them directly. But no worries if yours can't, you can simply follow to put your iPhone into Recovery mode first to address this puzzle.

Step 3: If you see this interface, it means you need to download the firmware for Fixppo to use it to fix your problem. And it's ok if you want to get other available firmware or you can just stick to the first one and click on Download to get it.

Step 4: After that, click the Start button, and Fixppo will begin the last step to successfully fix your iPhone won't connect to Wi-Fi after update problem within minutes.

To Conclude
Wi-Fi issue is certainly a nuisance, but the methods above should help you resolve the connectivity issue of the iPhone not connecting to Wi-Fi. And it's worth noting that though there are multiple potential solutions to solve this issue, the best and easiest one is using iMyFone Fixppo. And whatever the solution you take, we hope that your problem can be fixed without delay.
Limited Time 10% OFF Coupon Code for iMyFone Fixppo: FARTT91
(Click to rate this post)
Generally rated 4.7 (256 participated)
Rated successfully!
You have already rated this article, please do not repeat scoring!