


iPhone Disabled But You Know the Password? How to Unlock the iPhone without Losing Data?
Category: iPhone Issues

5 mins read
Question
Hi there, my iPhone got disabled but I know the password. The problem is it says "iPhone is disabled connect to iTunes" and not showing any option to enter the passcode. Actually, my little kid was playing with my iPhone and may have unintentionally made several wrong attempts, eventually, making my iPhone disabled but I know the password and I don't want to lose any of my data. So, I was wondering if there is any alternative way to re-enter my password and unlock my iPhone? Any help is greatly appreciated! Thanks!

We do understand that it is a bit awkward situation that your iPhone is disabled with you knowing the password, but you are still unable to unlock it. We have specifically done some tests on such issues in order to help you with your problem and get you device unlocked without losing your data. Let's explore now.
In this article:
About Trust This Computer
Prior to moving on to solutions, this first section of the article will guide you about the 'Trust this Computer' pop up alert which plays a vital role if you wish to save your data from getting wiped off during the fix.

'Trust This Computer' alert or other security alerts that asks you to 'Trust' a device pops up on your iPhone when you connect your device to a computer or other devices for the very first time. The primary reason behind such a precautionary measure is:
Only those computers or devices to which you have granted 'Trust' permissions are allowed to establish a connection with your iPhone or other iOS device to carry out sync operations, create backups or access your device's data like photos, contacts, videos, etc.
Note
Once you have trusted a device or computer, their permissions remain unchanged until you completely erase your iOS device or you yourself make amendments to these permissions.
If in case, you choose 'Don't Trust' on such security alerts, that implies you block or deny the computer or device access to the data stored on your iPhone. Also, whenever you connect your device to that computer, this security alert will always pop up on your screen to seek your permissions.
How do you know if you have trusted a computer before? If you have synced your iPhone to any computer before, then you must have trusted the computer.
If You Have Trusted a Computer Before
In the case, you have already tapped on 'Trust' button on the 'Trust this Computer' security alert before, simply connect your device to the 'Trusted' computer. After connecting your iPhone and the computer, follow the below mentioned solutions, and then you will be able to save your data.The good news is that your iOS device will be recognized successfully and there will be the options like "Update", "Restore iPhone", and "Back Up Now".
Note
It seems Apple changes the security mechanism and for some devices, there are not such options.
Method 1. Try "Update" Option First If There Is the Option
While we were performing some tests to get iPhone out of won't turn on situation, we were offered with Update option. Here's how we enable the disabled iPhone without erasing the data.
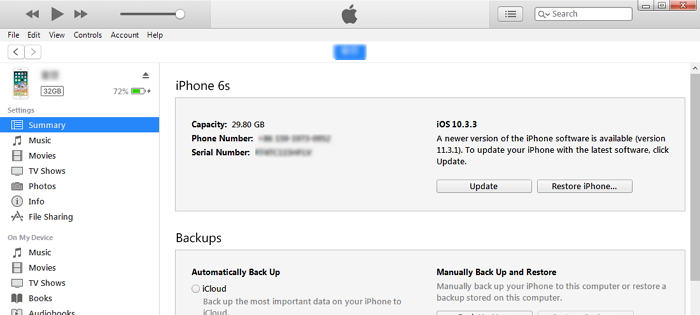

Method 2. Use iTunes to Backup iPhone & Then Restore Your iPhone
If you cannot see the "Update" option and you can see the "Back Up Now" option, you can just make backup of your iPhone via iTunes and then factory reset it. Later, when your iPhone is enabled, you can restore that backup to your iPhone and retrieve your data back. Here's what you need to do.

If You Never Trusted a Computer Before
As discussed in the previous section, you can only gain access to your iPhone's data via your computer when you have tapped on 'Trust' button on the 'Trust this Computer' alert. If in case you haven't granted the Trust permissions, then we're really sad to inform you that there is no other way round to help you and save your device's data yet. The only way to gain access to your iPhone is to restore it via iTunes which will wipe off entire data on your device and then reinstall its compatible iOS 14 firmware. Here are the steps to get this done.

Quick Tip: Selectively Restore Your Backup Files
Here's an additional tip for the users who wish to selectively restore their data. As we all know, iTunes just doesn't allows you to restore your data selectively, which is its biggest drawback. However, we have found this app called iMyFone iOS System Recovery, which is the highly trusted and powerful tool to serve the purpose of restoring your backup selectively and securely. Let's discover the steps involved.

Key Features:
- Supports to fix iPhone problems like iPhone not accepting Wi-Fi password.
- Allows you to preview and selectively extract data from iTunes or iCloud backup files; https://www.imyfone.com/iphone-issues/iphone-not-accepting-wifi-password/
- Compatible with various iOS devices, such as iPhone 17/16/15/14/13/12/11/XS/XR/X/8/7/6s/6/5s/5C, iPhone SE, iPad Pro, iPod touch running iOS 16/17/18/26;
Step 1: Connect your device to a computer
After you click Standard Mode, then connect your device to your computer and click the Next button. If you device cannot be recognized, follow the on-screen instructions to put your device into recovery mode or DFU mode.

Note
Unlock your device before clicking the Next button if your device is in normal mode and running iOS 12 or later.
Step 2: Download the firmware
The program will automatically detect the model of your device and show you the available versions of firmware. Choose the version you need and click Download.

Step 3: Fix iPhone is Not Currently Available
Now check the device and firmware information. Once you confirm that everything is correct, click the Start button. The program will automatically begin to fix the device.

Limited Time 10% OFF Coupon Code for iMyFone Fixppo: FARTT91
(Click to rate this post)
Generally rated 4.6 (256 participated)
Rated successfully!
You have already rated this article, please do not repeat scoring!