


[7 Ways] Fix iPhone Could Not Be Restored An Unknown Error Occurred
Category: iPhone Issues

3 mins read
Question
“I woke up to find my iPhone constantly rebooting itself. But when I tried to put it in recovery mode and restore it, I got a message saying “iPhone could not be restored. An unknown error occurred (4010).” Can anyone help me fix this?”
You may want to restore your iPhone via iTunes. But unexpectedly, the error message of iPhone could not be restored. An unknown error occurred pops up.
You don't know what the error code means, neither do you know how to fix this iTunes fail to restore iPhone problem. And you should be worried about the risk of data loss.

Luckily, this article shares ways to work around the iPhone could not be restored problem. In a few minutes, you can solve the issue effectively!
In this article:

Part 1: What Cause iPhone Error 4010?
When you try to restore iPhone using iTunes but run into the problem of iPhone could not be restored, the common reasons would be: failed jailbreaking, iTunes errors, the lack of enough iPhone storage or problematic iOS system.
And there are other common error codes and the reasons behind these error you should know.
Common error codes on iTunes:
Part 2: How to Fix iPhone Could Not be Restored Error 4010?
Apart from the hardware damages, most of the reasons behind these error codes including the error 4010 iTunes restore lie in the iOS system glitch. And that's why the professional iOS System Repair Software - iMyFone Fixppo is recommended, which helps to solve iOS system problems from home!

Restore iPhone Without Error Code:
- 3 easy clicks to fix iPhone could not be restored problem, no technical skills required.
- Ensure to fix iTunes not restoring iPhone for unknown error without data loss.
- Restore iPhone firmware without iTunes, no error code message pops up.
- Fix 150+ problems, including iTunes not detecting iPhone, iPhone frozen on install now, iTunes not restoring iPhone, etc.
- Support the latestiPhone 15/16/17 & iOS 17/18/26, and earlier iPhone models & iOS versions.
Now you can follow the steps below to try Fixppo to fix iTunes error 4010:
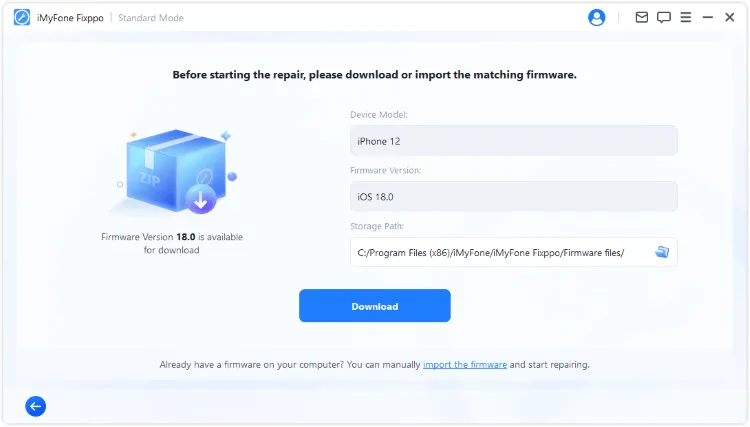
Step 1: Download Fixppo to your computer by clicking the button below.
Step 2: Connect your iPhone to the computer with a USB cable, then choose Standard Mode to fix the 4010 error on iTunes.

Step 3: Fixppo will automatically detect the iPhone with unknown error 4010 and provide the available firmware file. Click on Download to get it.
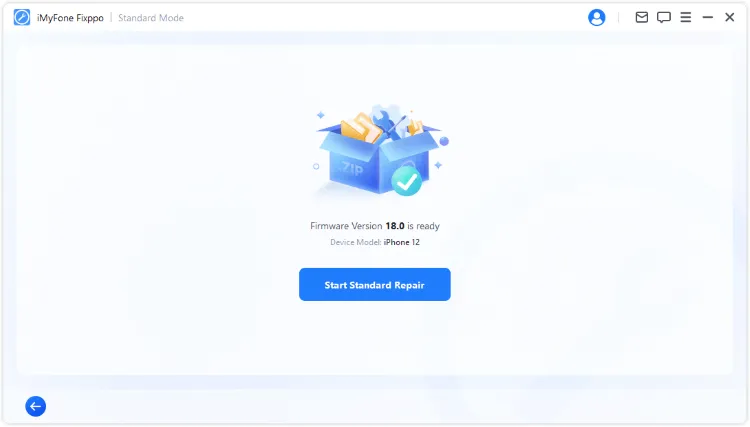
Step 4: When downloaded, click the Start Standard Repair and wait patiently for Fixppo to restore your iPhone.
When your iPhone is restarted, it means your iPhone is restored successfully. and since your iPhone is restored, you don;t have to try iTunes for a restoration now!
Part 3: How to Fix iPhone Could Not be Restored Error 4010?
When you see the iTunes could not restore iPhone messages, it's necessary to make a basic checking of the errro code with the reasons listed above. And sometimes, all you need to do is by following the simple methods here.
1 Check Your USB and Internet Connection
Sometimes the apple error 4010 on iPhone may be a result of a faulty USB/Internet connection. Check whether your device is stable and connected to the WiFi. Also, use the USB cable that came with the device. You can switch to a different USB port or a different computer.

2 Update iTunes to Remove iPhone Error 4010
The iPhone could not be restored error 4010 is likely occurs because iTunes is unable to communicate with Apple servers to download the necessary software. In this case, you may see a message “This device isn’t eligible for the requested build.”
Generally, you need to download the latest version of iTunes before try restoring the device with iTunes.
For iTunes on Windows:
Launch iTunes and click Help on the top-left pane, then choose Check for Updates.

For iTunes/Finder on Mac:
Click on iTunes and click on Check for Updates when there is an update for iTunes.

Note
Sometimes the restoring error, especially the error 1671, occurs because iTunes or your Mac (if it is running macOS Catalina or above) is downloading the latest software and all you have to do is wait for the download process to be completed.
3 Restart Your iPhone and Computer
If you've opened too many apps on your iPhone or computer, they may cause your device to respond slowly or lead to unknown error.
That's why you need to restart your iPhone and computer to force shut-down apps running on the background, maybe you can then fix the iPhone could not be restored problem.
- For iPhone 8/X/11/12/13/14/15/16/17: Press the Volume Up/Down and the Power keys, When the Slide to Power Off appears, drag it to turn off your iPhone. Wait for a while, then long-press the Power button to restart yoiur iPhone.
- For iPhone 7 and earlier: Long-press the Power/Lock button and turn off your iPhone by dragging the hint. After that, long-press the Power/Lock button again to restart your device.

4 Restore iPhone with iTunes to Fix Error 4010 on iTunes
When face with the error 4010 or others in iTunes, you can put iPhone in recovery mode, then try to restore your iPhone to factory settings via iTunes.
But since this method is a bit complicated, if you're concerned about operational errors that may cause other problems or trouble, then it's suggested to try Fixppo to fix the iPhone could not be restored error 4010 that have been mentioned before.
Step 1: Make sure your computer and iTunes have been updated to the latest version, in case other errors occur. Then connect your iPhone to the computer and open iTunes.
Step 2: For different iPhone models, there are different methods to put iPhone in recovery mode.
- For iPhone 8/X/11/12/13/14/15/16/17: Press the Volume Up > Volume Down keys. Keep holding the Power button and wait until you see the recovery mode.
- For iPhone 7/7 Plus: Press the Power button and the Volume Down key. Release them until you see the recovery mode on the screen.
- For iPhone 6s or earlier versions: Tap and hold the Home and Sleep/Wake buttons simultaneously. Release them when your iPhone has entered the recovery mode.

Step 3: If you've entered the recovery mode, you can see the follow window on your computer. Click Restore and iTunes will clear all settings and data from your iPhone.

Step 4: Wait for iPhone to reboot, then you can fix the iPhone won't restore an unknown error occurred.
5 Check Your Hardware
It is also very likely that the problem is hardware-related. There could be damaged components on both your device and computer causing the issue.
Check the device, the computer, and even the cable you are using. You might also need to try a different computer if you are sure your device isn’t damaged.

6 Connect to Apple Support Center
If you still can't fix the error code 4010 on iPhone issue after trying the methods above, you need to contact with Apple Support Center for help.
Conclusion
The iPhone could not be restored an unknown error occurred problem is not something uncommon. Though there are many reasons to this issue, several solutions listed in this article can effectively sovle your iPhone error 4010.
And if you're looking for an easiest way to solve the problem, then iTunes Error Code Fixer is your best choice. With its easy steps. you can remove the error code without data loss and in high success rate!
iMyFone Fixppo
Fix iOS System Without Losing Data
168,2820 people have downloaded it.
- Get iPhone/iPad into/out of recovery mode for FREE.
- Fix 150+ iOS/iPadOS issues no data loss.
- Repair iDevices with 99% success rate.
- 1-click upgrade/downgrade iOS/iPadOS.
- Reset iPhone/iPad without needing password/iTunes.
- Compatible with all iPhone models and iOS versions, [iPhone 15/16/17 & iOS 17/18/26].
(Click to rate this post)
Generally rated 4.7 (256 participated)
Rated successfully!
You have already rated this article, please do not repeat scoring!