Some contents on apple offer subscription based services relating to their content. Although Apple makes it pretty easy to manage these subscriptions, it could be really frustrating to pay for a service that is not in use. For this reason, it is first important to know subscriptions that renew automatically. They include:
- Apple News stand subscriptions
- Apple Music Individual
- Apple Magazine Subscriptions
- Apple News Subscriptions
- Subscriptions to apps on App Store
Apple News Stand, News and magazine subscriptions let you subscribe to your favorite new sources magazines and periodicals. This lets you enjoy your favorite stories from your favorite outlets – you no longer have to click on different apps to get these stories. In about the same way, Apple Music allows you access to the Apple Music catalogue containing songs, music videos and more.
How to View Apple Subscriptions
There are slightly different steps involved in viewing apple subscriptions on iPhones, iPad, iPod touch or iTunes
1How to View Subscriptions on iPhones, iPad or iPod Touch Running iOS 14
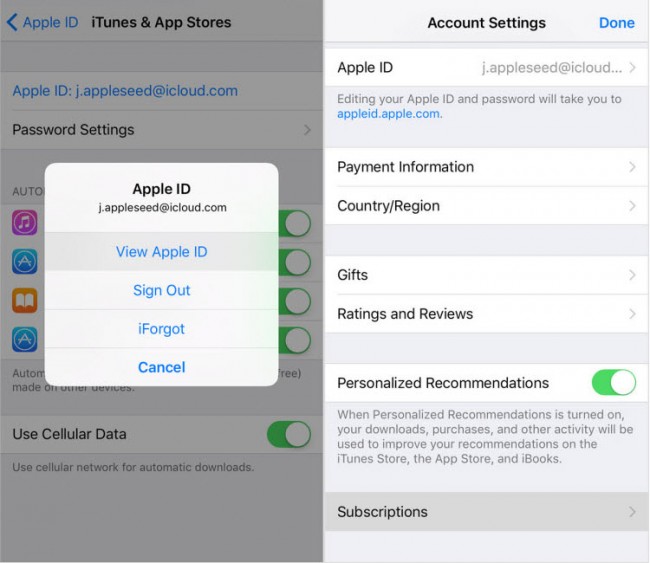
Step 1: Go to settings, click on your Apple account name ˃ iTunes & App Store.
Step 2: Click on your Apple ID at the top of your screen, click on View Apple, then sign in or use Touch ID.
Step 3: Once you have done this, click on Subscriptions, and then tap the subscription you wish to manage.
2How to View Subscriptions on iTunes
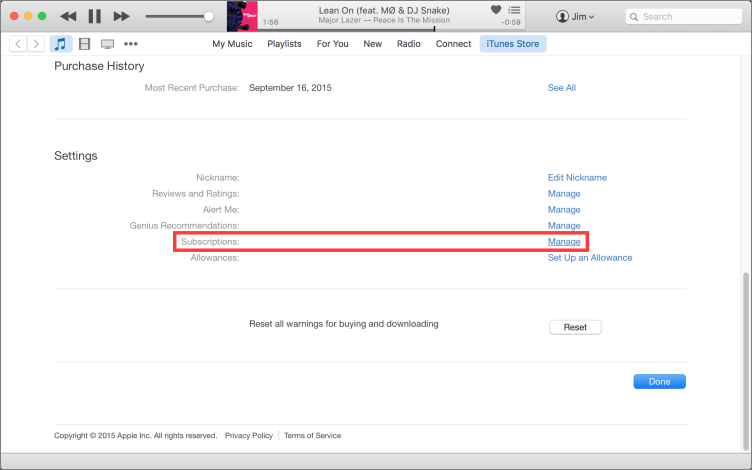
Step 1: Go to iTunes, sign in with your Apple ID if you are not signed already.
Step 2: Locate the menu bar at the top of your screen or iTunes window, go to Account, click on View My Account.
Step 3: Then enter your password or use the Touch ID option, press the Enter or Return tab.
Step 4: On your Account page, go to settings, scroll to the right of Subscriptions, and then click Manage if you have any issues with the subscription.
How to Cancel Subscriptions
Cancelling apple subscriptions could be necessary when you are charged without notice or you do not need the service anymore. In this case, you must follow the appropriate steps to ensure you continue enjoying only services you need and would wish to pay for.
1How to Cancel Subscriptions on iTunes
When you subscribe using your iTunes account to services such as Hulu Plus or Netflix, the subscription automatically renews until you turn it off. Turning off or cancelling your iTunes subscription is not so difficult a process. There are essentially two ways to do this.
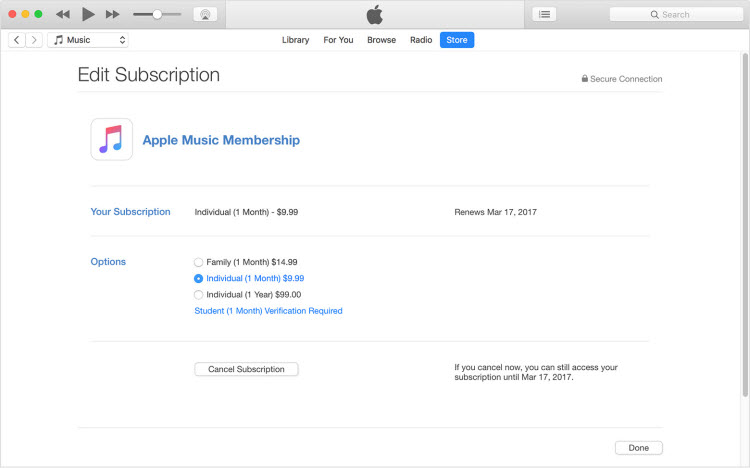
Step 1: Open iTunes Store, click on your Apple ID at the top-right corner and log in to proceed.
Step 2: Go to Settings, you will find Subscriptions at the bottom of the section. Click on the Manage link.
Step 3: As with managing and cancelling subscriptions on your iOS device, you can turn off the Auto-Renewal tab to stop the service from running.
2How to Cancel Subscriptions on iPhone
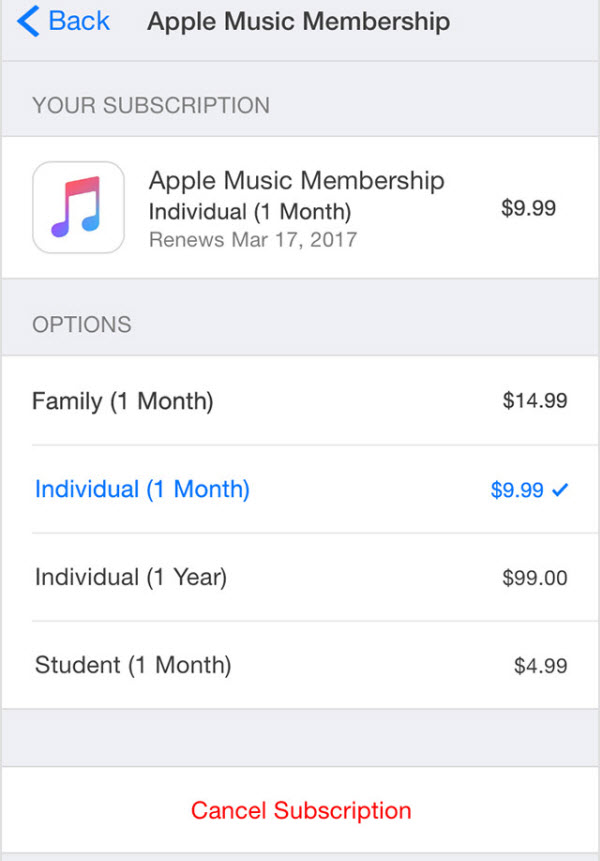
Step 1: Go to settings, click on iTunes and go to the App Store.
Step 2: Click on your Apple ID, sign if this is requested or use the Touch ID option.
Step 3: Click on Subscriptions, select the subscription you want to manage, then select the Cancel Subscription option to turn it off.
If you do not see a subscription you are being charged for, ensure you signed in with your correct Apple ID. If you signed in correctly, the subscription may be from the direct provider and not from Apple.
Enjoy Your Life with Apple Music
Apple’s acquisition of Beats ensured they were finally ready to delve into the streaming music service in addition to the basic function of allowing music enthusiasts listen to their favorite, already existing music. However, in merging iTunes with Apple Music, songs are duplicated with an iCloud and original version of the same music. This is a terrible flaw as deleting the music from either iCloud or the original would make you totally lose your song.
Apple Music’s duplication of music files is a really terrible feature that makes managing these files a difficult task. However, the iMyFone TunesMate lets you manage your music files without limits.
- iMyFone TunesMate can also let you sync iTunes between PC and iOS 14/13 seamlessly.
- It will help you manage your iPhone music, videos, apps and photos effectively
- Does your iTunes Library feel damaged already? iMyFone TunesMate will help you rebuild it.
- iMyFone TunesMate is a recommended tool to effectively help you manage your music files.
Transfer Music from iPhone/iPad/iPod with the latest iOS 14 to Computer
Step 1: Launch iMyFone TunesMate on your computer. Once this is done, connect your device – iPhone, iPod or iPad with a USB cable to the computer.
Step 2: Click on the Music icon at the top right end or you can use the "iTunes U/Audiobooks/Podcasts" option located at the left corner of your device.
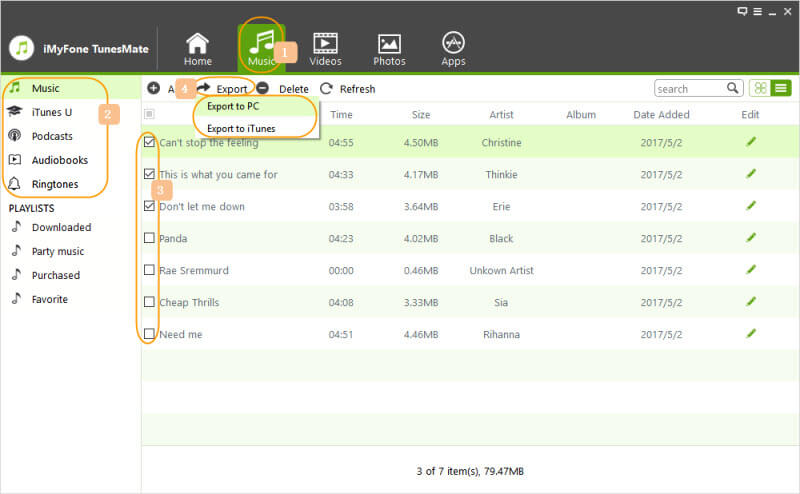
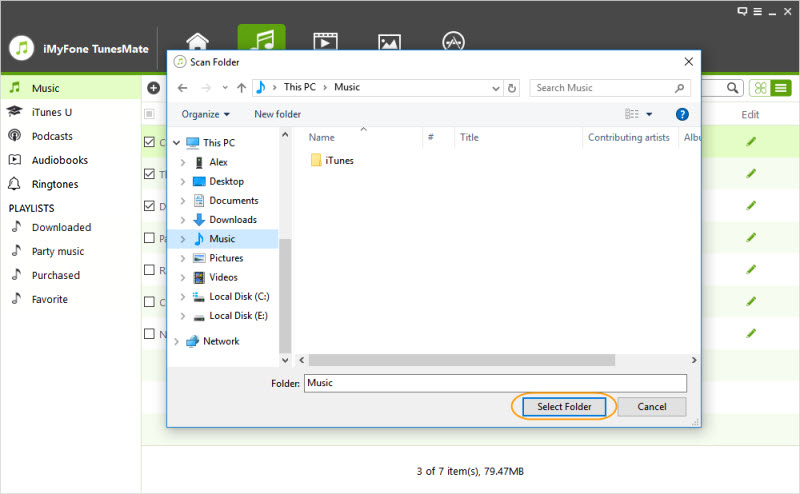
Step 3: Tick the songs you would want to transfer, click on "Export ˃ Export to PC" and select the folder you would wish to transfer the music files then click on "OK".
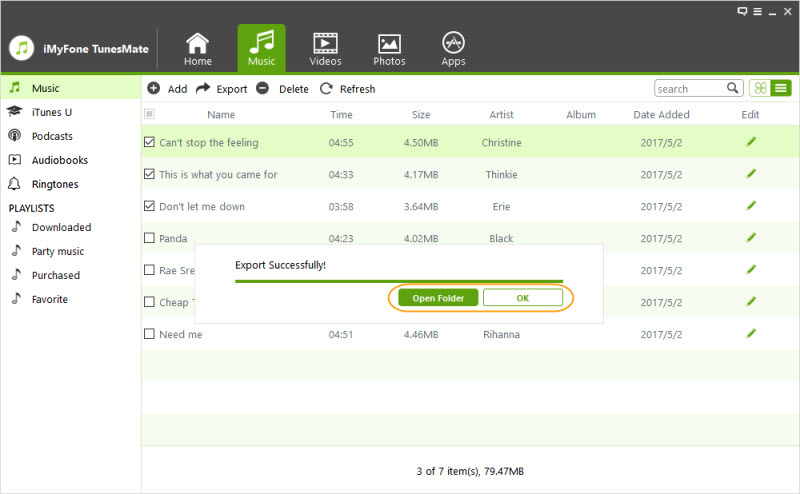
Step 4: When you are done with this process, you would see an "Export Successfully" pop-up indicating that the process is complete. You can either view your transferred files by tapping the "Open Folder" option or you click on "OK" to close the window for later viewing.
Only you can determine how much you enjoy your Apple subscriptions in general. You can make the best out of these subscriptions by paying for only what you enjoy and cancelling whatever is not in use. On the other hand, if you are experiencing music file duplication problems, iMyFone TunesMate, is your go-to partner for hassle-free, exceptional Apple Music experience.


 June 28, 2021