


iMyFone Umate Pro
Erase iOS Data Permanently to Secure Your Privacy!
Tell Us What You Think


Umate Pro Features
Erase Sensitive Information with Guaranteed 0% Recovery Rate
-
Erase Private Data
Preview and selectively erase personal data reliably like it never existed.
-
Erase All Data
A normal reset is recoverable. Umate Pro makes erased data irrecoverable even by the FBI!
-
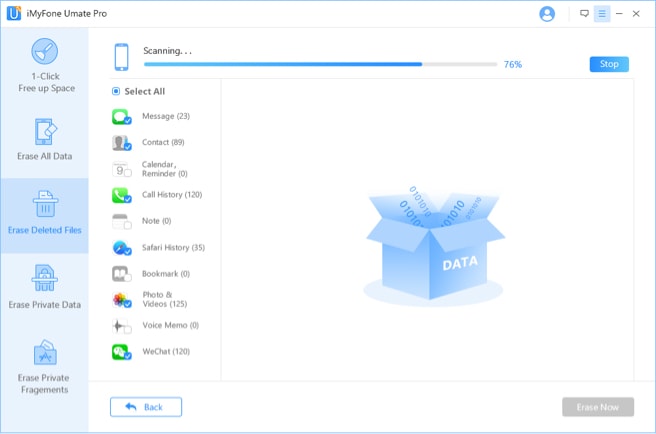
Erase Deleted Files
Previously deleted data is actually still saved on the device. We erase them all with no chance of recovery.
-
Erase Fragments
3rd-party apps constantly store incomplete fragments which cause your privacy get compromised.
-
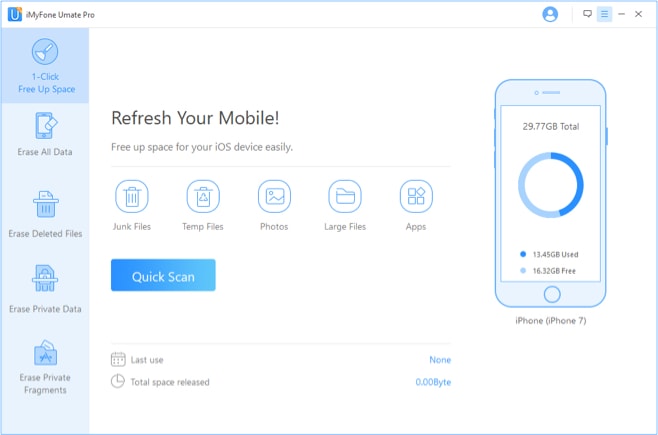
1-Click CleanUp
Instantly delete all hidden junk files, trash, caches, temp files etc.
-
More Features to Expect See More Features
Secure Use of Third-Party Apps
This ensures your personal chats are fully wiped and prevented from hackers. With iMyFone iPhone Data Eraser, you can scan and view your 3rd party App data and select private data to erase permanently.
Erase App Messages & Attachments:


Wipe App Fragments & Traces:


Note: Fragments are not cookies, cache or messages but the incomplete leftover of data that entails high privacy exposure risk.

Export/delete large files

Uninstall apps in bulk

Clean junk & temp files

Export/delete/
losslessly compress photos
iOS Devices Optmizer :
Save Space & Speed Up
The 1-click cleanup mode allows you to clean up hidden garbage and deleted files that are still lurking on your iPhone, making your iPhone run fast, just like when it was brand new.
Comprehensive iPhone Data Removal Solution
-
 No Possibility of Recovery
No any hacking tool can ever recover the data erased by this iPhone data eraser.
-
 Wipe Also 3rd-party Apps
Supports to erase 3rd-party apps data like WhatsApp, LINE, Kik, Viber without any hassle.
-
 3 Erasing Levels to Choose from
3 wiping levels (Low, Medium and High) available depending on your needs.
-
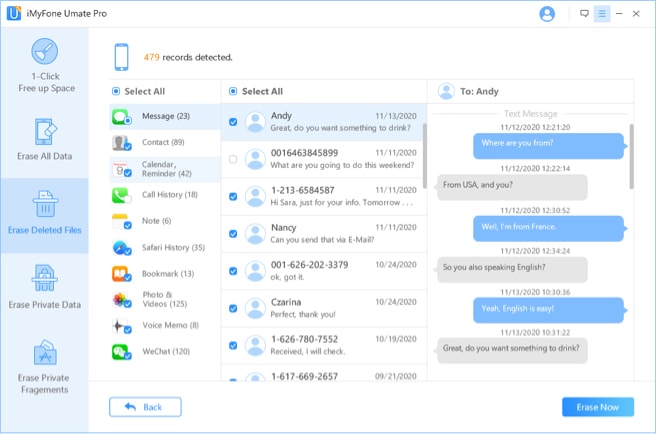
 Preview & Select before Erasing
Allows you to preview those iOS files before erasing and delete them selectively.
-
 1 Click Data Wiping Feature
Permanently erase any files that you want to delete from iOS devices in just one click.
-
 Free Up More Storage Space
Release more precious space for iPhone/iPad/iPod by clearing unneeded files.


Erase Data Convincingly from Any iOS Device
All models of iPhone 15 ~ iPhone 4 Series
All iOS System: iOS 18 (Beta), iOS 17, iOS 16, iOS 15, iOS 14, iOS 13, 12, 11, 10, 9, 8, 7, 6, 5

All models of iPad Pro, iPad Air, iPad, and iPad mini

iPod touch 7,iPod touch 6,iPod touch 5,iPod touch 4,iPod touch 3,iPod touch 2,iPod touch 1
Everything is Erasable:
-

WhatsApp Data
-

LINE Data
-

WeChat Data
-

Call History
-

(i)Messages
-

Kik Data
-

Reminders
-

Notes
-

Videos
-

App Cache
-

Apps
-

Safari History
-

Photos
-

Contacts
-

Bookmarks
-

Viber Data
-

Voice Memos
-

System Settings


Erase iPhone in 3 Simple Steps
Media Reviews

"I was really impressed with iMyFone Umate. Space-saving apps are a famously scammy category. It’s great to see one that over delivered on its promises. It managed to save me over 15 GB of space."
"Unless you like your privacy being invaded, then secure erasure is an absolute must. To stop the identity thieves stealing your data from your smartphone, you need to be able to pack a powerful punch. That punch can be delivered using iMyFone Umate Pro."
"iMyFone Umate shines in comparison to the usual, Apple-made method of managing mobile storage. It really is that easy. Within minutes, Cult of Mac's tester saved 5 gigabytes on a well-kept iPhone."
"If you need to make sure that your phone will have no trace of who it was previously owned by, or if you want to make sure some texts are never dug up again, iMyFone is an awesome pick."
"Worry about the account information, banking information, browsing history, emails, or other personal information on your mobile devices revealed to others? iMyFone Umate Pro can help you erase all private data on your iPhone."
"Unlike Factory Reset option on your device, iMyFone Umate Pro leaves no trace of the deleted files. The files deleted has no possibility to recover, in result your privacy is under protection, in case you want to sell your old iPhone."
FAQs
-
1. Why should I permanently erase data?
Because "simple deleting" just erases the pathway to the information and it remains recoverable if right tools are used. The file only gets marked as deleted but isn’t actually removed.
-
2. How iMyFone Umate Pro permanently erases data?
Umate Pro removes the original files in your device including the ones marked as deleted. Once the process of erasure is complete, Umate Pro will store random data on your device storage to overwrite deleted files. Then it again deletes the files and refills data again until recovery becomes impossible. After such intricate removal process, even the FBI cannot recover your data from the device.
-
3. What does “Erase Deleted Files” mean?
Deleted files can be recovered if these aren’t overwritten. Erase Deleted Files option in Umate Pro will fully remove previously deleted files as well as overwrite them. This makes them 100% unrecoverable.
-
4. After erasing data, why the previous erased data is still existing?
After you have erased data, please don’t log in your Apple ID account and password. Otherwise, part of the erased data might be recovered from your iCloud backup or iTunes backup.
-
5. What is 'Erase Deleted Files'?
When the system deletes any files, it only marks them as "unavailable". If these files are not overwritten, then they can be recovered. With the function of “Erase Deleted Files”, you can overwrite the files that are system deleted, which makes them unrecoverable. This erases only the deleted pictures, SMS and call logs. The exiting files on the device are not affected.
-
6. What should I do when the 'Encrypted Backup File' message comes while erasing?
For resolving this error, use the following procedure:
* Connect your device to your PC/Laptop and open iTunes.
* Select the iPod/iPhone/iPad icon and go on your device.
* Disable the option that says "Encrypt iPhone Backup" in the backup settings.
* Unlock the device backup by entering your password.
* You can now go ahead and use iMyFone Umate Pro.
Tips and Tricks
- Top 10 iOS Data Eraser Free (iOS 15 Supported)
- How to Delete WhatsApp Chat History Permanently
- How to Permanently Delete Snapchat Data
- Best iPhone Cache Cleaner (Support iOS 18)
- Clean junk files on iPhone - iOS 18 Supported
- How to Permanently Delete Recoverable iPhone Data
- Permanently Delete iPhone WhatsApp Messages
- 3 Effective Ways to Clear Mysterious "Other" Storage on iPhone
- Free iPhone Cleaner Apps (iOS 15 Supported)
- Fix: Erase All Content and Settings Not Working on iPhone/iPad
- What Does Erase All Content and Settings Do on iPhone
- Permanently Delete Call Log on iPhone
- Permanently Erase Deleted Messages on iPhone