Question: How can I move music from my Windows Media Player library to my iPhone?
Ever since people started using their computers to listen to music, they have used Windows Media Player as the main program that they use to listen to music. However, people would prefer to listen to music on the go. You may want to find out how to transfer music from media player to iPhone.
In this article, that’s exactly what we’re going to show you how to do – so, let’s jump right into it.
Transfer Music from Windows Media Player to iPhone without iTunes
As iTunes has lots of limits when transferring music, let’s start with the way to transfer music without iTunes. You can turn to iMyFone iPhone Transfer, an ultimate alternative to iTunes to help you manage your media library.
Main Features:
- Transfer music to iPhone directly from Windows Media Player, computer, external hard drive, iTunes, etc.
- Extract (purchased & non-purchased) music from iPhone to iTunes, computer, MP3 play, flash drive, etc.
- Freely manage music playlists: add, rename, delete, move music between playlists, backup, import, etc.
- Restore damaged/corrupted/crashed iTunes library in one click.
- Transfer all kinds of media files: music, movies, playlists, photos, audiobooks, podcasts, iTunes U, home video, etc.
- Receive many positive feedback from users and famous media.
How to Transfer Music from Windows Media Player to iPhone
Step 1. After iMyFone iPhone Transfer is installed on your computer, launch it and connect your iPhone.
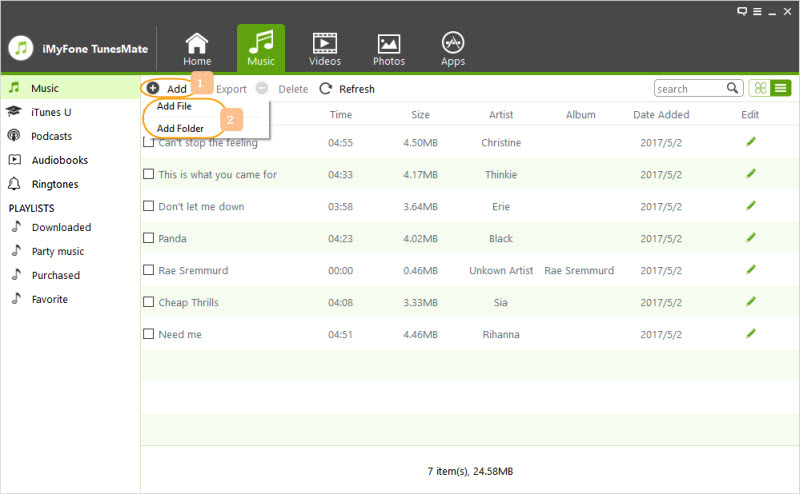
Step 2. Click on Music from the top panel on iMyFone. This will show you all of the music which is currently stored on your iPhone. Click on Add > Add File/Add Folder.

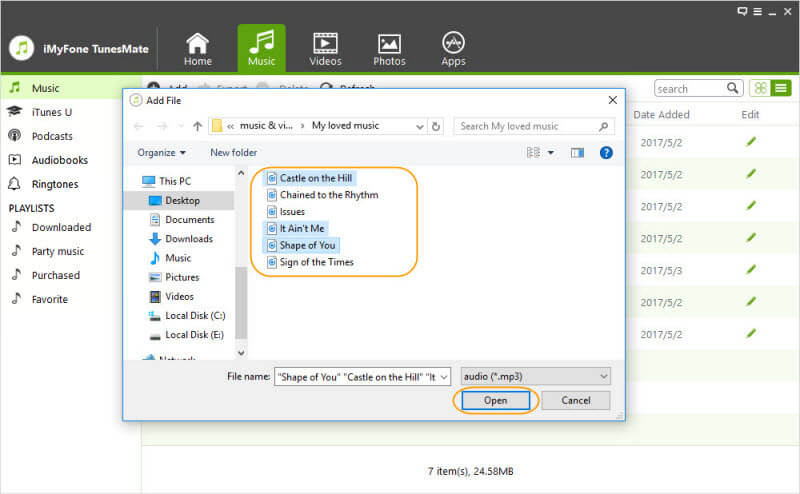
Step 3. Browse for the music folder of Windows Media Player, whic can be found by: Launch Windows Media Player > Right click on one songs > Choose Open file location.
Step 4. Select the songs that you want to transfer, and click Open.

Move Music from Windows Media Player to iPhone Using iTunes
Step 1. Before what you do, update your iTunes library to the latest version first. Connect your iPhone to computer.
Step 2. On your computer, browse for the music folder for Windows Media Player.
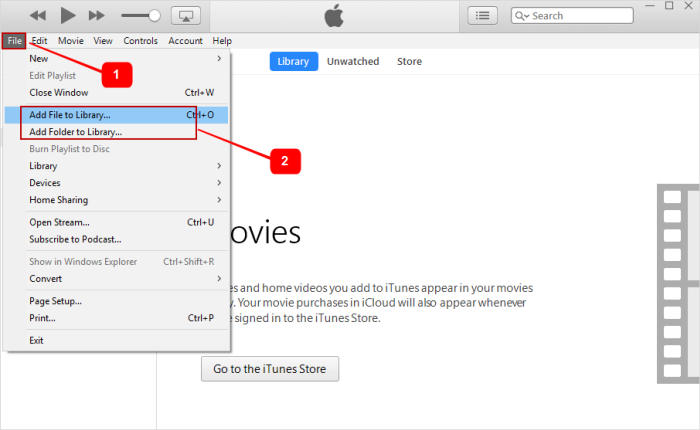
Step 3. Open iTunes, go to File > Add File/Folder to iTunes, browse for the music folder of Windows Media Player.

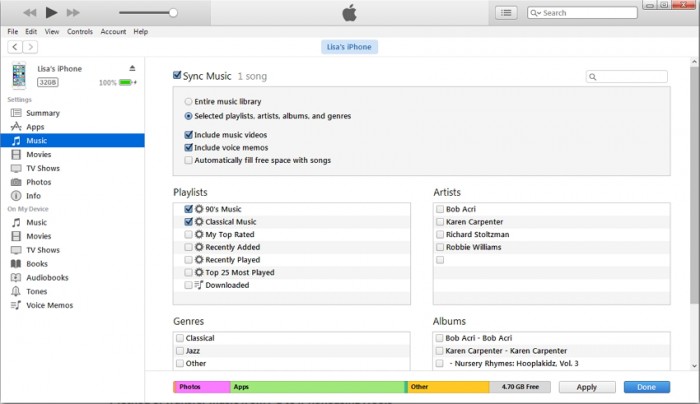
Step 4. Click on your iPhone tab at the upper-left corner on iTunes. Go to Music category from the left sidebar.
Step 5. Check Sync Music and the hit the Apply button.

Now all the iTunes music will be synced to your iPhone. But note that, the music library on iPhone will be deleted as well. If you never back up, you will lose all your songs.
Why You Should Use iPhone Transfer Instead of iTunes to Transfer Music?
|
Apps/Metrics
|
iTunes
|
|
|---|---|---|
|
Sync iTunes Library without Data loss
|

|
|
|
Sync an iPhone to Different Computers without Erasing
|

|
|
|
Directly Add Music to iPhone
|

|
|
|
Extract Files from iPhone
|

|
|
|
Support Non-Purchased Media
|
Only Purchases
|

|
|
Selectively transfer Media
|

|
|
|
Share iTunes Library
|
Lots of Limits
|

|
|
Extract photos to Computer
|

|
Sure, iTunes has a few benefits, but those benefits are heavily outweighed by the downsides. There’s no doubting that iMyFone iPhone Transfer is a much better program.
Also Read:
How to Transfer MP3 to iPhone without iTunes >>
How to Transfer Music from Dropbox to iPhone Music App without iTunes >>
To Conclude …
All in all, if you’re going to listen to music on the go, and you want to move music from Windows Media Player to iPhone, iMyFone iPhone Transfer is the program that you want to use. This program gives you access to a lot of other features on top of being able to transfer music, and as you can see, the comparison table shows that iMyFone is a much better choice.


 June 28, 2021