The technology of the camera industry has come a long way, both smartphone cameras and professional digital cameras. We can now capture amazing family moments, our pets and landscape in great qualities. However, great photo qualities come at the expense of the storage of your smartphone or whatever medium you save the files on. It can become so hard to select the photos to delete from your device when you are running out of space; thankfully, there's another viable option—compression! In this article, we shall be considering the best ways to compress your photos on your Mac.

- What is Compression, and Why Do You Need to Reduce Photo File Size?
- Types of Compression: Lossy Compression and Lossless Compression
- 3 Efficient Ways to Compress Photos on Mac
- How to compress one photo using the Preview app
- How to compress an album using the iPhoto/Photos app
- Compress photos in a folder into a ZIP file
- Using Other Third-Party Image Compressors to Reduce Photo File Size
- FAQs: Other Tips for Free Up Space on Mac
What is Compression, and Why Do You Need to Reduce Photo File Size?
When you minimize the size of a photo file, in bytes, without necessarily reducing the quality to a level that is unacceptable, you have successfully compressed a photo. In other words, it is getting rid of some of the photo's data, making the file size significantly smaller, but still retaining most of its quality. You now get the picture, right? So, let us see some reasons you need the reduce the file size of your photos.
- The first and most obvious reason we compress photo is to free up more space on your storage device (smartphone, cloud, flash drive, system, cards).
- To reduce the time needed to share them online, and from one storage device to another. It is way faster to share a picture of 2MB on Facebook than a 20MB picture.
Types of Compression: Lossy Compression and Lossless Compression
Lossy Compression
Lossy compression is a technique of data compression in which the file size is reduced by removing data from the file, i.e., image quality is sacrificed in order to reduce file size. The compression algorithm removes any data it deems unnecessary from the image, resulting in a smaller file size. Although the file no longer contains the same amount of data as it had before compression, this is usually not visible, even if the image's resolution has decreased. However, lossy compression becomes noticeable when a file you modify and resave a file multiple times.
Lossless Compression
Just as the name implies, it is a technique of data compression that the image quality still remains after compression. Lossless compression implies that you may lower the size of a picture without sacrificing its quality. This is usually accomplished by eliminating superfluous metadata from PNG and JPEG files. Everyone would have opted for losslessly compressing their images, but there's a catch—it can't compress your photos and reduce their file sizes as much as lossy compression.
3 Efficient Ways to Compress Photos on Mac
Everyone recognizes how important it is to compress photos, therefore, you can only expect that you cannot run out of options in this regard. Apple has particularly made it easy to compress photos on the Mac by providing various options and alternatives such as the Preview app, iPhoto/Photos, etc. So, let us see how to do so in details in the following section:
01 How to compress one photo using the Preview app
Step 1.Preview is an application that comes standard with every Mac. You can decrease the file size of nearly any photo with Preview. However, you can only do one photo at a time.
Step 2.First thing to do is navigating to where the picture you want to compress is on your system.
Step 3.Right-click on the picture and open it with the 'Preview' app. This action will launch the Preview app.
Step 4.On the Preview app, click 'File' on the task bar.
Then select 'Export' from the File drop-down list.
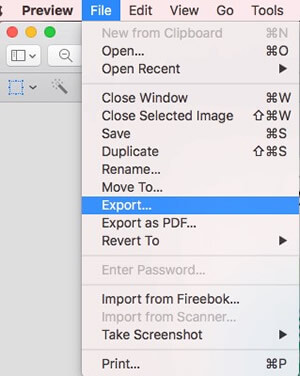
Step 5.From the 'Format' drop-down list, choose JPEG.
Step 6.Drag the 'Quality' slider left to reduce the quality, or right to increase the quality.
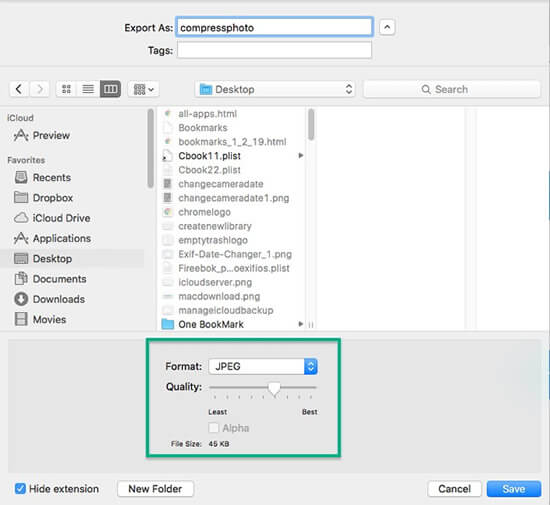
Step 7.You can uncheck 'Alpha' if you want further reduction in quality.
Step 8.Hit 'Save' when you are done. If you are not satisfied with your result, you can retry the process until you achieve your desired result.
02 How to compress an album using the iPhoto/Photos app
iPhoto is another fantastic Mac tool for picture compression. It's worth noting that it's now named Photos on newer Macs. This app can compress plenty of photos at a time.
Step 1.Arrange your photographs into an album in iPhoto.
Step 2.Launch the iPhoto app and click 'File' from the task bar.
Step 3.Select 'New Empty Album' from the drop-down list.
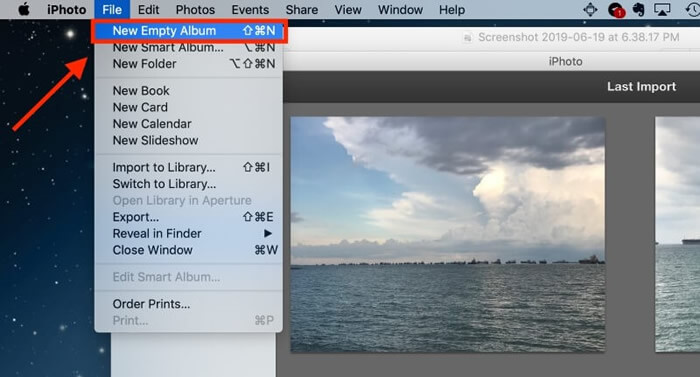
Step 4.Select the photos that you wish to add to the new album, right-click in the box and hit 'Copy' from the options.
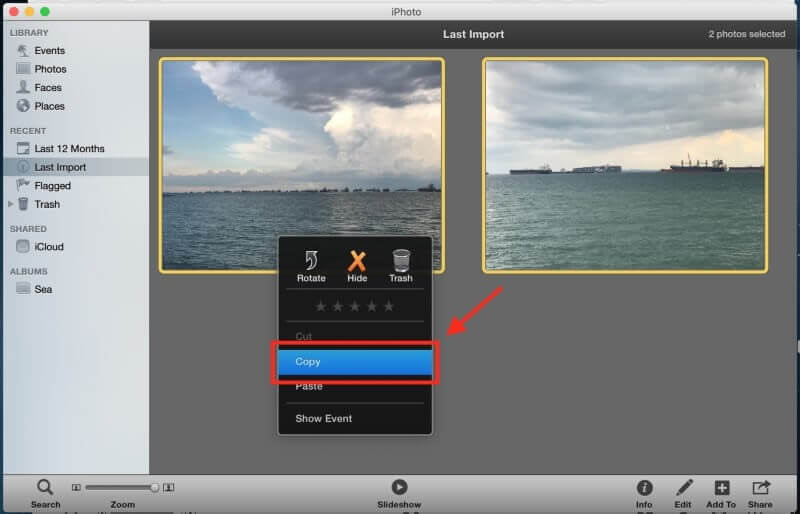
Step 5.Now, navigate to the new album which you created earlier, right-click again in the box and hit 'Paste' to paste the copied photos into the new album.
Step 6.Click 'File' on the task bar.
Step 7.Click on 'Export' from the drop-down list and you will be redirected to the export page.
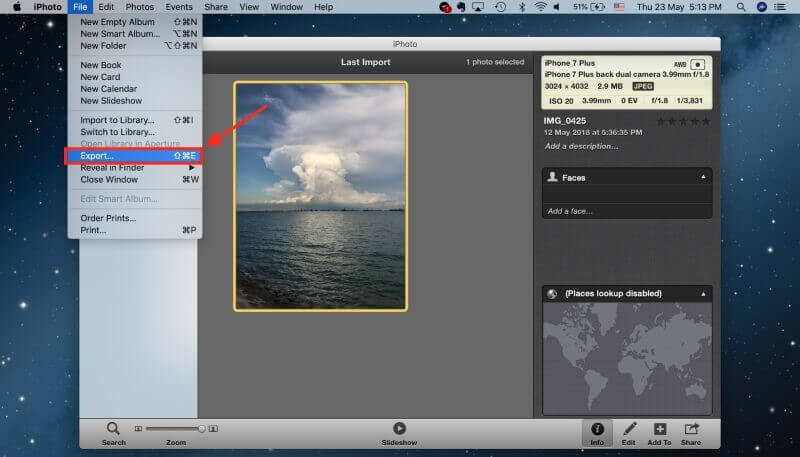
Step 8.Then click on 'File Export'.
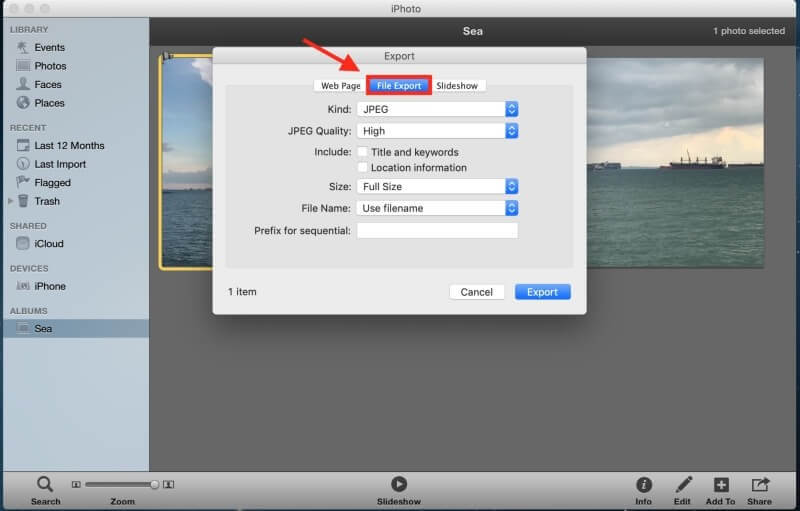
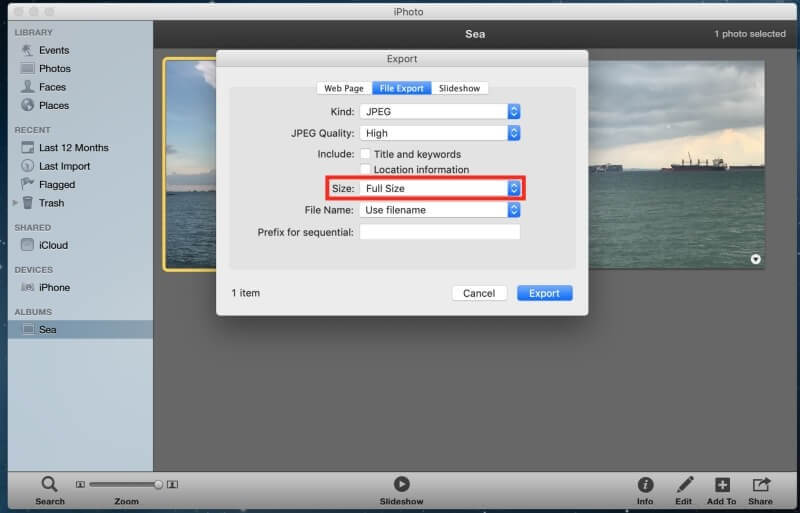
Step 9.To reduce or increase the file size, all you need to change is the size of the photo, as displayed in the screenshot below
Step 10.Go ahead and choose the location where you wish to save the file, as well as its name.
Step 11.If you are compressing more than one photo, then, choose 'Event Name' under 'Subfolder Format' before clicking 'Export'.

03 Compress photos in a folder into a ZIP file
There is still another way to reduce photo file size, the ZIP way is usually do when need to have an image transmission, here are the steps:
- Select and arrange the photos into one folde.
- Right click on the folder.
- Select 'Compress (folder name)'.
- A duplicate file will be created with .zip as its extension.
- You will have to unzip the folder any time you want to use the photos.
Using Other Third-Party Image Compressors to Reduce Photo File Size
If the aforementioned approaches are too time-consuming, you can always utilize third-party programs like ImageOptim, Photopress, etc., to compress your photos.
01 ImageOptim
ImageOptim is a web-based image compressor that may be downloaded as an app. The software helps you to compress files and eliminate unseen trash without sacrificing quality.
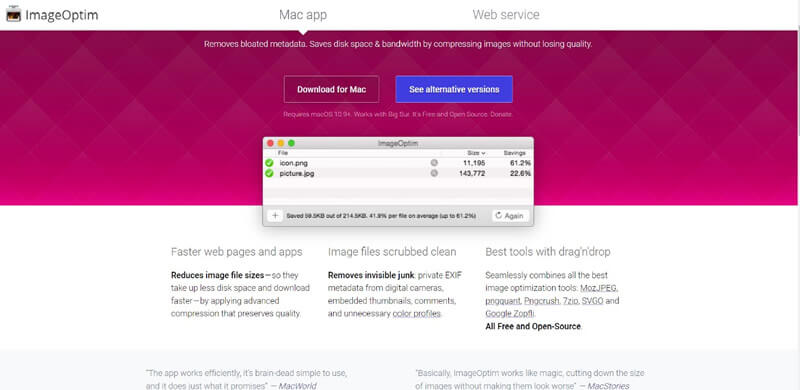
- Launch the program.
- Drag and drop the photos into the app.
- Wait for it to do its work.
- You can also use the web version in the same way.
02 PhotoPress
PhotoPress is a free macOS picture compression program that offers lossless compression and a resize option to minimize photo size. The current version supports the .jpg and .png file formats. It also allows you to keep and delete picture metadata in compressed photographs, as well as batch resize or compress photos.
- Download and install PhotoPress application on your Mac.
- Drag and drop photos into PhotoPress.
- Wait for it to automatically compress the photos.
- The compressed photo will be listed there.
03 CM Shrink My Photo
With this app, you can also compress your picture and reduce the load on your disk. It is also very easy to use.
- Download and install CM Shrink My Photo on your Mac.
- Import or drag and drop the photos into the app.
- Play with the sliders until you have achieved your desired result.
Conclusion
If, like many of us, you can't bear the thought of deleting any of your precious and memorable photos, compressing them is a wonderful way to free up storage space. Hopefully, this post has helped to clear up any confusion about how to compress the file size of a photo on a Mac.
FAQs: Other Tips for Free Up Space on Mac
1 How do I reduce file size on Mac?
Choose 'File' > 'Reduce File Size'. Then scale down the resolution. Or you can compress it to a .zip file to reduce the size.
2 How to erase photo junk on Mac?
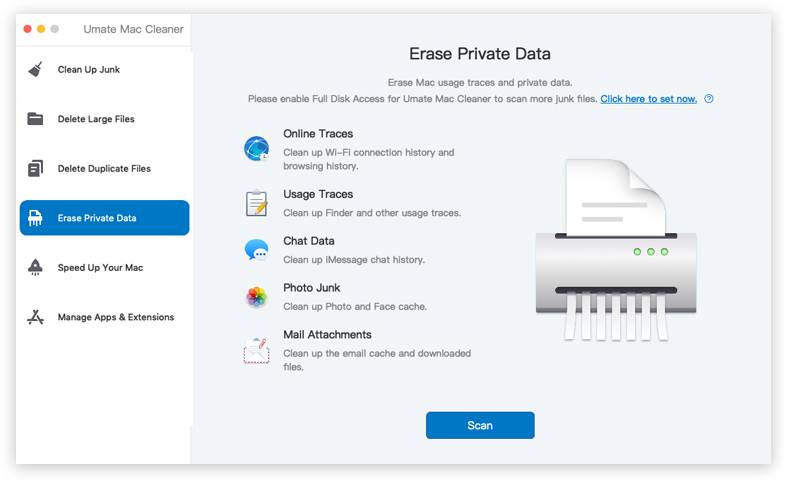
Umate Mac Cleaner gives you a chance to erase photo junk on Mac. Launch Umate and choose 'Erase Private Data' tab, click 'Scan' for locating the private stuff. After scanning, you will see how many erasable privacy files in the next window, including online traces, usage traces, chat data and photo junk, etc. Select 'Photo Junk' and click 'Erase' to wipe them out of your Mac.
3 How to manage apps and extensions on Mac?
Again, iMyFone Umate Mac Cleaner helps you to uninstall unused applications and remove extensions with simple clicks to release more space on your Mac. Supports to scan all Apps and extensions on Mac, then you can choose the specific one to remove.


 September 8, 2021
